
Sage green nail ideas keep showing up on saved boards because this color solves a problem most polish shades cannot. It is soft enough to feel calming, yet it still reads as a real color rather than a plain nude. On the other hand, it looks clean and a little earthy, like dried herbs, linen, and morning light on a leaf.
I notice that people who are tired of pink and beige usually land here next. They want something fresh that still goes with every outfit, and sage does exactly that. It sits quietly next to denim, cream knits, black dresses, and bright summer clothes, so your manicure never fights with what you are wearing.
What makes a sage manicure interesting is how much it changes with small choices. A creamy finish looks gentle and sweet, while a matte coat feels modern and a little moody. Add gold foil or a chrome glaze, and the same green suddenly looks expensive. French tips, tiny flowers, marble swirls, and checkerboards all take on a different personality when the base is sage.
Shape and length matter just as much as the color. On short square nails, sage looks neat and practical. On long almond or coffin nails, it shows more depth and gives you room for artwork. A short oval keeps things soft, and a sharp, long shape makes the same polish feel bolder.
Below you will find 22 sage green nail designs, including quiet solid colors and detailed nail art, with notes on finishes, shapes, and how to recreate each look at home or explain it clearly to your nail tech. Save the ones that catch your eye, because your next manicure might be hiding in here.
Why Sage Green Nails Look Good on Almost Every Hand
Sage is a muted green with gray in it. That gray is why it feels soft and expensive rather than loud. Once you understand the small differences between sage shades, picking the right one gets much easier.
Undertones decide how the color sits on your skin. A sage with a yellow lean looks warm and earthy, and it usually flatters golden and deeper skin tones. A sage with a gray or blue lean looks cooler and cleaner, which suits fair and pink undertones. A milky pale sage is the safest choice if you are unsure.
Here is what to think about before you book or start painting:
- Color depth: Pale sage looks airy and sheer. Mid-tone sage looks classic. Deep sage looks rich and almost olive.
- Finish: Glossy cream looks fresh. Matte looks modern. Chrome and velvet finishes add shine that moves as your hand moves.
- Nail shape: Short squoval and round shapes look gentle. Almond looks elegant. Square looks crisp. Coffin looks bold.
- Length: Short nails suit simple colors and tiny details. Medium and long nails give you space for marble, florals, and large patterns.
- Artwork: Fine line work looks delicate, and big swirls or checkerboards look graphic.
- Accents: Gold foil, pearls, and silver flakes dress up the green without hiding it.
- Minimal or detailed: One clean color is easy to wear. Mixed textures and patterns make the manicure the main event.
Sage also plays well with other colors. Cream, white, beige, soft gold, dusty rose, and silver all look natural beside it, so you can mix and match without worrying about clashing.
Quick Reference: All 22 Sage Green Nail Designs at a Glance
Use this table to compare the looks before you read the full descriptions.
| Nail Design | Base Color | Finish | Nail Shape | Overall Look |
| Creamy Solid Sage | Soft dusty sage | Glossy cream | Short squoval | Clean and everyday |
| Sage Green French Tips | Sheer milky nude | Glossy | Short almond | Soft and classic |
| Matte Sage Almond | Mid-tone sage | Matte | Medium almond | Modern and calm |
| Sage and Gold Foil | Soft sage | Glossy with foil | Medium square | Rich and polished |
| Sage Chrome Glaze | Sheer sage | Pearl chrome | Medium almond | Glassy and shiny |
| Sage with White Daisies | Pale sage | Glossy | Short round | Fresh and floral |
| Milky Sage Jelly | Sheer milky sage | Glossy jelly | Short oval | Dewy and soft |
| Sage Marble Swirl | Sage and white | Glossy | Medium almond | Artistic and flowing |
| Sage and Cream Checkerboard | Sage and cream | Glossy | Short square | Retro and playful |
| Sage Ombre Fade | Sage to nude | Glossy | Medium oval | Gentle gradient |
| Sage Leaf Line Art | Sheer nude | Glossy | Short almond | Botanical and delicate |
| Sage Velvet Cat Eye | Deep sage | Magnetic velvet | Medium almond | Deep and dimensional |
| Sage and Beige Two-Tone | Sage and beige | Satin | Short square | Neutral and tidy |
| Reverse French Sage Moon | Nude with sage moons | Glossy | Short oval | Subtle and modern |
| Sage with Pearl Accents | Soft sage | Glossy with pearls | Medium oval | Gentle luxury |
| Sage Abstract Swirl | Sage and cream | Glossy | Medium almond | Modern art |
| Sage Aura Gradient | Sage glow on cream | Glossy | Medium almond | Dreamy and blurred |
| Sage and Dusty Rose | Sage and rose | Glossy | Short squoval | Romantic and soft |
| Sage Shimmer Tips | Sheer nude, shimmer tips | Shimmer | Medium square | Sparkly but gentle |
| Sage with Mini Hearts | Pale sage | Glossy | Short round | Sweet and cute |
| Glossy Wavy Lines on Matte Sage | Matte sage | Matte and gloss | Short oval | Tone-on-tone texture |
| Long Tonal Sage Coffin | Mid-tone sage | Glossy | Long coffin | Bold and sleek |
Sage Green Design Directions to Match Your Mood
Not every day calls for the same manicure, so here is how the 22 designs group together. Use this as a shortcut when you already know the feeling you want.
Quiet and minimal. If you like a hand that looks tidy without trying, look at the creamy solid sage (1), milky jelly (7), two-tone sage and beige (13), reverse French moons (14), and glossy wavy lines on matte (21). These work well on short nails and grow out gracefully.
Classic and polished. Sage French tips (2), matte almond (3), pearl accents (15), and the long tonal coffin (22) give you a finished, put-together look that feels at home at work, dinners, and family events.
Shiny and luxe. Gold foil (4), chrome glaze (5), velvet cat eye (12), and shimmer tips (19) add light and movement. They catch the eye in photos and look great for weddings and nights out.
Soft, floral, and sweet. White daisies (6), leaf line art (11), dusty rose pairing (18), and mini hearts (20) bring a gentle, handmade feeling, and they are fun if you like small details.
Artistic and modern. Marble swirl (8), checkerboard (9), ombre fade (10), abstract swirl (16), and aura gradient (17) are for days when you want your nails to be the statement.
The Complete Sage Green Nail Design Collection
1. Creamy Solid Sage Short Nails
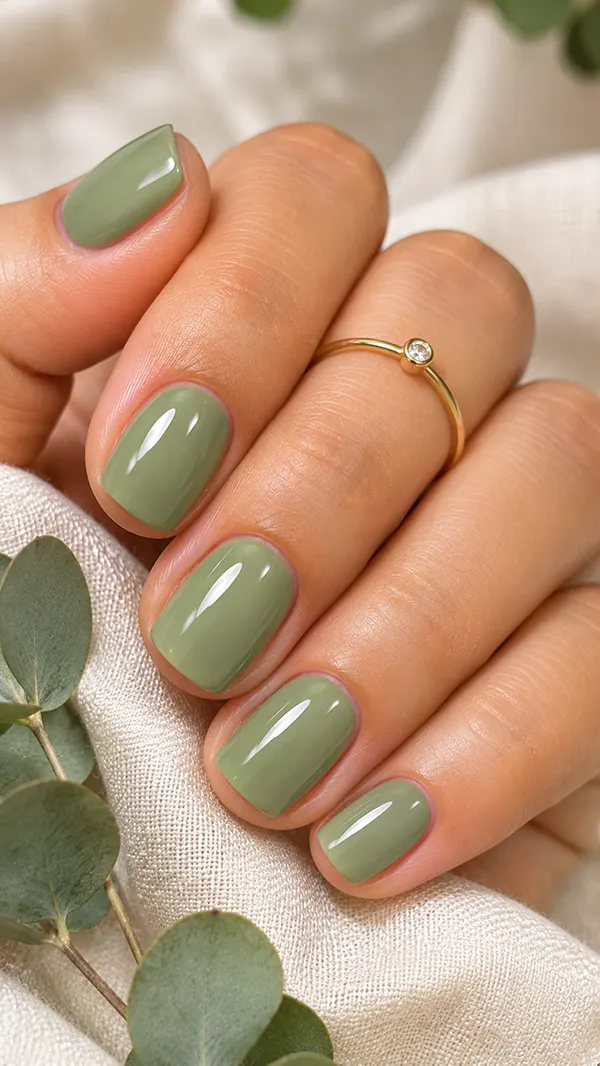
Start here if you want the easiest way into the trend. A creamy solid sage manicure uses one soft, muted green with a slightly dusty gray undertone, applied in two even coats so the color looks smooth and opaque. The glossy cream finish catches the light gently, making the nails look healthy and well cared for. On short squoval nails, the shade looks tidy and quiet, almost like a nude with a little more personality. This is one of those sage green nail ideas you can wear to the office, class, or a weekend brunch without any extra thought.
The beauty of a single color is that nothing distracts from the shape and the polish itself. Because there is no pattern, the quality of the application shows, so a clean cuticle line and a thin, steady brush stroke matter a lot. Pick a sage with a touch of gray if your skin has pink undertones, and a slightly warmer, olive-leaning sage if your skin is golden or deep. Test the shade on one nail first, since sage can look very different in the bottle than it does on your hand.
To recreate it at home, apply a thin base coat, then paint the first layer of sage lightly and let it set for a minute. The second coat evens out any streaks. Seal the free edge with the brush to stop chipping, and finish with a glossy top coat. If you want it to last, a gel version holds the cream finish for about three weeks. It also grows out gracefully because the soft color hides regrowth far better than darker shades.
Manicure Tip
Keep every coat thin. Thick sage layers tend to look streaky and take longer to dry, and a dusty color shows every bubble. Two thin coats will always give you a smoother surface than one heavy coat.
Before the top coat, clean the skin around each nail with a small brush dipped in acetone. It sharpens the edges and makes a plain color look like it was done in a salon.
2. Sage Green French Tips
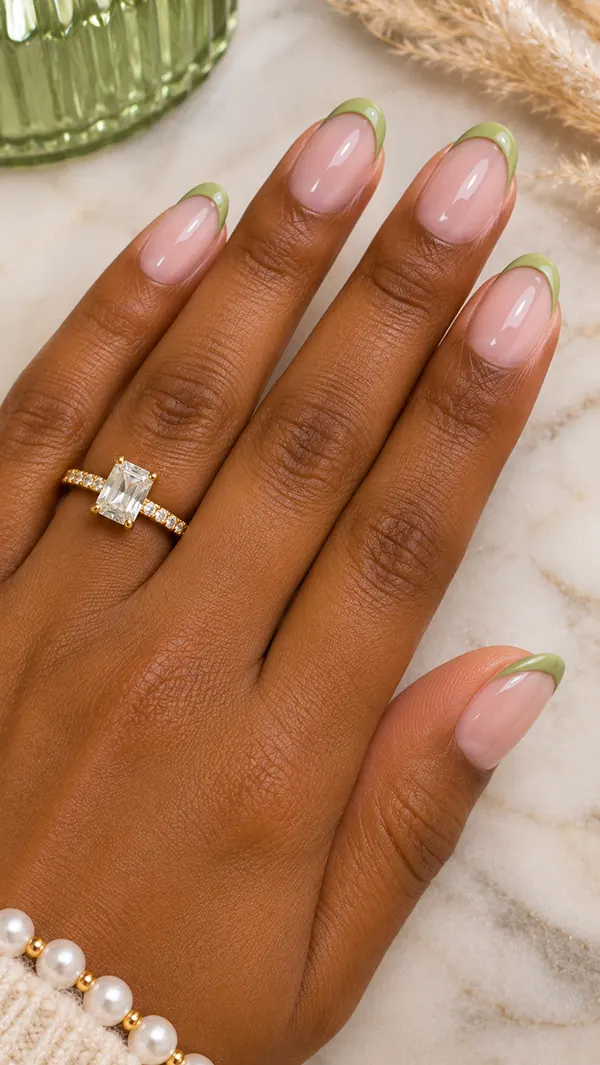
A sage green French tip takes the most familiar manicure and gives it a calmer color. The base is a sheer milky nude with a hint of pink, and the tips are painted in a soft sage with a thin, gently curved smile line. The contrast is lower than that of a white French, so the whole hand looks softer and more modern. On short almond nails, the line sits close to the edge, which keeps things delicate and easy to wear daily.
Tip thickness changes the mood of the design more than people expect. A very thin line looks minimal and refined, while a thicker band feels bolder and more graphic. If your nails are short, keep the sage tip narrow so it does not shrink the nail bed. On longer nails, you can go wider and even try a slightly deeper shade. The color of the base also matters, since a pinker base feels sweet, while a beige base feels more grown-up.
Painting a clean line is the hardest part when you do this yourself. Use a thin striping brush or a small tip guide, and rest your hand on a table to keep it steady. Paint the tip in one smooth sweep from side to side, then go back and clean the edge with a tiny brush dipped in remover. Finish the whole nail with a glossy top coat so the base and the tip blend into one smooth surface.
Best Nail Shape
Short almond and short oval shapes suit this design best because their rounded edges naturally follow the curve of the smile line. Square nails can work too, but the tip needs a straighter, flatter cut to look balanced.
If you prefer a squarer look, ask for a slightly softened corner. It keeps the French line neat without making the nail look sharp or stiff.
3. Matte Sage Green Almond Nails
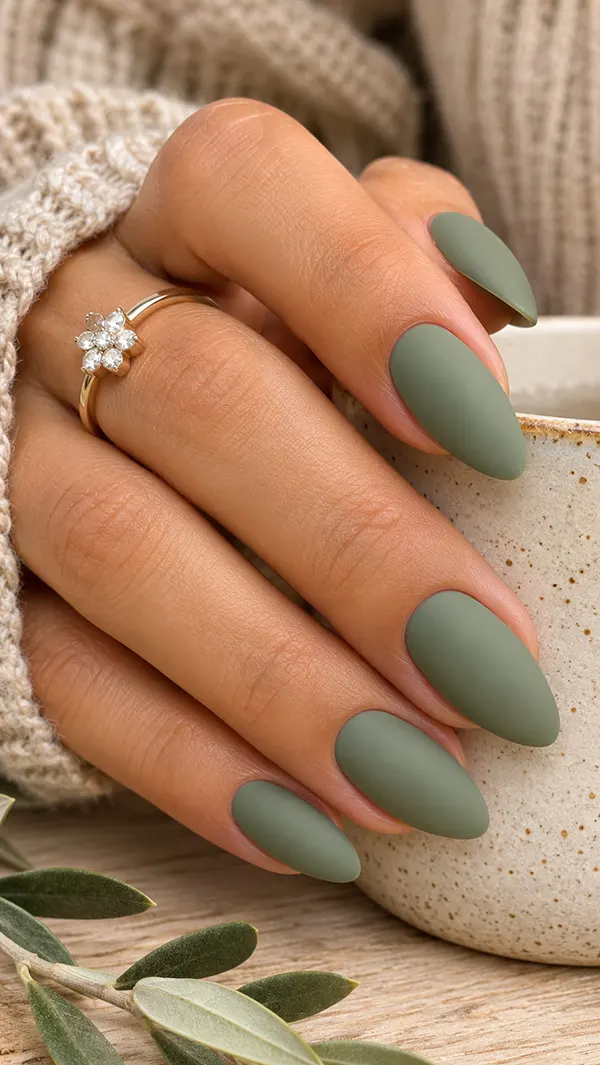
Matte sage green nails look like soft velvet paper, with no shine to bounce the light around. The color becomes quieter and slightly deeper, and the gray in the sage comes forward. On medium almond nails, the effect is graceful because the tapered shape gives the flat finish a lot of length to show off. It is a calm, modern manicure that photographs beautifully in natural light.
The matte finish is also very easy to wear with clothes. It looks natural next to wool, linen, and denim, and it keeps the nails from looking too shiny for a formal setting. If you like an earthy, autumnal feel, choose a mid-tone sage with a touch of olive. For a cleaner and softer look, pick a pale gray sage. Either way, the nail shape does a lot of work here, so ask your tech to keep the almond smooth and symmetrical.
Matte top coats are available for both gel and regular polish. Apply it just like a normal top coat, making sure the whole nail is covered, including the edge. Keep in mind that matte nails show oils and dirt more easily, so wash your hands with a gentle soap and avoid rubbing heavy hand cream onto the nail surface. If the finish starts to look shiny after a week, a quick buff with a clean cloth usually restores its flatness.
Finish Tip
Never wipe a matte top coat with alcohol or a rough cloth, since this can leave shiny patches. Use a soft, lint-free wipe and let the nails dry fully before you touch anything.
If you ever want to change the mood, add a thin layer of glossy top coat over just one accent nail. The contrast looks intentional and adds a playful detail to the manicure.
4. Sage Green and Gold Foil Nails
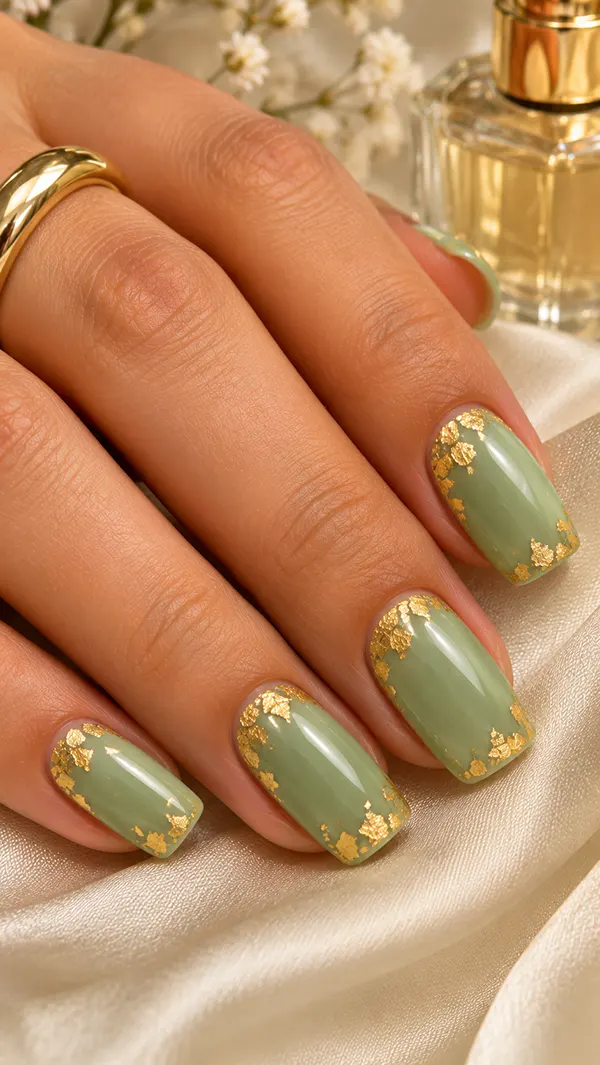
Gold foil on a sage base is one of the easiest ways to make a green manicure look rich. The nails are painted in a soft, creamy sage, and thin flakes of gold leaf are pressed onto the surface in uneven patches, usually near the cuticle or the tip. The foil looks like tiny pieces of sunlight caught in the polish. On medium square nails, the shape gives the gold a clean frame and keeps the design feeling polished.
What I like about this look is how controlled it feels, even though the foil is irregular. You can place just a few flakes on one or two accent nails for a quiet touch, or cover most of the nail for a bolder effect. Warm golden skin tones look especially lovely with it, and deeper skin tones make the gold glow. If gold feels too warm for you, silver foil creates a cooler version that looks icy against the green.
To do it at home, paint the sage base and cure or dry it completely. Brush on a thin layer of sticky top coat or foil glue, wait until it turns tacky, and press small pieces of foil on with tweezers or a silicone tool. Seal everything with a glossy top coat so the edges stay smooth. Skipping the sealing step leaves rough bumps that catch on hair and sweaters.
Salon Advice
Ask your nail tech to use real foil flakes instead of glitter if you want that thin, hammered metal look. Flakes sit flat and shine like a leaf, while glitter looks chunkier.
Show a photo of the amount of foil you like. Some people imagine a light scatter and end up with a full gold nail, so a picture saves you from surprises.
5. Sage Green Chrome Glaze Nails
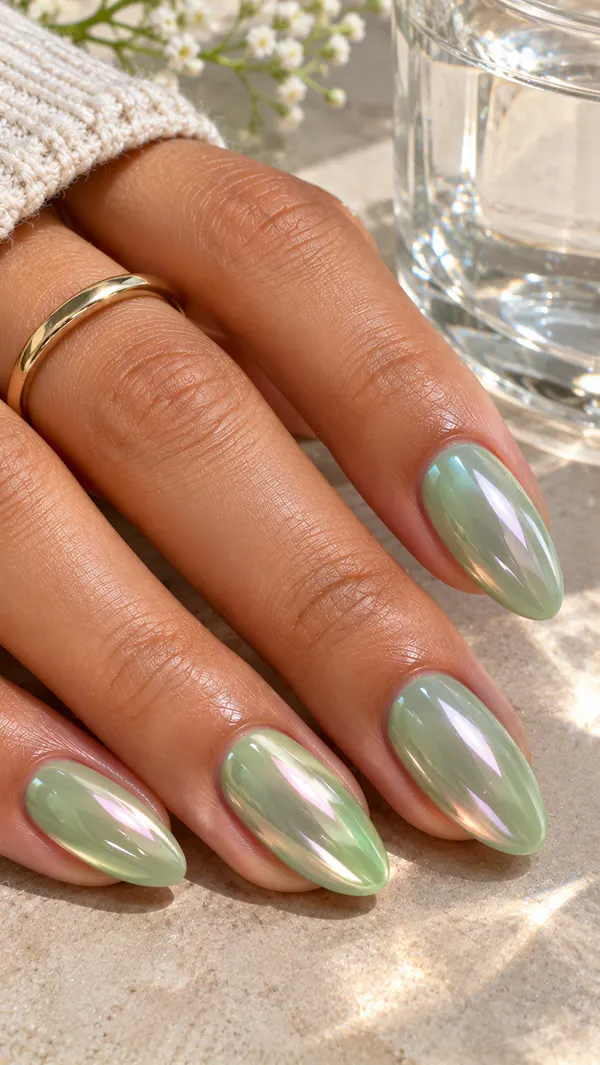
A chrome glaze turns a plain sage polish into something that looks like the inside of a seashell. The base is a sheer sage green, and a fine pearl or champagne chrome powder is rubbed over it, leaving a soft mirror shine. The color shifts slightly as light changes, going from green to a silvery cream. On medium almond nails, the curved surface catches the light beautifully, making the whole nail look glassy and smooth.
This is a very good option if you like glossy nails but find regular sage a little plain. The chrome is subtle enough for daily wear, and it looks especially good in photos with natural light. Choose a sheer base if you want the pearl effect to show up clearly, and a more opaque base if you prefer more green. A white or pale pearl powder gives a milky glaze, while a silver powder gives a cooler, more metallic result.
Chrome powder needs a gel top coat that has been cured but not wiped, so it is usually a salon service. If you want to try it at home, use a no-wipe gel top coat, rub the powder on with a soft applicator, and seal with another layer of no-wipe top coat. Work in small areas and keep your touch light, since pressing too hard can leave uneven patches.
Design Detail
The finest chrome glaze looks almost wet, and that depends on how smooth the base is. Any bumps or ridges in the polish will show under the mirror finish, so buffing the natural nail first makes a visible difference.
Ask for a thin base of sage rather than a thick, opaque coat. A thinner base lets the chrome play with the light, and the manicure feels more airy.
6. Sage Green Nails with White Daisies
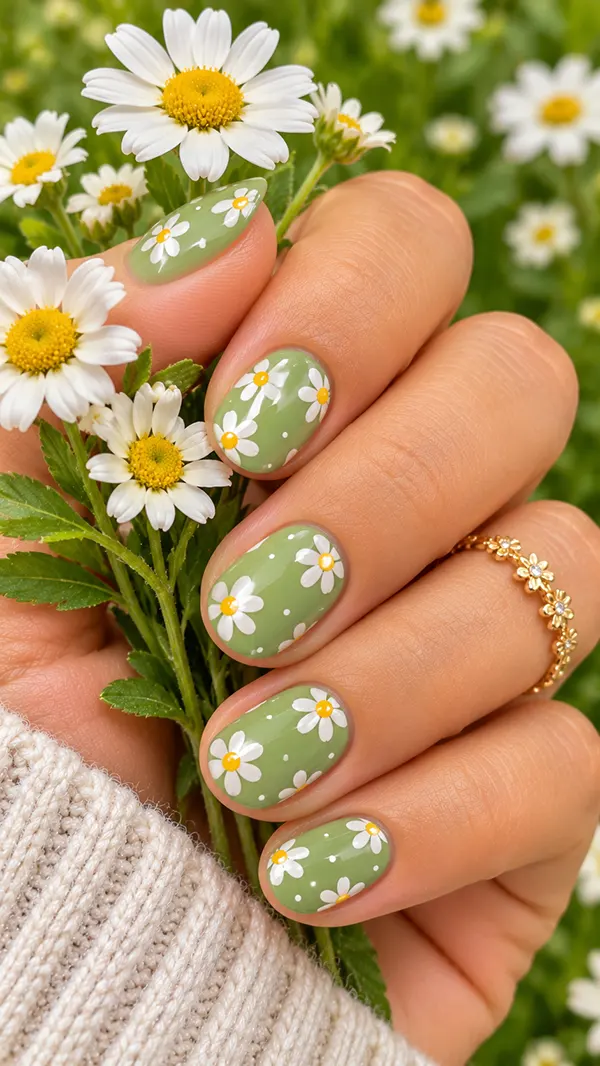
Little white daisies look sweet on sage green nails because the green acts like a soft garden background. Each flower has five or six rounded white petals and a tiny yellow center, painted on a pale sage base with a glossy finish. On short round nails, the flowers sit comfortably without crowding, and the whole manicure looks fresh and a bit playful. It feels like spring even when you wear it in the middle of winter.
You do not have to put a daisy on every nail. A single flower on the ring finger, with a few scattered ones on the other nails, keeps the design relaxed. Scale matters too, since tiny blooms look delicate while bigger flowers look bold and retro. If your nails are very short, stick to smaller daisies and leave space between them. The pale sage base also lets the white petals stand out clearly, which a darker green would not do.
Painting daisies is easier than it looks with a dotting tool. Press a small white dot, then gently pull it outward to form each petal, repeating around a central point. Let the petals dry for a minute, then add a yellow dot in the middle. Seal the design with a glossy top coat, taking care not to drag the brush across the flowers, so the petals stay crisp.
Copy This Look
If you are painting these yourself, practice the flower once on a piece of paper or an old nail tip. Five petals in a circle are simple, but spacing them evenly takes a few tries.
For a calmer version, use only a yellow dot on its own, with no petals. These tiny dots read like buttercups and take only a couple of minutes to read.
Useful for You: 25 Cute Nail Ideas That Make Every Manicure Look Adorable
7. Milky Sage Green Jelly Nails
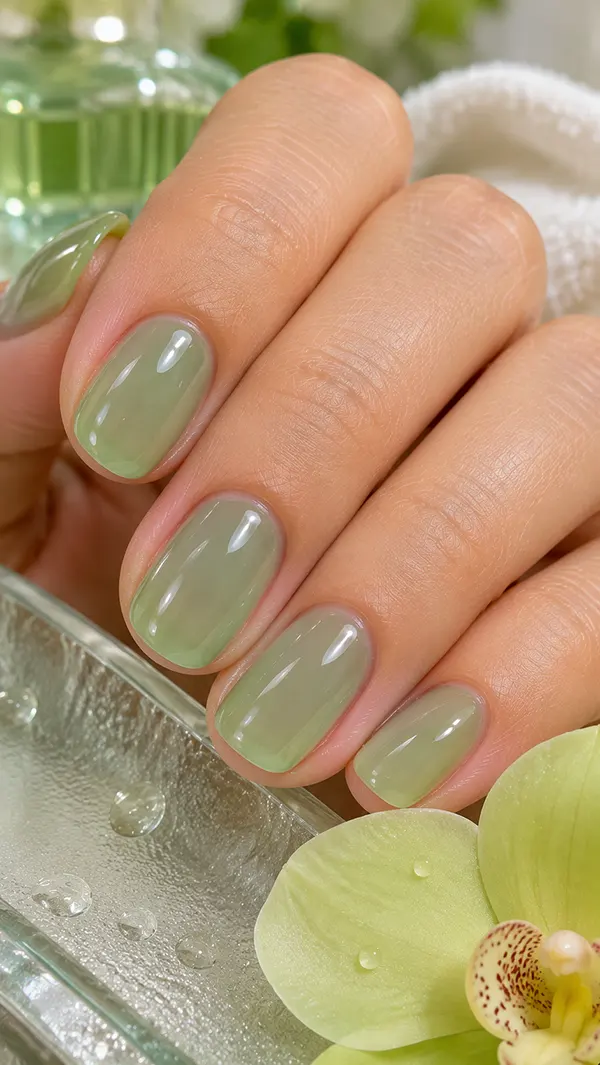
Milky jelly nails look like frosted sea glass. The sage color is sheer and slightly cloudy, so you can see a hint of the natural nail underneath, and the finish is high gloss with a soft, juicy look. On short oval nails, this creates a dewy, clean effect that feels fresh and effortless. It is a good place to start if you love the idea of sage green but worry that a solid color will look too strong.
The sheer finish is also very forgiving. Small imperfections in the nail bed blend away, and the color grows out so gently that the manicure looks neat for weeks. Pale and light skin tones get a soft green wash, while deeper skin tones get a richer, tinted-glass effect. If you would like a little more green, add a third thin layer. If you want it even milkier, mix a drop of white polish into the sage before painting.
To get that jelly look, apply the polish in thin, even layers and let each one set. Brush strokes should go in the same direction so the color stays smooth. A thick, glossy top coat gives the final glassy depth, and curing a slightly thicker top layer, if you use gel, adds a plump, juicy shine. Avoid pressing the brush hard, since jelly polish can easily pool at the cuticles.
Color Note
The jelly effect depends on your natural nail color. Pinker nail beds create a warmer, slightly peachy-green blend, while whiter nails create a cooler mint-like tone, so the same polish can look different from person to person.
If you want more consistent color, apply a thin, sheer nude or milky white base first. This gives the sage something even to sit on and keeps the shade closer to the bottle.
8. Sage Green Marble Swirl Nails
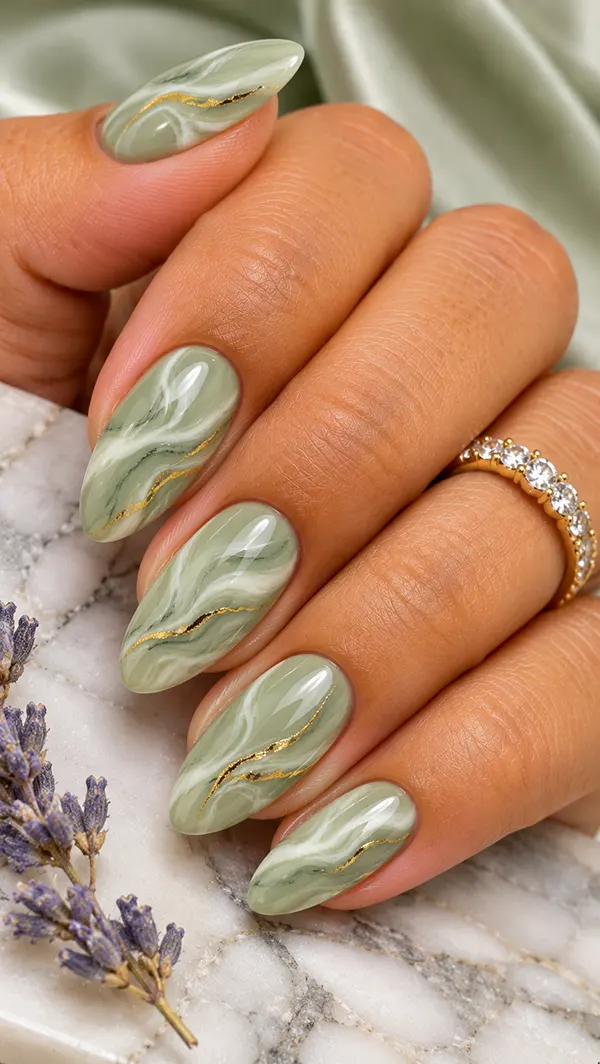
Marble nails borrow the look of polished stone, and sage makes one of the prettiest versions. The base is a soft sage, with thin white and cream veins curling across it in uneven ribbons and a few faint gray lines for depth. On medium almond nails, the swirls run along the length of the nail, as if flowing from the cuticle to the tip. The glossy finish gives it that smooth-stone feel, and the result looks artistic without ever feeling loud.
What keeps marble from looking messy is restraint. Veins should be thin and should cross each other only a few times, the way real stone does. Leave patches of clear sage between the lines so the color can breathe. For a warmer marble, use cream and a touch of beige for the veins. For a crisper, cooler look, go with white and pale gray. Cream veins feel softer against golden skin, while white veins stand out beautifully against deeper skin tones.
At home, the easiest method needs only a fine brush. Paint the sage base, and while it is still slightly tacky, draw a few thin white lines diagonally. Use a clean, dry brush or a sponge-tipped tool to gently drag and blur some of them, creating a soft, cloudy effect. Finish with a thick, glossy topcoat to smooth out any ridges. Gel polish gives you more time to shape the nails before curing, so beginners often find it easier.
Design Detail
No two marble nails should match exactly. Real stone never repeats itself, so the slightly different swirls on each finger make the set look natural rather than stamped. Try to keep the main vein running in the same general direction across all ten nails so the hand still looks like one design.
If you like a little extra richness, add a single fine gold line along one vein. It catches the light without taking over, and it ties the marble to metallic jewelry you may already wear.
9. Sage Green and Cream Checkerboard Nails
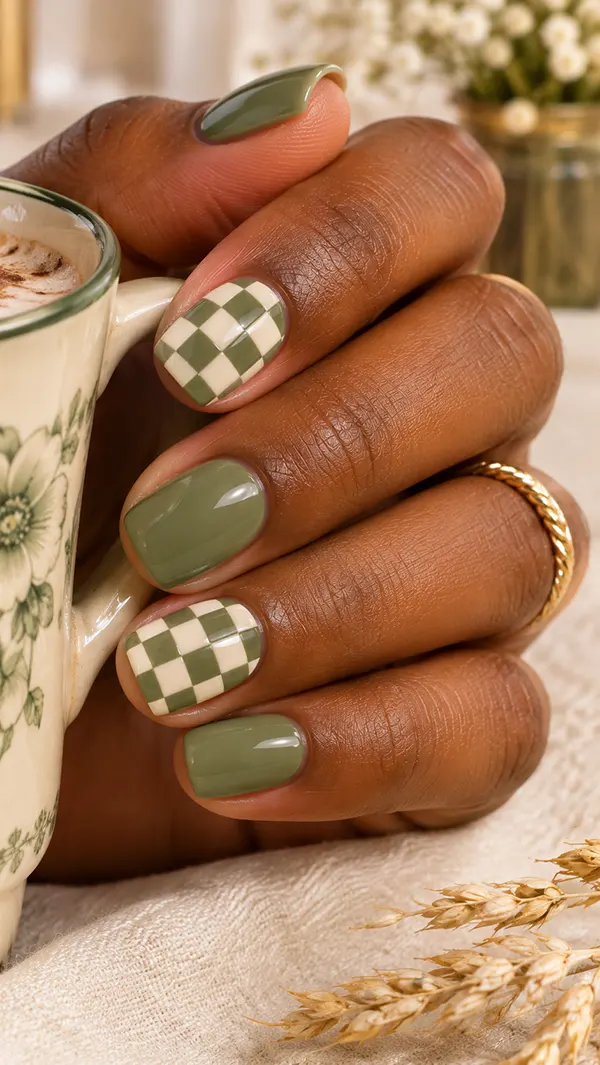
Checkerboard nails have a playful, retro feeling, and sage and cream are the gentlest way to wear the pattern. The design uses small alternating squares of muted sage and creamy off-white, arranged in a tidy grid on a short square nail. The glossy finish keeps the colors crisp, and the soft palette stops the pattern from looking too sharp. It is graphic, but it still feels calm.
I would not cover all ten nails with the grid. A better balance is a checkerboard on two or three accent nails, with solid sage or solid cream on the rest. That way, the pattern becomes a detail instead of the entire story. On short nails, keep the squares small and count only three or four rows, so each square stays readable. On longer nails, you can make the grid larger and let the pattern stretch up the nail like a flag.
For a DIY version, paint the entire nail with cream and let it dry fully. Then use a thin striping brush or small pieces of striping tape to mark a grid. Fill every second square with sage, working across each row and taking care not to touch wet paint. A fine liner brush helps tidy up the edges. Seal with a glossy top coat, and use a thin layer so the grid lines do not smear.
Wear It For
This design works well for casual weekends, coffee dates, and trips where you want your hands to look cute in photos. The pattern pairs nicely with plain clothes, so a white tee, denim, or a cream cardigan lets the nails do the talking.
If you plan to wear it to the office, choose the version with one accent checkerboard nail. It reads as a subtle detail and maintains an overall professional look.
10. Sage Green Ombre Fade Nails
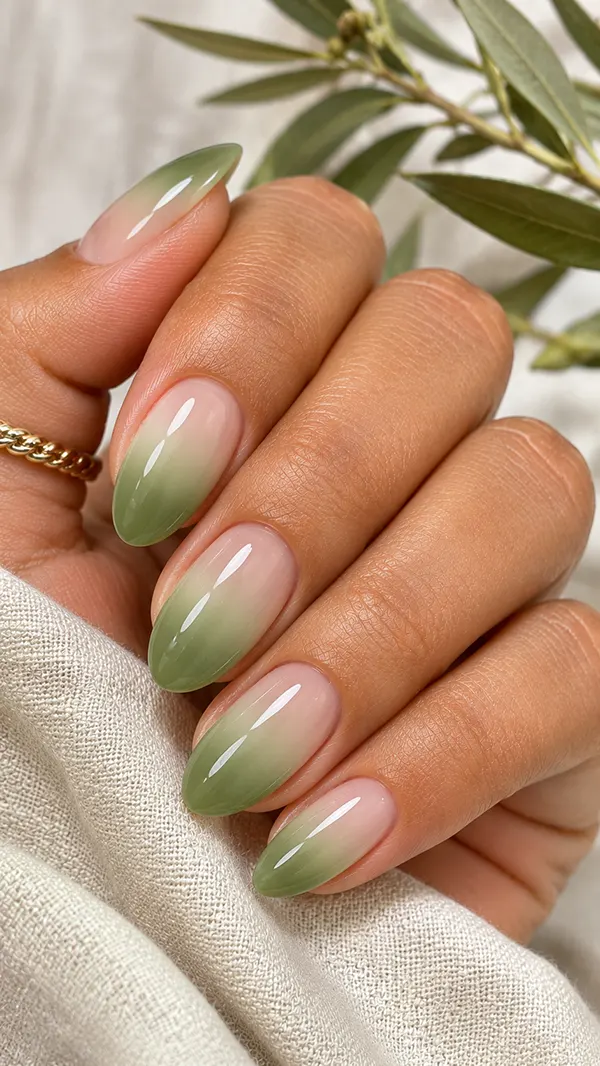
An ombre fade lets sage melt gently into a soft nude, so the color seems to emerge rather than be painted on. The cuticle area stays sheer and light, and the green slowly deepens toward the tips—or the other way around if you prefer. On medium oval nails, the gradient flows smoothly along the curve, creating a dreamy, blurred effect. It looks soft in person and even better in pictures.
The secret to a good fade is a very soft transition. If you can see a line where the colors meet, the blend needs more work. A sponge makes this easier at home, since it dabs the color on in light layers and builds it up slowly. Choose a nude that matches your skin or a creamy beige, and avoid stark white, which can make the sage look chalky. Warm sage and sandy nude feel sunny, while gray sage and pale pink feel cooler.
To create it, paint a nude base and let it dry. Dab sage and nude polish side by side on a makeup sponge, then press the sponge lightly onto the nail, repeating two or three times. Clean the skin around the nail with a brush dipped in acetone, then apply a glossy top coat to smooth the texture the sponge leaves behind. Gel polish keeps the blend from drying before you finish.
Salon Advice
Tell your nail tech which direction you want the fade to go. Sage at the tips looks classic and slightly longer-fingered, while sage at the cuticle looks modern and grows out into a more obvious gap.
Ask for a very light buffing of the nail surface first. A smooth nail makes the gradient look seamless, and it prevents the sponge from leaving tiny lines you will notice later.
11. Sage Green Leaf Line Art Nails
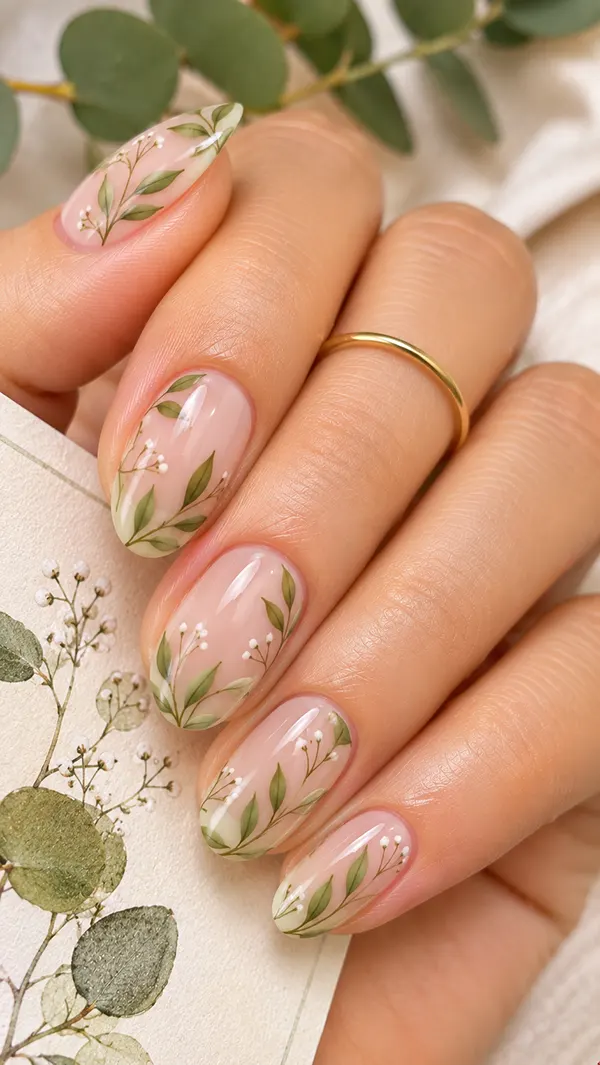
Leaf line art is a quiet, botanical design that feels hand-drawn and personal. The nails are painted with a sheer nude base, and thin sage and olive branches are sketched along the edges, each with small leaves growing along the stem. On short almond nails, the branches curve with the nail’s shape and appear to grow out of the cuticle. The glossy finish lets the fine lines stay crisp.
I like this one because it looks delicate but is much easier than it sounds. The lines do not have to be perfect, since a slightly wobbly leaf actually looks more natural. Keep the branches asymmetrical, with a few more leaves on one side, and let some branches run off the edge of the nail. Using two shades of green—a soft sage and a darker olive—adds depth to the plants. You can also add tiny white dots as buds for a slightly floral touch.
For painting, thin the polish slightly, or use a nail art liner brush already loaded with color. Draw the stem first in one smooth stroke, then press the tip of the brush against the nail to form each leaf, lifting as you pull away to make a point. Let it dry, then add a glossy top coat. A thin top coat avoids dragging the lines, so do not brush back and forth over the artwork.
Manicure Tip
Rest the side of your painting hand on the table while drawing the stem. That small anchor keeps the lines steady and prevents the shaky strokes that happen when your whole hand floats.
If you make a mistake, wait for the paint to dry and cover it with another leaf. Botanical art hides errors better than almost any other design, because an extra leaf looks like growth.
12. Sage Green Velvet Cat Eye Nails
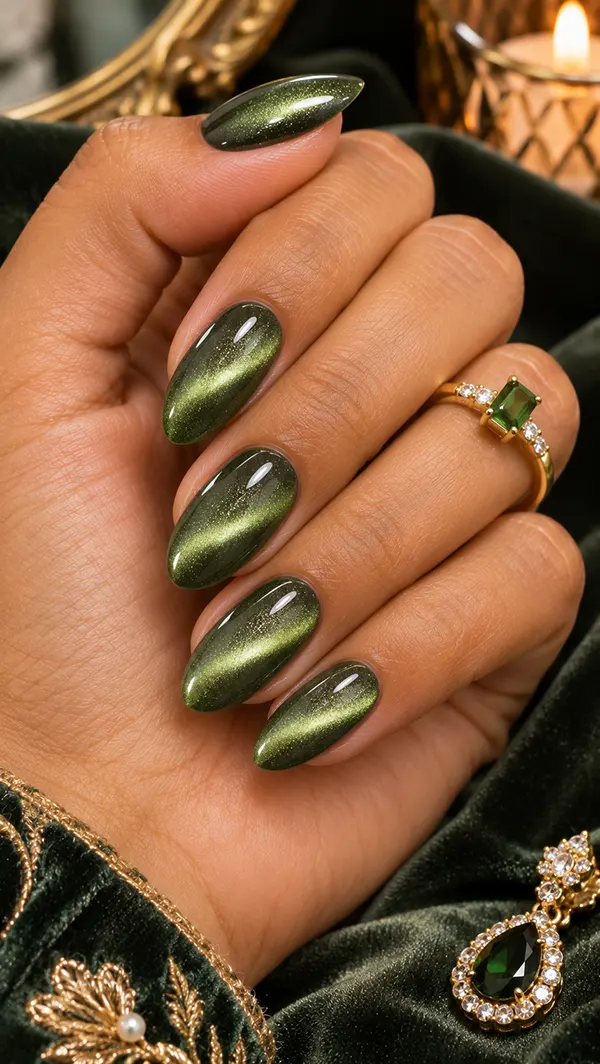
Velvet cat-eye nails shift and glow as you move your hand. A deep sage gel polish contains tiny magnetic particles, and a magnet pulls them into a soft band of light across the nail. The band looks like a thin, shimmering line that follows the surface’s curve, shifting position as the light changes. On medium almond nails, the effect looks deep, rich, and slightly mysterious.
This look is the one I reach for when I want a sage manicure that feels more evening than everyday. The color is usually darker than a creamy sage, with a hint of forest green beneath, which gives the shimmer something to catch. Deeper skin tones and olive skin tones look especially rich in this shade, while fair skin gets a nice contrast. You can place the band across the center, along the tip, or diagonally. A diagonal line feels dynamic, and a center line feels classic.
Cat-eye polish needs a magnet, and the technique is quick but precise. Apply a thin layer of the magnetic gel, hold the magnet close to the nail for about five to ten seconds, and cure under the lamp while the particles are still in place. Do each nail separately, since moving on too early can scatter the pattern. Finish with a no-wipe top coat to protect the shimmer without dulling it.
Salon Advice
Most salons carry magnetic gels, but not every tech uses them often. Ask whether they have a deep sage option, and bring a photo showing which direction you want the band to run.
Plan for a darker base, since the magnetic effect disappears on sheer colors. A solid, slightly opaque sage provides the particles with a background that makes the line stand out.
13. Sage Green and Beige Two-Tone Nails
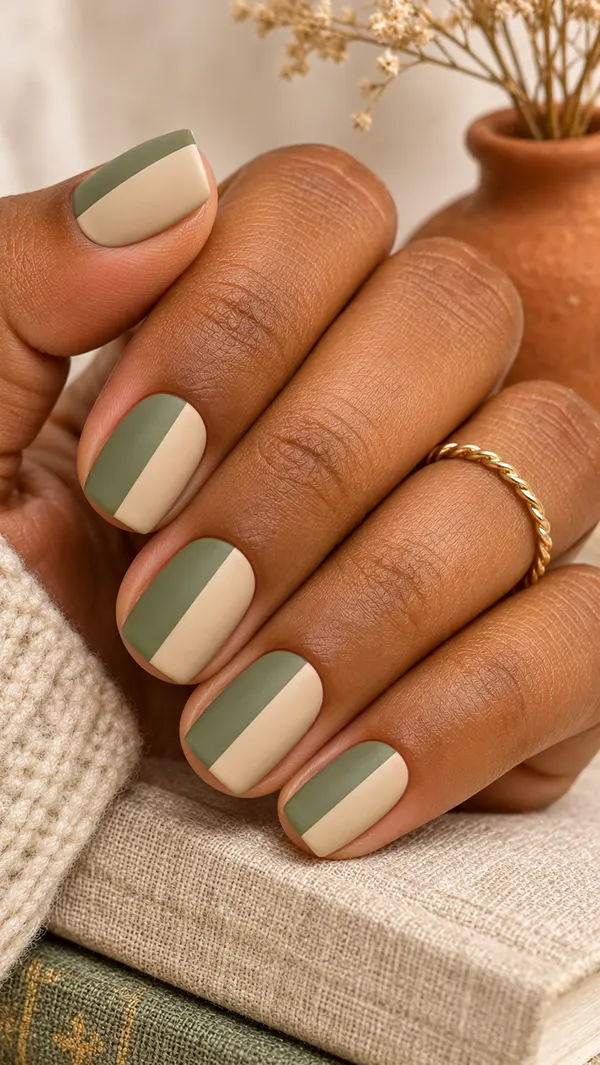
A two-tone manicure uses only two colors, and sage with beige is a combination that looks calm and clean. The nails are painted in a muted sage and a warm beige with a soft satin finish, either alternating from finger to finger or splitting each nail into two sections with a straight line. On short square nails, the neat shapes make the colors look tidy and modern. It is the kind of design that looks intentional rather than decorated.
Because both shades are muted, the result feels very wearable. There is no strong contrast, so the manicure fits easily into an everyday wardrobe. Beige with a pinkish tone looks softer, while beige with a yellow tone looks earthier. For a clean look, keep the color blocking sharp with a straight edge. For a softer look, paint a diagonal line or a gentle curve where the colors meet, and leave a tiny gap of bare nail between them.
Doing a split nail at home is easy with striping tape. Paint the first color on the whole nail, let it dry thoroughly, then press a piece of tape across the middle or diagonally. Paint the second color over the exposed section, then remove the tape while the paint is still slightly wet to get a crisp edge. Use a satin or semi-matte top coat to give the colors a soft, uniform texture.
Style Tip
This manicure pairs well with neutral wardrobes. Cream, camel, white, and olive clothing all repeat the colors in your nails, so the hands look like part of the outfit. A wooden or gold watch fits right in.
If you want a little more personality, make one nail a solid shade of the opposite color. The two-tone pattern stays, but the break in rhythm makes the whole set feel more thoughtful.
14. Reverse French Sage Moon Nails
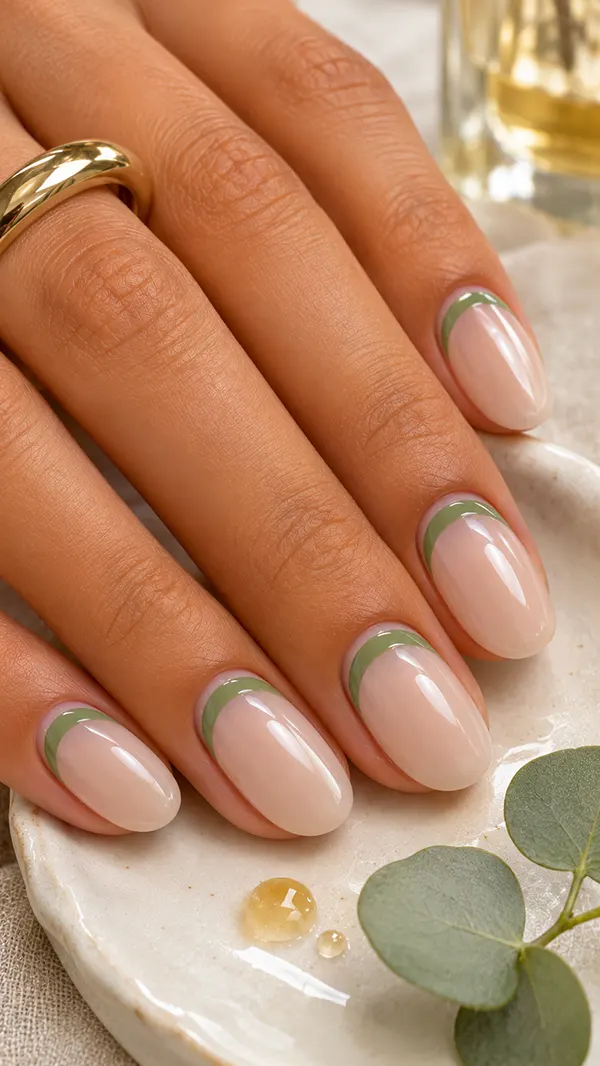
A reverse French flips the usual manicure by placing the color at the base of the nail instead of the tip. Here, a soft sage half-moon curves around the cuticle, while the rest of the nail is a sheer nude or milky pink. The crescent shape frames the nail bed, making short oval nails look a bit longer and more elegant. It is a quiet, modern design that looks like a detail you notice on a second glance.
The moon can be thin and delicate or wide and bold, and that choice shapes the design’s personality. A narrow moon feels refined and minimal, while a thick crescent feels graphic and fashion-forward. You can also leave a tiny gap of bare nail between the cuticle and the sage, which gives the design a floating look. Pale sage looks airy and soft, and a deeper sage creates a stronger contrast against the nude base.
To paint it at home, use a small brush or a round nail sticker as a guide for the curve. Paint the nude base first, let it dry, then place the guide near the cuticle and brush the sage along the edge. Remove the guide while the polish is still wet so the edge stays smooth. A glossy top coat unifies the shapes. The design also hides regrowth well, since the moon is already near the cuticle.
Nail Care Note
This look puts attention on your cuticles, so a little preparation goes a long way. Gently push them back after a shower, and apply cuticle oil daily. Healthy, tidy cuticles make the moon curve look crisp and intentional.
Avoid cutting the cuticle too aggressively. Trimming only the loose bits and leaving the living skin intact keeps the area from getting irritated, which matters because the color sits so close to it.
Also Check Out: 20 Stunning Soft Candy Color Nails for a Cute and Confident Look
15. Sage Green Nails with Pearl Accents
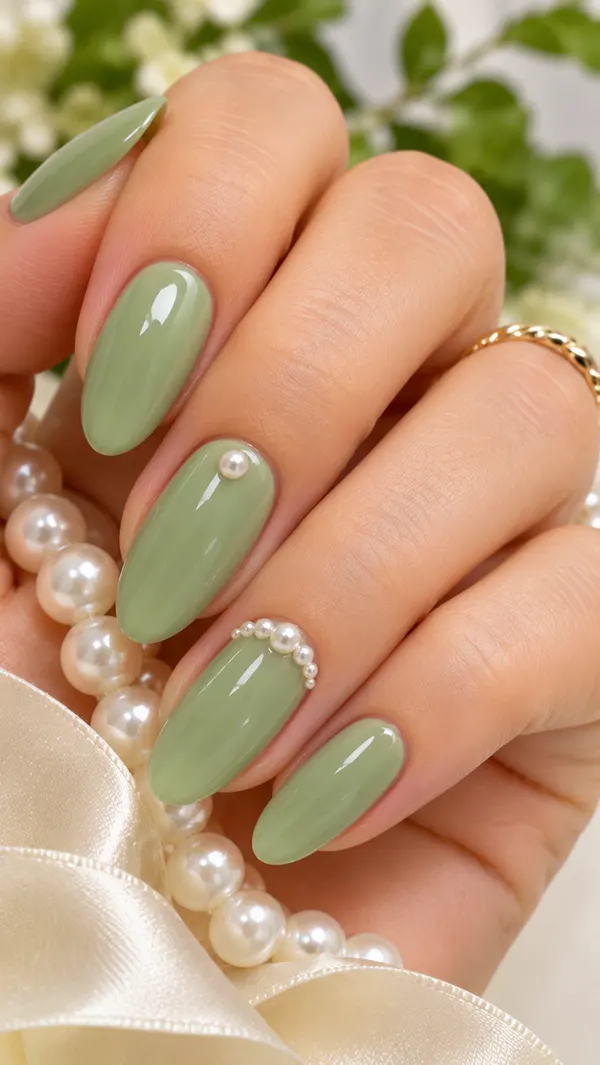
Pearls bring a soft, bridal kind of glow to a sage manicure. The nails are painted in a gentle creamy sage with a glossy finish, and a few tiny white pearls are set near the cuticle or along the center of one accent nail. On medium oval nails, the rounded shape keeps the pearls looking neat and balanced, so the design feels refined and a little vintage. It is a lovely choice when you want sage green nail ideas that look dressed up without any heavy glitter.
Placement decides how formal the design feels. A small cluster of three pearls on the ring finger looks understated, while a curved line of pearls following the cuticle looks more decorative. Keep the pearls small and uniform in size, since mismatched sizes can make the nail look crowded. White pearls look crisp against sage, and champagne pearls look warmer and slightly antique. If your nails are short, one or two pearls on a single nail are plenty.
Pearls need proper adhesion to stay put. Dab a small drop of builder gel or nail glue where each pearl will sit, place it with a wax pencil or tweezers, and cure or let it dry fully. Then seal around the edges of each pearl with top coat, taking care not to cover the pearl itself, which keeps its shine. Avoid pearls on nails you use for typing or opening cans, because constant pressure loosens them.
Wear It For
Weddings, graduations, and dinner parties suit this design best, since the pearls catch candlelight and flash. The sage base also looks good in photos with greenery, so it’s a natural fit for garden events.
For a calmer everyday version, keep the pearls on one nail only and leave the others plain. You still get the pretty detail without having to be careful with every task you do.
16. Sage Green Abstract Swirl Nails
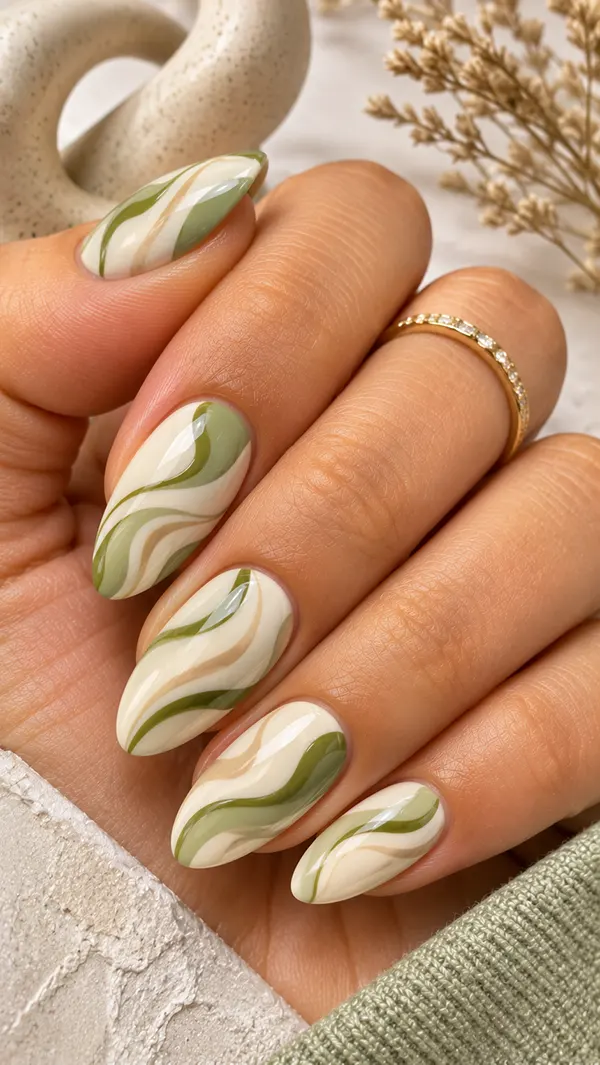
Abstract swirls feel like brushstrokes in a modern painting. On a cream or sheer white base, ribbons of sage green curl across each nail in loose, flowing shapes, sometimes overlapping with a second shade, such as olive or beige. On medium almond nails, the swirls follow the curve of the nail, giving each finger its own little scene. The glossy finish makes the colors look like wet paint.
What I enjoy about this design is how forgiving it is. Because the shapes are meant to be organic, there is no right or wrong curve, and small wobbles look intentional. Keep the palette tight, using two or three colors at most, so the artwork looks calm. A bit of negative space between the swirls lets the nail breathe. Thin lines look delicate and graceful, while thicker ribbons feel bold and playful. Choose whichever matches how loud you want your hands to be.
To paint swirls, load a thin brush with sage polish and draw a slow, curved line, then add a second curve that echoes it. Let the shapes cross in one or two places instead of staying parallel. A dotting tool can fill in small circles or half-moons for extra interest. Let each layer dry before adding the next color, then seal everything with a smooth, glossy top coat so the ridges between layers disappear.
Copy This Look
Take a photo of an abstract painting or a piece of patterned fabric you like and use its color palette as your guide. Pulling colors from something real keeps the swirls looking balanced.
Start with the thumb and index finger, which are the easiest to see, and match the rest to them. If you run out of patience halfway, the finished nails still look cohesive.
17. Sage Green Aura Gradient Nails
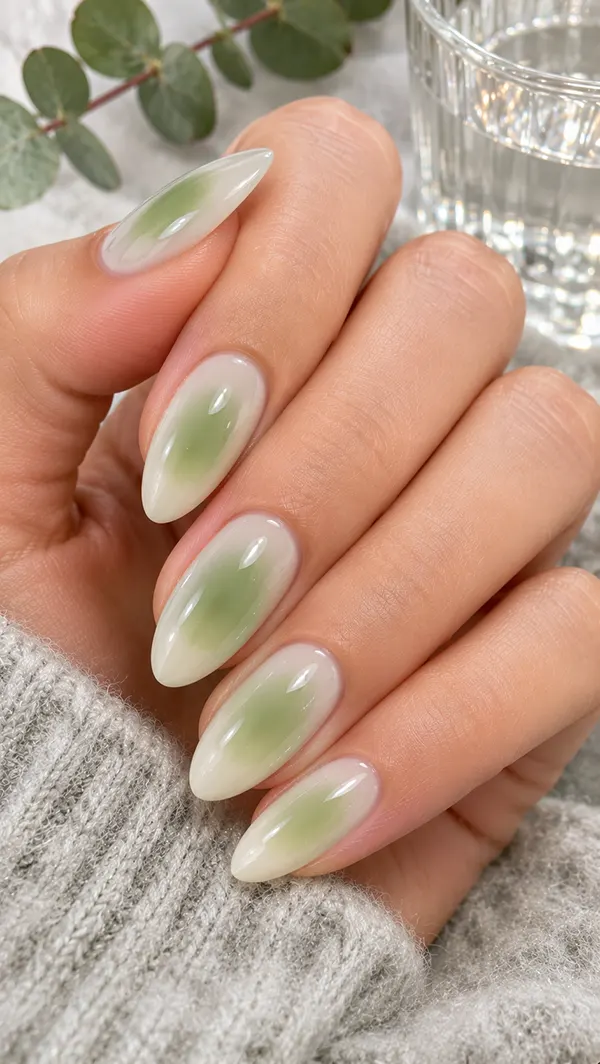
Aura nails look like a soft glow of color floating in the center of the nail. A blurred sage-green circle sits on a creamy, off-white base, fading outward into nothingness, so the edges seem to dissolve. On medium almond nails, the aura sits slightly above the center, creating a dreamy halo effect. The glossy finish gives it a smooth, airbrushed look that feels very current and very soft.
The charm of this design is the blur. You can make the glow tight and small for a subtle effect, or wide and generous so it nearly fills the nail. A single shade of sage looks calm, while a second shade like pale mint or butter yellow around the edge adds a sunrise quality. If your base color is very white, the green pops. If it is a milky beige, the whole design looks warmer and gentler, which many people find easier to wear daily.
An airbrush gives the smoothest result, but a makeup sponge or a soft eyeshadow brush works well at home. Paint the base, dab a little sage polish onto the sponge, and press it onto the center of the nail in a circular motion. Build the color slowly with two or three light touches. Clean the skin with a small brush, then apply a glossy top coat to blend any remaining texture.
Design Detail
The size of the aura should relate to the nail length. On shorter nails, a smaller glow looks more natural, because a big circle can swallow the whole nail and turn into a solid color.
Try placing the glow in different positions across the fingers, with some near the cuticle and others near the tip. The variation makes the set look like a gentle pattern instead of ten identical circles.
18. Sage Green and Dusty Rose Nails
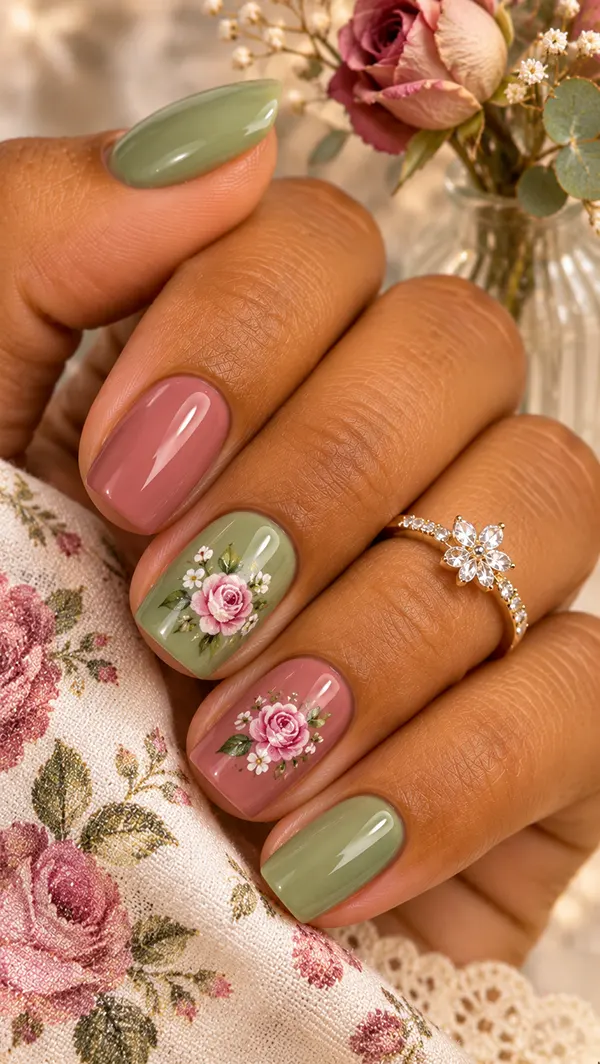
Sage and dusty rose are an old-fashioned color pair that feels fresh on nails. The shades sit opposite each other on the color wheel, but both are muted, so they blend instead of clash. On short squoval nails, you can alternate the colors finger by finger, paint a soft half-and-half split, or keep sage as the main shade and add rose as tiny flowers or accent lines. The glossy finish keeps the colors feeling romantic and slightly vintage.
This pairing is lovely because it feels gentle and a little nostalgic, like faded floral wallpaper. Cooler skin tones look sweet with a pinkish rose, while warmer skin tones look beautiful with a rose that leans toward terracotta. If you would like a quieter manicure, let sage be the star and use rose in only one place. If you enjoy softer sweetness, make the two colors equal and add a thin cream line between them.
To keep the colors balanced, choose shades with a similar level of gray. A bright pink next to a muted sage looks mismatched, but a dusty, slightly brown-toned rose sits beautifully beside it. Paint each color in two thin coats, and let them dry before adding any detail. If you make small flowers, use a dotting tool in a rose with a tiny cream center. Finish with a glossy top coat for a smooth, jewel-like surface.
Undertone Guide
Hold both colors up against your hand in daylight before you commit. Sage that leans yellow pairs best with a peachy rose, and sage that leans gray pairs best with a pink-toned rose.
If you are not sure, add a neutral between them, such as cream or beige. A neutral nail in the set gives the eye a place to rest and keeps the two main colors from competing.
19. Sage Green Shimmer Tips
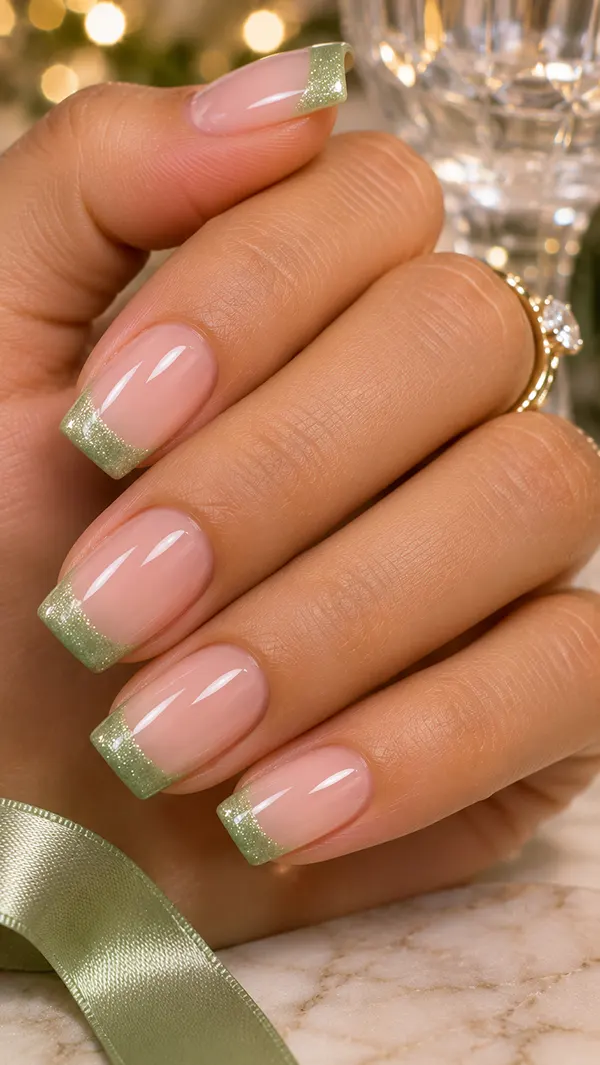
Shimmer tips are a sparkly twist on the classic French manicure, yet still feel soft. The base is a sheer nude or milky pink, and the tips are painted in a pale sage green with a fine shimmer running through it, like crushed pearl dust. On medium square nails, the straight tip line looks crisp and modern, and the glittery edge catches the light with every hand movement. It is a gentle way to add sparkle without full glitter.
The shimmer particles in this style should be very fine. Chunky glitter makes the tip look rough and a bit dated, while a fine shimmer looks smooth and almost liquid. A silver-pearl shimmer keeps things cool and airy, and a champagne shimmer adds warmth. If you want more drama, you can make the tip thicker or add a second thin, shimmery line above it. Short nails look good with a narrow band, and longer nails can handle a wider one.
To get a smooth shimmer tip, apply a clear base coat first, then use a thin brush to paint the sage shimmer along the edge of the nail. A tip guide or a piece of striping tape gives a clean line if you are new to it. Let the shimmer layer dry, then apply a thick, glossy top coat to bury the particles’ texture so the surface feels smooth to the touch.
Finish Tip
Always apply the top coat slightly over the free edge of the nail. Shimmer sits right where nails get knocked the most, and capping the edge helps stop chipping and keeps the sparkle intact.
If the surface still feels slightly gritty after top coating, add a second thin layer. Two thin coats are smoother than one thick coat, and they keep the shimmer from sinking.
20. Sage Green Nails with Mini Hearts
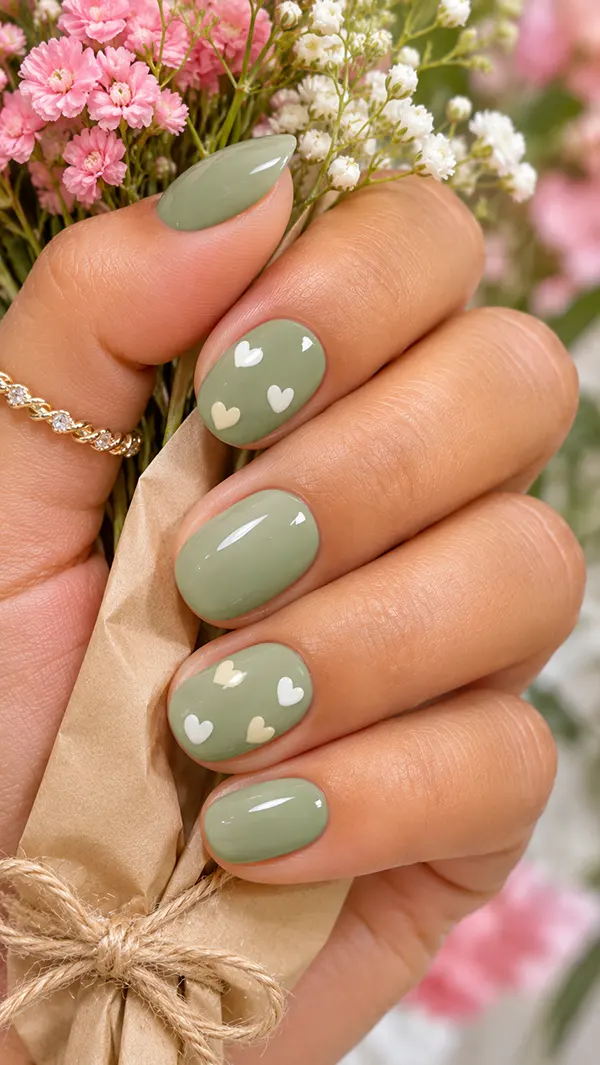
Mini hearts add a sweet, playful feeling to a sage base without making it childish. The nails are painted in a pale sage with a glossy finish, and tiny hearts in white, cream, or a slightly deeper green are scattered across a few nails. On short round nails, the little hearts look cute and compact, and the soft color keeps the whole manicure from getting too bright. It is the kind of design people tend to save for Valentine’s Day and then wear all year.
The size and placement of the hearts matter more than the number. Very small hearts look delicate and refined, while bigger ones feel more cartoonish. Scatter them loosely across one or two nails instead of lining them up evenly, which gives a sprinkled look. A tone-on-tone version, using a slightly darker sage for the hearts, looks quiet and subtle. White hearts look crisp and graphic, and cream hearts feel softer and more vintage.
Painting hearts is easier than it seems. Dot two small circles side by side with a dotting tool, then drag the tips of the dots downward and together with a fine brush to form the point. Wait until the hearts have dried before sealing with a top coat. You can also use heart stickers or stamping plates, which give uniform shapes and save time. A glossy top coat unifies the design and protects the details.
Style Tip
Pair this design with simple clothes, so the nails remain the only playful element. A cream sweater, a white tee, or a denim jacket lets the little hearts feel charming instead of busy.
If you want a nod to the design without full commitment, paint one tiny heart on the ring finger only. That single detail still feels thoughtful and is quick to redo if you want a change.
21. Glossy Wavy Lines on Matte Sage Nails
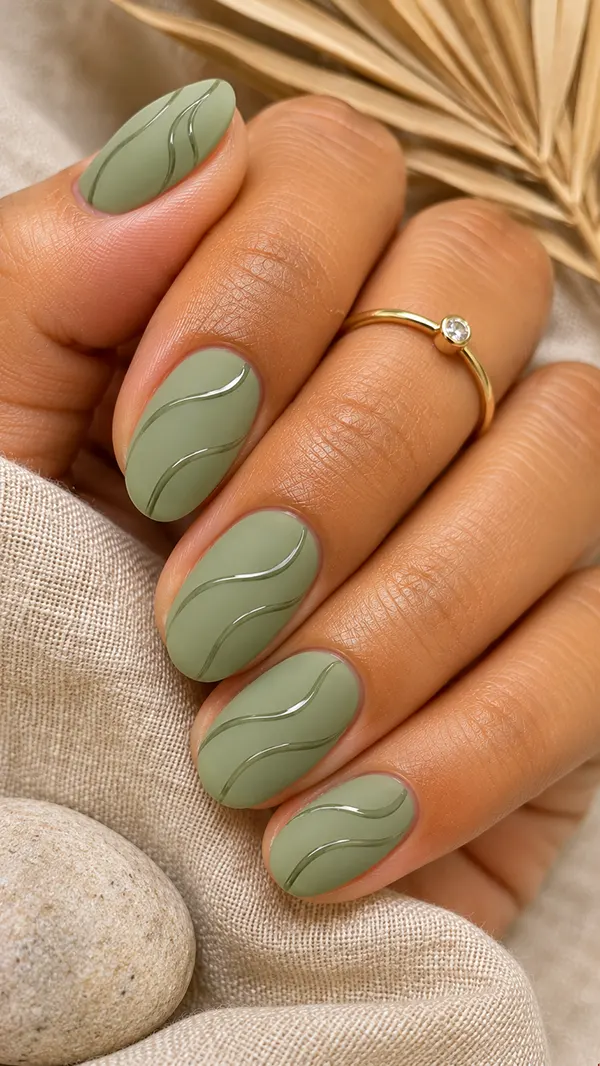
This design plays with texture instead of color. The nails are coated in matte sage, and thin wavy lines are painted over them in a glossy clear or tone-on-tone sage, so the pattern only appears when light hits it. On short oval nails, the flowing lines add movement and depth while the overall color stays calm. It is a subtle design that rewards a second look.
What makes it special is the contrast between flat and shiny surfaces. In dim light, the wavy lines almost disappear, and in sunlight, they appear as soft ripples across the nail. You can keep the lines clear for a tone-on-tone effect, or paint them in a slightly deeper sage for more visibility. Keep the waves loose and fluid, and let them flow in the same direction across all fingers so the hand looks cohesive.
To make it, paint two coats of sage and cover the nail with a matte top coat. Once dry, use a thin brush to draw wavy lines with a glossy top coat or a clear gel, working slowly so the lines stay smooth. Let it set or cure, and avoid touching the wet lines. If the gloss spreads, wait until it dries and soften the edge by gently tapping with a clean brush. Cure each nail fully before starting the next if you use gel.
Maintenance Tip
Matte and gloss combinations hold up best when you avoid heavy hand creams on the nails. Oil breaks down the matte layer unevenly, and the glossy lines can look smudgy.
If the glossy waves start to dull after a couple of weeks, apply a very thin layer of clear top coat over only the lines. It refreshes the contrast without changing the matte background.
22. Long Tonal Sage Coffin Nails
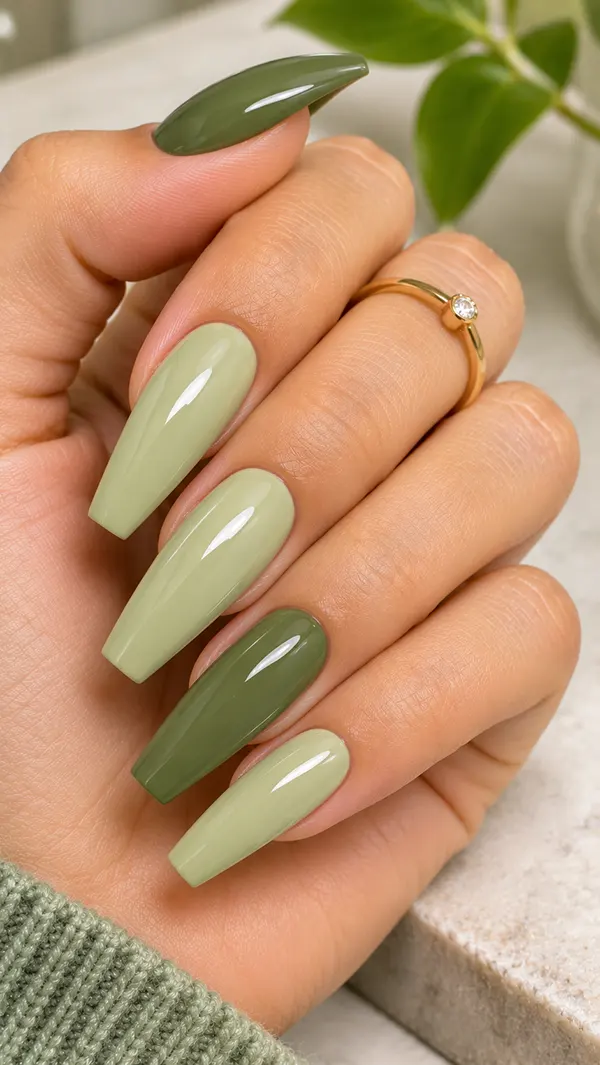
Long coffin nails in sage look bold and sleek. The nails are painted in a rich mid-tone sage with a glossy cream finish, and the long, tapered shape with a flat tip makes the color feel important. A tonal design uses different shades of the same green, such as a pale sage on some nails and a deeper sage on others, which adds quiet variety without breaking the color story. It is confident, polished, and very photogenic.
Length gives you room to play with shade changes. You might paint the thumb and ring finger in a darker sage, and the rest in a lighter one, or fade from light to dark across the hand. A single color is more minimal, and a few tonal shifts look intentional and stylish. Because the surface is larger, the quality of the polish shows, so a smooth, streak-free application is important. A glossy finish also emphasizes the length and shape.
Long nails do need practical care. Ask for a sturdy structure, such as hard gel or acrylic, so the nails do not bend or snap during daily tasks. Keep the sidewalls straight and the stress point slightly thicker, then file the tip square with softened corners. At home, sage press-on coffin nails are an easy alternative that gives the same look without the commitment. Apply a glossy top coat for a salon-quality finish.
Salon Advice
Bring a reference photo and tell your tech how long you want the nails to be, since “long” can mean very different things. Pointing to a length in the photo avoids a result that is too short or too dramatic.
Ask for a slightly shorter length if you type a lot or work with your hands. A coffin shape can still look elegant at a medium-long length, and it will be much easier to live with.
Choosing Among These Sage Green Nail Ideas for Your Own Hands
Twenty-two designs are a lot to look at, and the hardest part is usually deciding which one to book or paint. I find it easier to stop asking “which one is prettiest” and start asking “which one fits my nails and my week.” Four questions narrow it down quickly: how long your nails are, how much upkeep you want, where you will wear them, and how much attention you want the manicure to get.
Here is a quick guide to match the designs above to your situation.
| Your Situation | Designs to Try | Why It Works |
| Very short or uneven nails | 1, 7, 14, 21 | Solid, sheer, or tone-on-tone color needs no space and hides small imperfections |
| Short nails you still want to decorate | 6, 11, 20 | Tiny daisies, leaves, and hearts stay readable in a small area |
| Medium almond or oval nails | 2, 3, 5, 8, 10, 15, 16, 17 | The curved shape carries swirls, gradients, and glossy finishes beautifully |
| Long coffin or square nails | 4, 9, 12, 19, 22 | The extra surface gives foil, grids, and velvet shimmer room to show |
| Office or conservative settings | 1, 2, 13, 14 | Soft shades and clean lines look polished and quiet |
| Weddings and evening events | 4, 5, 12, 15 | Foil, chrome, velvet, and pearls catch light and photograph well |
| Low-maintenance routines | 7, 10, 14, 17 | Sheer color and cuticle-focused designs grow out without a harsh gap |
Skin tone is the second thing worth checking. Sage has gray in it, so the right shade depends on what your skin brings to it.
| Skin Undertone | Sage Shade to Try | Finish That Pairs Well |
| Fair with pink undertones | Cool, grayish pale sage | Creamy gloss or milky jelly |
| Light to medium with golden undertones | Warm, slightly olive sage | Satin or gold foil |
| Medium with olive undertones | Mid-tone sage with a gray base | Matte or pearl chrome |
| Deep skin tones | Rich deep sage or a very pale milky sage for contrast | Velvet cat eye, gold accents, or high gloss |
Budget and lifestyle matter too. Simple sage green nail ideas, like a creamy solid or a jelly finish, are quick and cheap to redo at home, and they look just as good in regular polish as in gel. Designs with foil, chrome, or magnetic polish usually need salon products, so plan for more time and a higher price. If you type all day or work with your hands, choose shorter lengths and skip raised details like pearls on your most-used fingers.
Explore More: 18 Stunning Butter Yellow Nail Ideas for a Fresh and Chic Look
How to Recreate These Manicure Designs at Home
Almost every look in this collection follows the same basic routine. Once you know the order, the only thing that changes from design to design is step four.
You will want a few tools on hand:
- A thin striping or liner brush for fine lines and tips
- A dotting tool for flowers, hearts, and small details
- Striping tape or tip guides for clean edges
- A makeup sponge for gradients and aura glows
- Tweezers or a wax pencil for foil flakes and pearls
- A glossy top coat, plus a matte one if you like velvety finishes
Then follow these steps:
- Shape and prep. File your nails into your preferred shape, gently push back the cuticles, and lightly buff the surface. Wipe each nail with a lint-free pad so no oil is left behind.
- Apply a thin base coat. This protects the natural nail from staining and helps the polish grip. Let it dry or cure fully.
- Paint the sage color in thin coats. Two light layers always beat one thick one. Run the brush along the free edge of the nail to seal it, which reduces chipping.
- Add the design. This is where each idea differs. Use the liner brush for veins, leaves, and tips; the dotting tool for flowers and hearts; the sponge for ombre and aura effects; and tweezers for foil or pearls. Let each layer set before adding the next one.
- Seal with a top coat. Use a generous glossy layer for cream and jelly looks, or a matte top coat for velvety ones. Cap the tip again to keep the design protected.
- Clean up and moisturize. Dip a small brush in remover and trace around each nail to sharpen the edges. Finish with a drop of cuticle oil.
If you are heading to a salon instead, clear communication makes all the difference. Bring a photo of the exact design, and name the details out loud: the shade (for example, “a gray-leaning sage”), the finish (glossy cream, matte, chrome, velvet), the shape, and the length you want. Ask your tech to test the color on one nail first, since sage can look quite different once it is on your hand.
Making Your Manicure Last Longer
A sage manicure is soft and subtle, so chips and a dull top coat show up quickly. A few small habits keep it looking fresh well past the first week.
Cuticle oil is the single most useful product. Applying it once or twice a day keeps the skin around the nail soft, which stops lifting at the edges and makes the whole manicure look newer. Wear gloves when you wash dishes or clean, because hot water and detergents weaken polish faster than almost anything else.
Treat your nails as nails, not tools. Opening cans, scraping labels, and prying things open all lead to chips. If you notice the shine fading on a regular polish manicure, a thin layer of top coat every three or four days brings it back.
- Avoid long, hot soaks in the first 24 hours after painting.
- Keep matte finishes away from heavy hand creams, which can leave shiny patches.
- Press decorations like pearls and foil down with your top coat, and check them to see if they catch on clothing.
- Never peel off polish. Soak a cotton pad in remover, wrap it around the nail for a minute or two, and gently slide the color off.
As a rough guide, regular polish lasts about five to seven days with good care, while gel often stays neat for two to three weeks. Sheer designs like the milky jelly or the reverse French moon grow out the most gracefully, so they hold up longest when you cannot get back to the salon on time.
Building Your Own Sage Green Formula
After browsing this many sage green nail ideas, you may notice that every design is really a combination of four choices. Once you know them, you can create a manicure that is yours instead of copying one exactly.
- Pick the shade. Pale and milky for a soft look, mid-tone for a classic one, deep for something richer.
- Pick the finish. Glossy cream is fresh; matte is modern; satin is calm; chrome and velvet are dramatic.
- Pick the shape. Short squoval and round are gentle; almond is elegant; coffin and square are bolder.
- Pick one detail. A single accent such as a daisy, a few foil flakes, a pearl cluster, or a thin line keeps the design from getting busy.
A few formulas to try:
| Mood | Shade | Finish | Shape | Detail |
| Quiet workweek | Pale gray sage | Glossy cream | Short squoval | None, or a clean cuticle line |
| Weekend coffee date | Mid-tone sage | Satin | Short round | One tiny daisy on the ring finger |
| Evening out | Deep sage | Velvet cat eye | Medium almond | A few gold foil flakes on one nail |
| Garden party | Milky sage | Jelly gloss | Medium oval | Three pearls near the cuticle |
The best rule I can give you is to change only one thing at a time. If you love your usual creamy sage, try it in a matte finish next time, or add one accent nail. Small changes help you learn what suits your hands without starting over.
Frequently Asked Questions
What colors go well with sage green nails?
Cream, white, beige, soft gold, and dusty rose are the easiest partners. They share sage’s muted, slightly gray quality, so nothing clashes. Silver and pearl add a cooler shine. For bolder pairings, try deep olive or a touch of terracotta for an earthy look.
Does sage green nail polish suit all skin tones?
Yes, as long as you pick the right shade. Cooler, grayer sages flatter fair and pink undertones. Warmer, olive-leaning sages look lovely on golden skin. Deeper skin tones glow in rich sage with gold or velvet accents. Testing one nail in daylight helps you confirm.
What nail shape looks best with sage green?
Almond and oval shapes show off sage beautifully, as their curves make the color look smooth and elegant. Short squoval nails look neat and everyday. Square nails feel crisp and modern, and coffin shapes give long nails a bold, sleek finish. The best shape is the one that matches your lifestyle.
How long does a sage green manicure last?
Regular polish usually stays neat for five to seven days, depending on how much you use your hands. Gel polish can last two to three weeks. Sheer and nude-based designs grow out more gracefully, so they look fresh for longer than solid, opaque shades.
Are sage green nails appropriate for work?
Absolutely. Sage is a soft, muted shade that reads as polished and calm. A creamy solid, a sheer jelly, or a sage French tip fits almost any office. If you want a little extra, keep the design to one accent nail so it looks subtle.
Should I choose matte or glossy sage green nails?
It depends on the mood you want. Glossy finishes look fresh, healthy, and slightly dressy. Matte finishes feel modern, earthy, and quiet. You can also mix them, using matte sage with glossy lines or one glossy accent nail, to get both textures in a single manicure.
Which seasons suit sage green nails?
Sage works all year. In spring, it feels fresh and floral, and in summer, it looks cool and airy. In autumn, deeper shades and matte finishes look warm and earthy, and in winter, velvet and gold-foil versions look rich. It is one of the few shades that never feels out of season.