
There is a reason butter yellow keeps showing up on your feed. It is the rare pastel that feels both soft and sunny, like the first warm week of spring captured on ten nails. It is not as loud as neon yellow, not as pale as cream, and not as sweet as baby pink. It sits right in the middle—warm, creamy, and quietly confident—making it one of the easiest colours to wear every day without ever feeling boring.
What I love about butter yellow is how much character it has without demanding attention. A glossy butter yellow manicure looks polished in a meeting, fresh at brunch, and pretty in photographs, all without a single piece of nail art. It flatters most skin tones because its warmth is gentle rather than brassy, and it pairs beautifully with gold jewellery, white linen, denim, and every neutral already sitting in your wardrobe.
If you are searching for butter yellow nail ideas, you probably want more than one plain coat, and that is where this colour really shines. Butter yellow is a generous base. It works with daisies, French tips, chrome glazes, gold foil, gingham, and glitter, and it never fights the design layered on top of it. It can be the star of a minimalist manicure or the calm background that lets a bolder detail sing.
Nail shape and length change the whole feeling of this colour, which is worth knowing before you book your appointment. On short, rounded nails, butter yellow looks neat, fresh, and practical. On almond nails, it looks elegant and elongated. On long square nails, it looks modern and fashion-forward. The same bottle of polish can give you three completely different manicures, depending on the shape you choose, so think about your hands, your lifestyle, and how much maintenance you honestly enjoy.
This guide walks you through the colour itself, compares finishes and shapes at a glance, explores the design directions that suit butter yellow best, and then gives you eighteen complete ideas, each with its own look, expert tip, and design. Whether you visit a salon or paint your nails at home, you will leave knowing exactly which butter yellow manicure is yours.
Understanding the Beauty of the Butter Yellow Nails Trend
Butter yellow works because it is a warm pastel with a creamy undertone, not a cool or chalky one. Think of softened egg yolk, melted butter, or pale custard—a yellow warmed with a drop of cream until it glows rather than shouts. That warmth is what keeps it wearable. Cool, icy yellows can look harsh against skin, while butter yellow sits gently, almost like a neutral with a sunny personality.
Undertones matter more than most people realise. A butter yellow with a slightly golden undertone flatters warm and olive skin beautifully, while a butter yellow leaning a touch more milky suits cooler skin tones. If you have ever tried a yellow polish and felt it clashed, the undertone was probably the problem, not the colour family. Hold a few swatches against your hand in natural light before committing, and you will see the difference immediately.
Shape and length decide how playful or polished the result feels. Short round nails make butter yellow look fresh and low-maintenance. Almond nails stretch the colour into something more elegant. Coffin and square shapes give it a modern, editorial edge. Length also changes how much art a nail can carry: a daisy fits easily on a medium almond nail, while a short nail suits a single accent or a simple French tip.
Finish is the other big decision, and butter yellow takes every finish well. A high-gloss top coat makes it look juicy and fresh. A matte top coat turns it soft, powdery, and surprisingly chic. A chrome glaze adds a pearly, lit-from-within glow. Glitter or shimmer gives it a festive sparkle. Each finish changes the mood of the same colour, so you can wear butter yellow all season and never repeat yourself.
- Minimalist butter yellow: one coat, one finish, nothing else, and it still looks complete.
- Elegant butter yellow: French tips, half-moons, and fine gold lines for a classic feel.
- Playful butter yellow: daisies, polka dots, lemons, and gingham for a cheerful, spring-like mood.
- Statement butter yellow: chrome, glitter gradients, and 3D accents for evenings and events.
- Mixed butter yellow: paired with cream, sage, pink, or nude in skittle and colour-block designs.
The beauty of this trend is its range. You can wear butter yellow as quietly or as loudly as you like, and the colour will support you either way.
Butter Yellow Nail Designs at a Glance
| Nail Design | Base Color | Finish | Nail Shape | Overall Look |
| Classic Glossy Butter Yellow | Butter yellow | High gloss | Short oval | Fresh, neat, everyday |
| Butter Yellow French Tips | Nude pink with butter tips | Glossy | Almond | Elegant, classic |
| Butter Yellow Daisy Florals | Butter yellow | Glossy | Medium almond | Playful, spring-like |
| Soft Matte Butter Yellow | Butter yellow | Matte | Short round | Powdery, chic |
| Butter Yellow Glazed Chrome | Butter yellow | Chrome glaze | Almond | Pearly, luminous |
| Butter Yellow and Gold Foil | Butter yellow | Glossy with foil | Oval | Luxe, delicate |
| Butter Yellow Polka Dots | Cream with butter dots | Glossy | Round | Sweet, retro |
| Butter Yellow and White Swirls | Butter yellow | Glossy | Almond | Modern, artistic |
| Butter Yellow Color-Block | Butter yellow and cream | Glossy | Square | Graphic, clean |
| Butter Yellow Glitter Gradient | Butter yellow | Glitter fade | Coffin | Festive, sparkling |
| Butter Yellow Lemon Slice | Butter yellow | Glossy | Almond | Fun, summery |
| Butter Yellow and Sage Botanical | Butter yellow and sage | Glossy | Oval | Fresh, botanical |
| Butter Yellow Half-Moon | Butter yellow | Glossy | Round | Vintage, refined |
| Butter Yellow Negative Space | Sheer nude with butter | Glossy | Almond | Modern, airy |
| Butter Yellow Micro-French with Gold | Nude with butter and gold | Glossy | Short square | Delicate, jewellery-like |
| Butter Yellow Pastel Skittle | Butter, pink, lilac, mint | Glossy | Oval | Cheerful, colourful |
| Butter Yellow Gingham Check | Butter yellow and white | Glossy | Square | Picnic-chic, retro |
| Butter Yellow Pearls and Bow | Butter yellow | Glossy with 3D accents | Almond | Romantic, special-occasion |
How Butter Yellow Breaks Into Design Directions
Minimalist designs are where butter yellow feels most at home. A single creamy coat, a half-moon, or a micro-French tip lets the colour speak without competition, and these designs survive a busy week best. They chip less noticeably, grow out gracefully, and suit every outfit you own.
Elegant and classic manicures take butter yellow in a more refined direction. French tips, gold lines, and pearl accents turn a playful pastel into something you could wear to a wedding or a formal dinner. The trick is restraint: one refined detail, placed precisely, rather than several competing ones.
Bold statement designs prove butter yellow is not only a quiet colour. Chrome glazes, glitter gradients, and 3D bows add drama and photograph beautifully. These designs suit longer nails and special occasions, where a little extra effort feels worth it.
French tip variations are the natural home of butter yellow, because the colour is soft enough to replace white without losing the French manicure’s clean feeling. Butter tips, double lines, and gold-edged tips all keep the classic shape while adding warmth.
Floral and artistic details lean into butter yellow’s spring personality. Daisies, lemon slices, botanical leaves, and hand-painted swirls all sit naturally on a butter base, and they are the designs people ask about most.
Glitter and chrome finishes change the colour’s temperature entirely. Glitter makes butter yellow festive, chrome makes it pearly and almost ethereal, and both are surprisingly wearable because the base colour stays soft.
Seasonal inspirations follow butter yellow through the year: gingham and lemons for summer picnics, matte butter for early autumn, and gold-accented butter for holiday parties. It is a colour that adapts to the calendar instead of belonging to a single month.
The Complete Butter Yellow Nail Design Collection
1. Classic Glossy Butter Yellow on Short Oval Nails
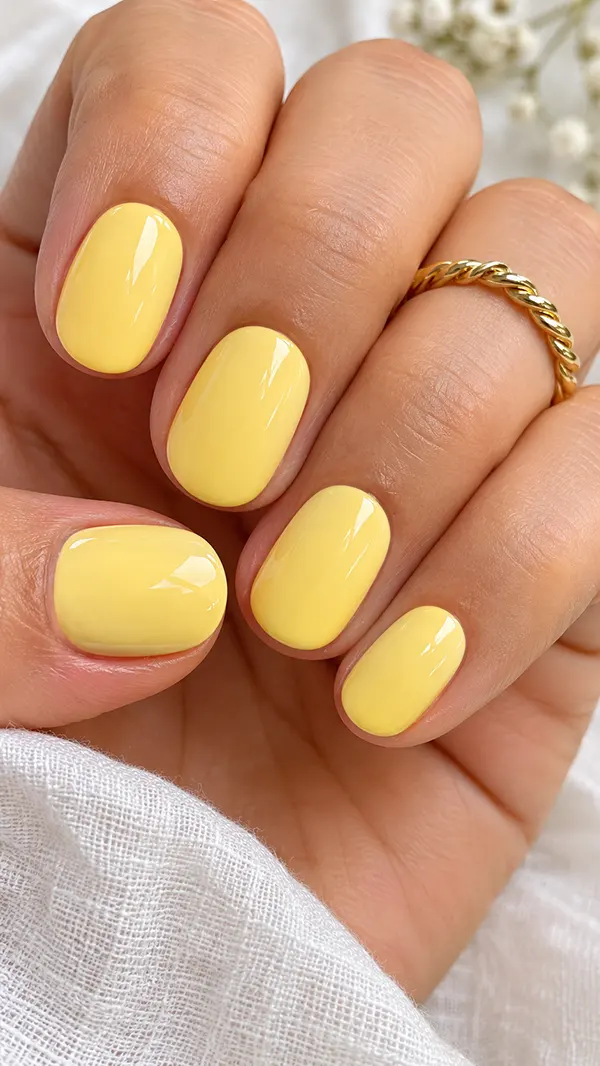
A classic, glossy butter-yellow manicure is the purest expression of this trend, and it is far from boring. The colour itself does the work: a warm, creamy yellow with a soft golden undertone, laid over short oval nails so the shape stays practical and the colour stays the focus. Two even coats give you a smooth, opaque finish with no streaking, and a high-shine top coat adds a juicy, freshly painted glow that catches the light every time you move your hands.
This design works because butter yellow on short nails reads as intentional rather than unfinished. Short nails can sometimes make a pale colour look washed out, but butter yellow’s warmth keeps it visible and flattering, even at a shorter length. The oval shape softens the hands and makes fingers look longer, which is why this combination suits so many people. It is also the most forgiving butter yellow design for at-home painting, since there is no art to smudge and small imperfections disappear under a glossy top coat.
Wear this manicure anywhere, and it will fit. It looks fresh with a white shirt and jeans, pretty with a floral dress, and polished in a professional setting where bolder nail art might feel out of place. It also pairs beautifully with gold rings and bracelets because warm gold and warm yellow share the same sunny undertone. If you are trying butter yellow for the first time, this is the design to start with, as it helps you see whether the colour suits you before you invest in art.
Manicure Tip
Apply butter yellow in thin coats rather than one thick one, because pastel yellows are notorious for streaking when applied too heavily. Two thin coats, with a minute of drying time between them, will give you a far smoother, more opaque result than a single thick coat, and the colour will look creamier and more even. If your polish still looks patchy after two coats, a third thin coat is better than trying to fix it with a heavy second layer.
Choose a ridge-filling base coat if your nails have ridges or uneven texture, because pastel colours show every bump that darker shades hide. A smoothing base creates an even canvas, helps the yellow apply evenly, and improves wear time. Finish with a glossy top coat and reapply it every two to three days to keep the shine fresh and protect the colour from dulling.
2. Butter Yellow French Tips
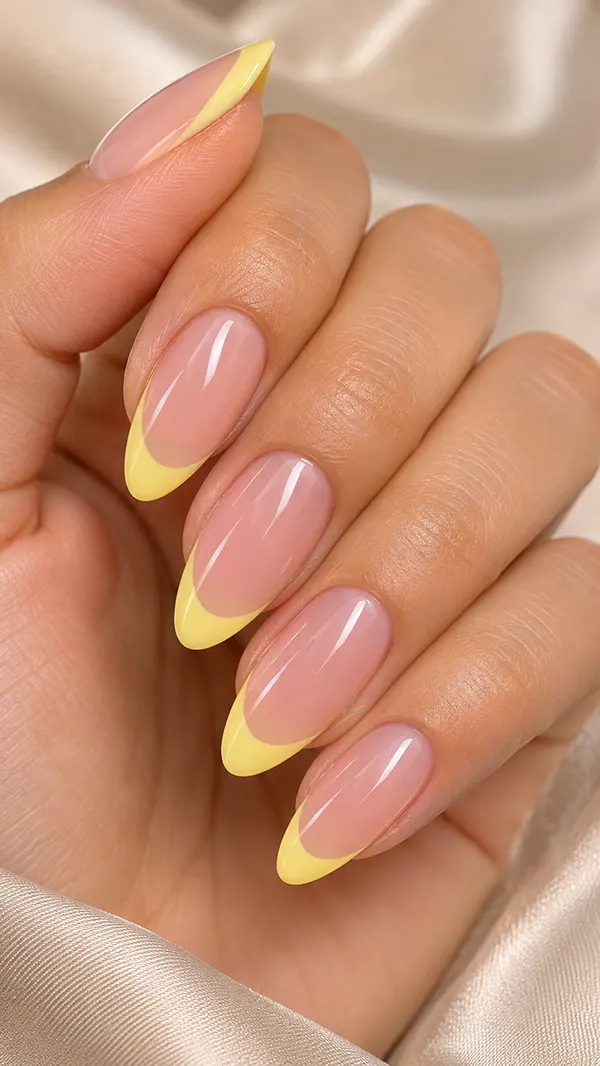
Butter yellow French tips take the most classic manicure in the world and warm it up. Instead of stark white tips, the free edge is painted in soft butter yellow over a sheer nude pink base, which keeps the French manicure’s clean, elegant shape while making it feel fresh and modern. The contrast is gentler than a white tip, so the result looks softer against the skin and less formal, which makes it easier to wear every day.
The shape matters here. Almond nails give butter French tips a graceful, elongated look, and the curved smile line follows the nail’s natural shape beautifully. On shorter nails, a thinner tip keeps the design proportional and neat. The nude base should be close to your natural nail colour—not too pink and not too beige—so the butter tip stands out cleanly without a harsh boundary. A glossy top coat seals the smile line and blends the two colours into one smooth surface.
This design works because it borrows the polish of a French manicure and the personality of a pastel. It suits weddings, work, and weekends equally, and it flatters every skin tone because the nude base adapts to your hand while the butter tip adds the colour. If you love French manicures but find white tips too stark, butter yellow is the gentlest way to update them.
Salon Advice
Ask your technician for a thin, curved smile line rather than a thick, straight tip, because butter yellow looks best when the tip is delicate. A thick tip can make the yellow look heavy and blocky, while a thin curve keeps the design light and elegant. Bring a reference photo if you can, and ask them to check the smile line against your cuticle shape, since a line that follows your natural nail curve will look far more professional.
For a longer-lasting result, consider a gel version of this design, because the smile line is the first place a regular polish manicure shows wear. Gel locks the tip in place and keeps the boundary crisp for two weeks or more. If you prefer regular polish, apply an extra layer of top coat along the free edge every few days to protect the tips from chipping.
3. Butter Yellow Daisy Florals
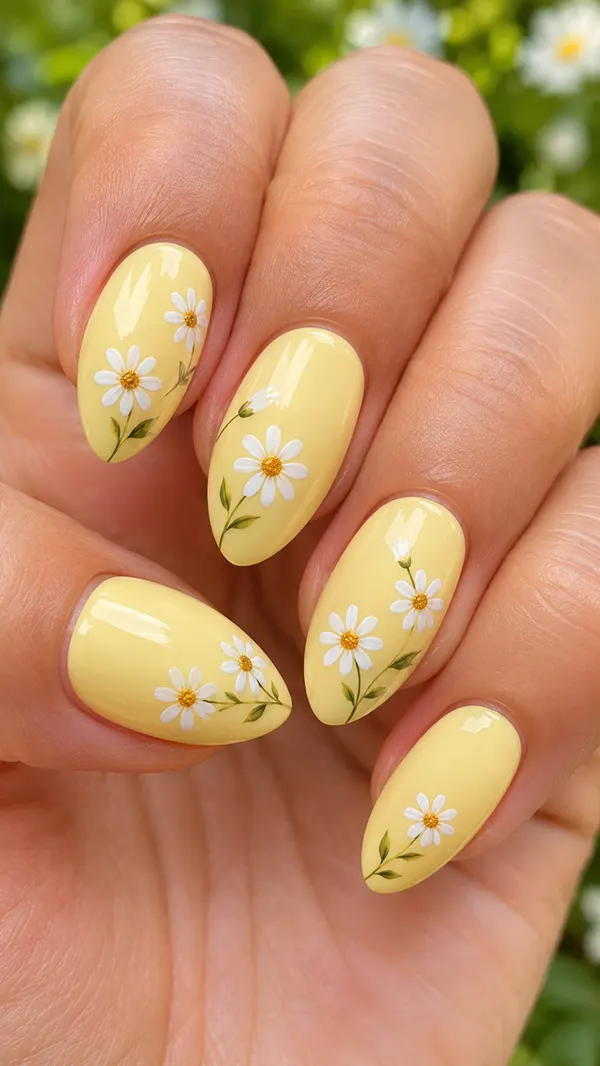
Butter yellow daisy florals are the design most people picture when they think of this colour, and for good reason. Tiny white daisies with golden centres scattered over a butter-yellow base feel like spring itself: cheerful, fresh, and quietly pretty. The white petals pop gently against the yellow without harsh contrast, and the golden centres echo the base colour, which ties the whole design together into something that looks considered rather than random.
Placement is what separates a pretty daisy manicure from a messy one. A single daisy near the cuticle or in one corner of each nail looks refined and modern, while a full scatter of daisies across every nail feels playful and cottage-like. Medium almond nails give you the most room to paint a daisy cleanly, but the design also works on shorter nails if you keep the flowers small and limit them to one or two accent nails. A dotting tool makes the petals easy: five small dots arranged in a circle, with a tiny golden dot in the centre, are all a daisy needs.
This design works because it uses butter yellow’s natural association with sunshine and flowers without becoming a costume. It suits spring weddings, garden parties, and holidays, and it photographs beautifully in natural light. It also ages well through the week, because a small flower near the cuticle still looks charming even as the manicure grows out slightly.
Design Detail
Keep your daisies small and consistent, because one oversized flower among tiny ones will throw the whole manicure off. Practice on a nail wheel or a piece of paper first, and use the smallest dotting tool you have for the petals. If freehand painting feels intimidating, daisy nail stickers or a stamping plate will give you the same look with far less effort, and a glossy top coat will melt the sticker edges into the polish so they look painted on.
Choose white petals with a true golden centre rather than an orange one, because orange centres can clash with butter yellow’s soft warmth. A warm gold or deep butter centre keeps the palette harmonious and makes the daisies look like they belong on the yellow base rather than sitting on top of it.
4. Soft Matte Butter Yellow
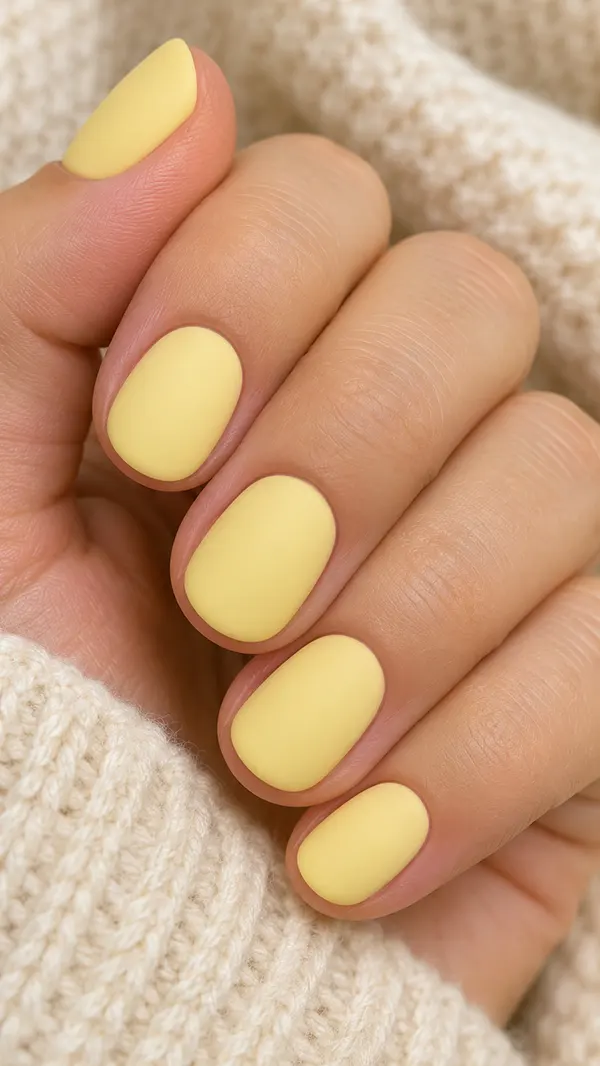
A soft, matte butter-yellow manicure takes the same sunny colour and gives it an entirely different personality. Without shine, butter yellow becomes powdery, velvety, and almost like suede, which makes it look surprisingly sophisticated. The matte finish softens the yellow further, so it reads less like a bright pastel and more like a muted, expensive neutral, and that is why this design appeals to people who love butter yellow but want it to feel grown-up.
Matte polish behaves differently from glossy polish, and it is worth knowing that before you choose it. Matte top coats show fingerprints and oils more readily, and they can look patchy if the base colour underneath is uneven. Two smooth, even coats of butter yellow are essential, and the matte top coat should be applied in one steady layer without going back over it, because reworking matte polish creates streaks. Short round nails suit this finish beautifully because the soft shape matches the soft texture.
This design works because contrast is interesting: a sunny colour with a quiet finish. It looks beautiful with knitwear, linen, and tailored neutrals, and it suits autumn and winter just as well as spring. If you usually find pastels too sweet, matte butter yellow might be the version that finally wins you over.
Finish Tip
Apply cuticle oil carefully with a matte manicure, because oil on a matte surface creates shiny patches that spoil the powdery effect. Use a small brush to apply oil only to the cuticles, and wipe any excess from the nail surface immediately. If your matte nails start to look shiny at the tips from daily wear, a fresh layer of matte top coat will restore the finish in minutes.
Matte manicures also tend to chip slightly faster than glossy ones because the matte top coat is less flexible. Protect your nails from water and harsh cleaning products by wearing gloves for housework, and keep a bottle of matte top coat at home for quick touch-ups between salon visits.
5. Butter Yellow Glazed Chrome
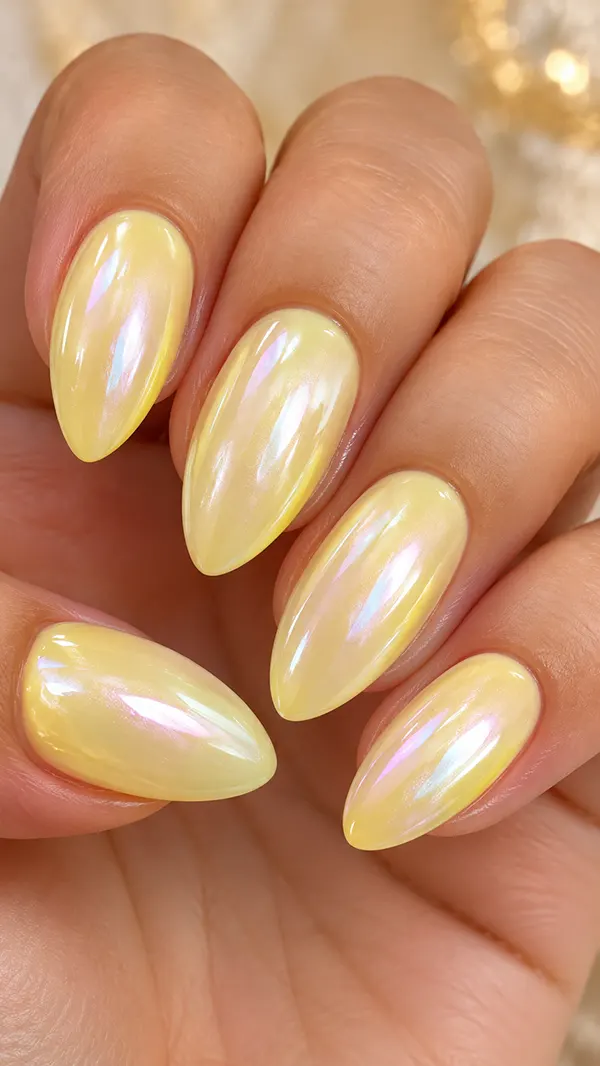
Butter yellow glazed chrome is the manicure that looks lit from within. A sheer chrome powder rubbed over a butter yellow base creates a pearly, opalescent glow, like sunlight through frosted glass. The colour stays recognisably butter yellow, but the finish adds a luminous depth that shifts as your hands move, which makes this design feel almost magical in person and exceptionally photogenic.
The technique matters more than the colour here. The chrome powder must be applied over a fully cured gel base, with no sticky layer left, or the powder will clump instead of smoothing into a mirror-like glaze. Your technician will rub the powder in with a sponge applicator, brush off the excess, and seal it with a gel top coat to lock the glow in place. Almond nails show off the glazed effect best because their curved surface catches the light from every angle, but the design works on any shape.
This design works because it turns a simple pastel into something that looks expensive and unusual. It suits weddings, parties, and anyone who loves the glazed doughnut trend but wants a colour with more warmth than milky white. It is also surprisingly versatile: the glow is subtle enough for daytime, but it comes alive in evening light.
Salon Advice
Ask specifically for a sheer, pearl chrome powder rather than a bold metallic chrome, because a strong chrome will overpower butter yellow and turn it gold. The goal is a translucent glaze that lets the yellow show through, not a mirror finish. If your salon offers different chrome powders, ask to see them over a butter yellow swatch before committing, since the same powder looks different over every base colour.
Glazed chrome lasts best as a gel manicure because regular polish cannot hold chrome powder properly. Expect to pay a little more than a standard manicure, and book a technician experienced with chrome, since the application is fussy and a rushed job will look patchy rather than pearly.
6. Butter Yellow with Gold Foil Accents
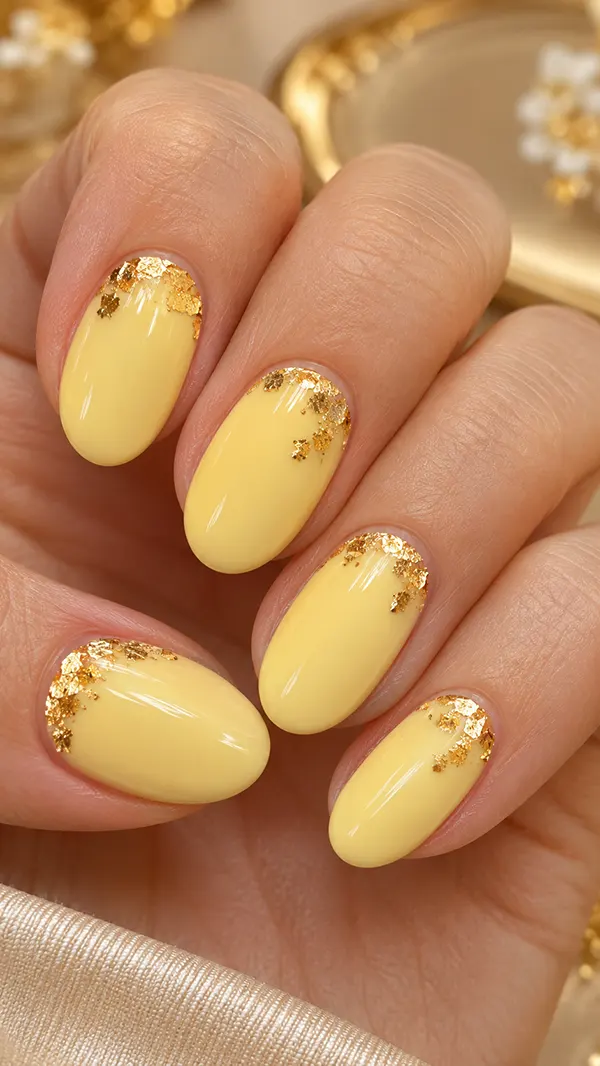
Butter yellow with gold foil accents is a small detail that makes a manicure feel like jewellery. Irregular flakes of gold foil pressed onto a butter-yellow base catch the light in unpredictable, beautiful ways, and because no two flakes land the same way, every nail looks slightly different. The effect is luxurious without being formal, like wearing a delicate gold bracelet that happens to be on your nails.
The application is forgiving, which is part of this design’s charm. The foil is pressed onto a tacky layer of polish or gel, then sealed under a glossy top coat, and it does not need to be precise to look good. A few flakes near the cuticle or scattered across one or two accent nails give you the luxe effect without overwhelming the butter yellow, while a full foil coverage on every nail feels more dramatic. Oval nails suit this design well because their soft shape matches the organic, irregular foil.
This design works because gold and butter yellow share a warm undertone, so they harmonise rather than compete. It suits celebrations, holidays, and evenings out, and it elevates a simple butter manicure into something that looks salon-expensive with very little extra effort. It is also one of the easiest butter yellow designs to recreate at home.
DIY Tip
Apply gold foil with tweezers rather than your fingers, because the flakes are thin and tear easily. Press them gently onto a still-tacky coat of polish, then seal with two layers of glossy top coat to smooth the foil edges and stop them from catching on fabric. If a flake lifts at the edge, a dab of top coat underneath it will glue it back down before your final seal.
Buy a small pot of gold foil flakes rather than pre-cut shapes, because irregular flakes look more organic and expensive than uniform pieces. A little goes a long way: start with two or three flakes per accent nail and add more only if the design still feels too plain.
7. Butter Yellow Polka Dots
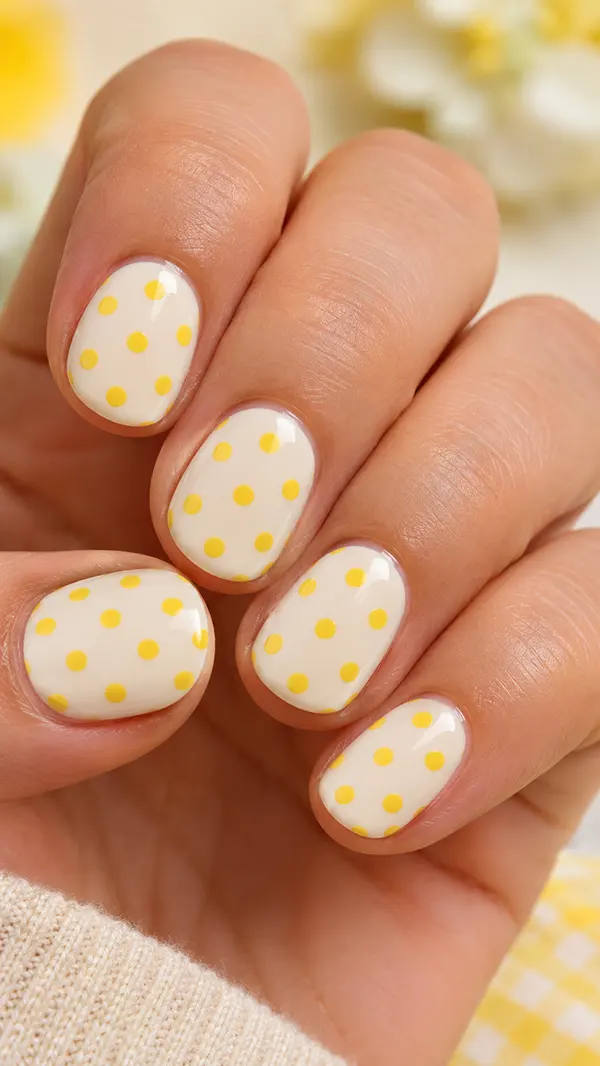
Butter yellow polka dots are pure retro charm. Butter dots scattered over a cream base, or cream dots over a butter base, create a playful, vintage pattern that feels like a summer dress or a picnic tablecloth. The dots are simple, but their regularity gives the manicure a crisp, graphic quality that stops it from feeling childish, and the butter-and-cream palette keeps it soft enough for adults.
A dotting tool is the secret to good polka dots. Random-sized dots look messy, while uniform dots look intentional, so use the same tool for every dot and reload it with polish regularly. Spacing matters too: evenly spaced dots in a grid feel classic, while scattered dots in different sizes feel more whimsical. Round nails suit this design beautifully because the curved shape echoes the round dots, and it works on any short- to medium-length nail.
This design works because it is cheerful without being loud. It suits holidays, summer parties, and anyone who loves vintage style, and it is one of the most forgiving nail art designs for beginners, since a dot is the easiest shape to paint. It also pairs wonderfully with gingham and floral prints in your wardrobe, because the palette is the same sunny family.
Why It Works
Polka dots work on butter yellow because the colour palette stays tonal: butter and cream are neighbours, not opposites, so the pattern reads as texture rather than contrast. That tonal quality is what keeps a playful pattern feeling chic. If you used black dots on butter yellow, the design would feel graphic and bold; butter dots on cream feel soft and pretty, which is a different mood entirely.
Keep the dots small on short nails and larger on longer nails, because proportion is what makes polka dots look refined. A dot that covers a third of a short nail will look clumsy, while the same dot on a longer nail looks balanced and intentional.
8. Butter Yellow and White Swirl Art
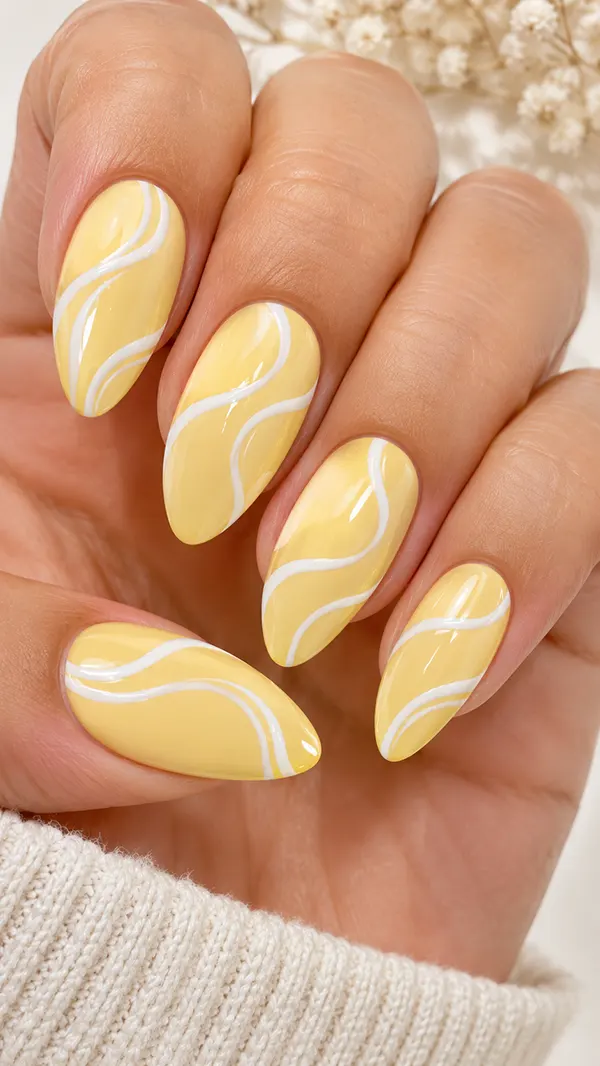
Butter-yellow-and-white swirl art is a modern, abstract way to wear this colour. Flowing white lines curve across a butter-yellow base like soft waves or ribbons, creating movement and artistry without any recognisable picture. The design feels contemporary and salon-fresh, and because every swirl is freehand, no two manicures ever look exactly alike.
Swirls are painted with a thin liner brush, and the key is confidence: a single flowing stroke looks far better than a hesitant, wobbly one. Practice the motion on paper first, and let the brush do the work rather than forcing it. Two or three swirls per nail is enough; more will tangle the design and lose the airy feeling. Almond nails give the swirls room to flow, and the elongated shape makes the curves look even more graceful.
This design works because it combines butter yellow’s softness with white’s crispness in a way that feels artistic rather than decorative. It suits people who love abstract nail art, modern interiors, and contemporary fashion, and it is a wonderful choice if you want nail art that looks like it belongs in a gallery rather than a greeting card. It also grows out gracefully, since the swirls distract from the regrowth line.
Design Detail
Use a highly pigmented white polish for the swirls, because a sheer white will disappear into the butter yellow instead of standing out. A gel liner or a nail art polish with a thin brush will give you far more control than a regular polish brush and keep the lines crisp rather than blobby. Seal with a glossy top coat to smooth the swirl edges and give the design a polished, finished feel.
If you are new to freehand art, start with one swirl per nail on two accent nails and keep the rest plain butter yellow. That gives you the artistic effect without the pressure of painting ten matching designs, and it looks just as intentional as a full set.
9. Butter Yellow Color-Block with Cream
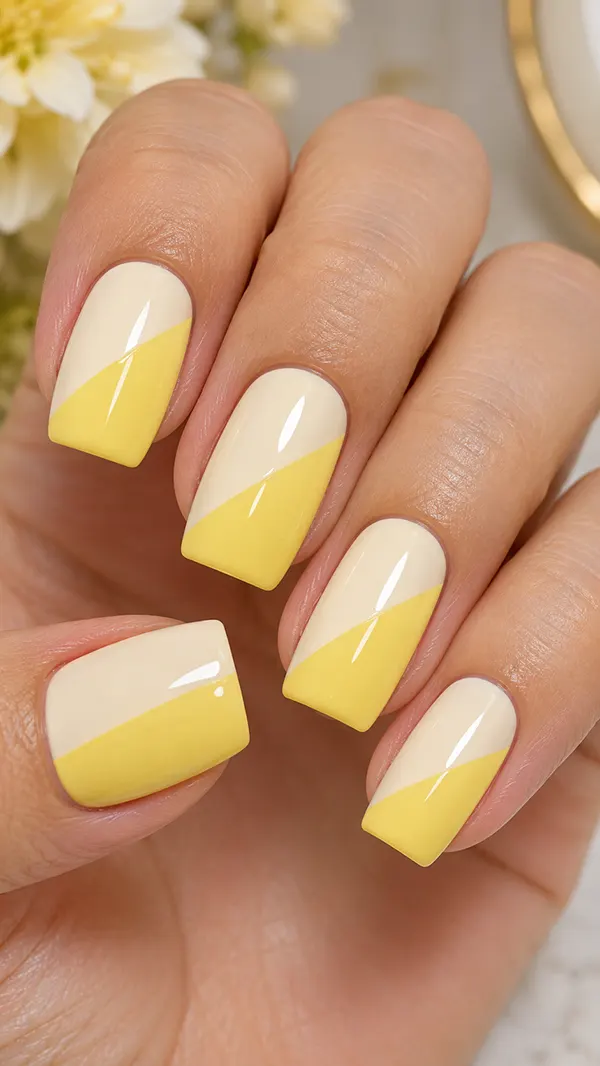
Butter yellow colour-block with cream is a graphic, architectural way to wear pastel. A clean diagonal or horizontal division splits each nail into a butter yellow section and a cream section, creating a crisp, modern design that looks like it belongs in a design magazine. The two colours are close enough to harmonise but different enough to create a clear, intentional division, which is what makes colour-blocking work.
Precision is everything here. Use striping tape or a steady hand with a flat brush to create the division, and let the first colour dry completely before painting the second, or the boundary will bleed. A diagonal block feels dynamic and modern, while a horizontal block feels calm and classic, so choose the angle that matches your mood. Square nails suit this design particularly well because their straight edges echo the geometric division.
This design works because it proves pastels can be graphic and grown-up. It suits people who love clean lines, minimal fashion, and contemporary style, and it is a strong choice for work, where it looks polished without being distracting. It also lets you wear two pastels at once without the design feeling sweet or busy.
Manicure Tip
Apply a thin layer of top coat between the two colour sections if you are painting freehand, because it seals the first colour and stops the second from dragging it. Once both sections are dry, finish with a generous glossy top coat, which levels the slight ridge where the colours meet and makes the division look sharp rather than stepped.
If striping tape feels fiddly, a French manicure guide sticker placed diagonally across the nail will give you the same clean line with far less effort. Press the guide down firmly so polish cannot seep underneath, and remove it while the second colour is still slightly damp for the crispest edge.
10. Butter Yellow Glitter Gradient
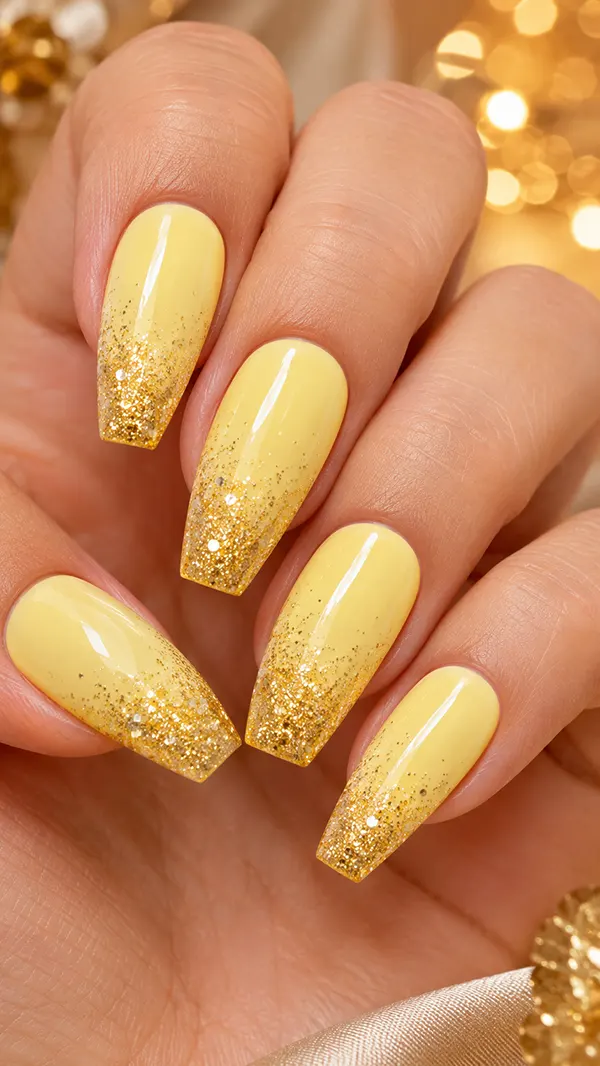
A butter-yellow glitter gradient is the festive version of this colour. Fine gold or champagne glitter fades from the tip of the nail down toward the cuticle, or from the cuticle upward, creating a sparkling ombre that catches the light with every movement. The butter-yellow base keeps the glitter soft and warm, so the design feels celebratory rather than garish, and the gradient concentrates the sparkle where it matters most.
The gradient is built by sponging or dabbing glitter polish onto the nail, starting dense at one end and fading toward the other. A makeup sponge gives you the most control: dab the glitter onto the tip, then press lighter and lighter as you move down the nail, until the glitter disappears into the butter base. Coffin nails show off a gradient beautifully because their length gives the fade room to develop, but the design works on any medium- to long-length nail.
This design works because it combines two things people love about manicures: a pretty pastel and a touch of sparkle. It suits parties, holidays, weddings, and New Year celebrations, and it is forgiving to wear because glitter hides chips and regrowth far better than a plain colour. It also photographs beautifully, which makes it a favourite for special occasions.
Finish Tip
Seal a glitter gradient with two layers of glossy top coat, because glitter polish is textured and a single top coat won’t fully smooth it. The first layer locks the glitter in place, and the second creates a glass-like surface that lets the sparkle shine through without feeling rough. Reapply top coat every few days to keep the gradient smooth and prevent the glitter from catching on fabric.
Remove glitter polish with the foil method rather than scrubbing, because scrubbing damages the nail surface. Soak a cotton pad in remover, place it on the nail, wrap it in foil, and wait ten minutes: the glitter will lift off cleanly without harsh rubbing.
Related Reading: 20 Stunning Burgundy Nail Ideas for a Luxurious Look
11. Butter Yellow Lemon Slice Accent
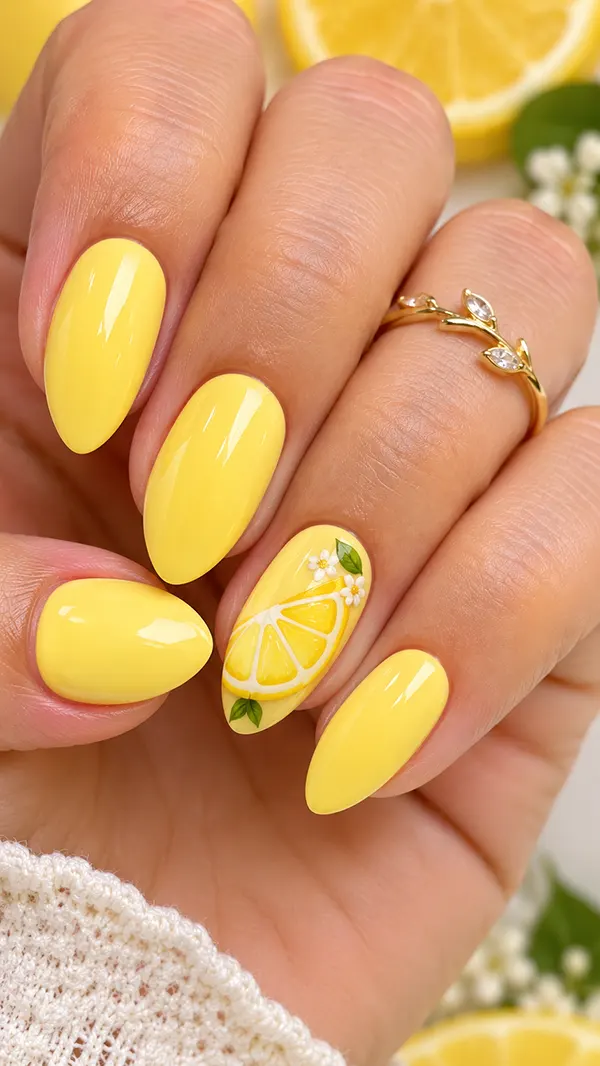
A butter-yellow lemon-slice accent is the most summery design in this collection, and it is impossible not to smile at it. One or two nails feature a hand-painted lemon slice—a pale yellow circle with white pith lines and tiny segments—while the remaining nails stay plain butter yellow. The lemon ties the whole manicure to its colour story, because the fruit and the polish share the same sunny family.
Painting a lemon slice is simpler than it looks. Start with a pale yellow circle, add a thin white ring just inside the edge, then paint fine white lines radiating from the centre to create the segments. Keep the slice small and place it near the tip or in a corner, so it reads as an accent rather than a picture. Almond nails give you the most room for the detail, but a lemon slice also works on medium round nails if you keep it compact.
This design works because it is literal in the best way: butter yellow is already a citrus-adjacent colour, so a lemon accent feels like a natural extension rather than a random decoration. It suits summer holidays, garden parties, and anyone who loves fruit-inspired nail art, and it is a wonderful conversation starter. It also keeps the manicure wearable, because only one or two nails carry the art while the rest stay simple.
Design Detail
Use a pale, almost white-yellow for the lemon flesh rather than the same butter yellow as your base, so the slice stands out from the background. If the lemon and the base are the same shade, the design will disappear. A white pith ring and fine white segment lines give the slice its definition, and a glossy top coat makes it look juicy and fresh.
If freehand lemons feel daunting, a lemon nail sticker or a water decal will give you the same result with far less practice. Place the decal on a fully dry butter base, press out any air bubbles with a silicone tool, and seal with two layers of top coat so the edges disappear.
12. Butter Yellow and Sage Botanical
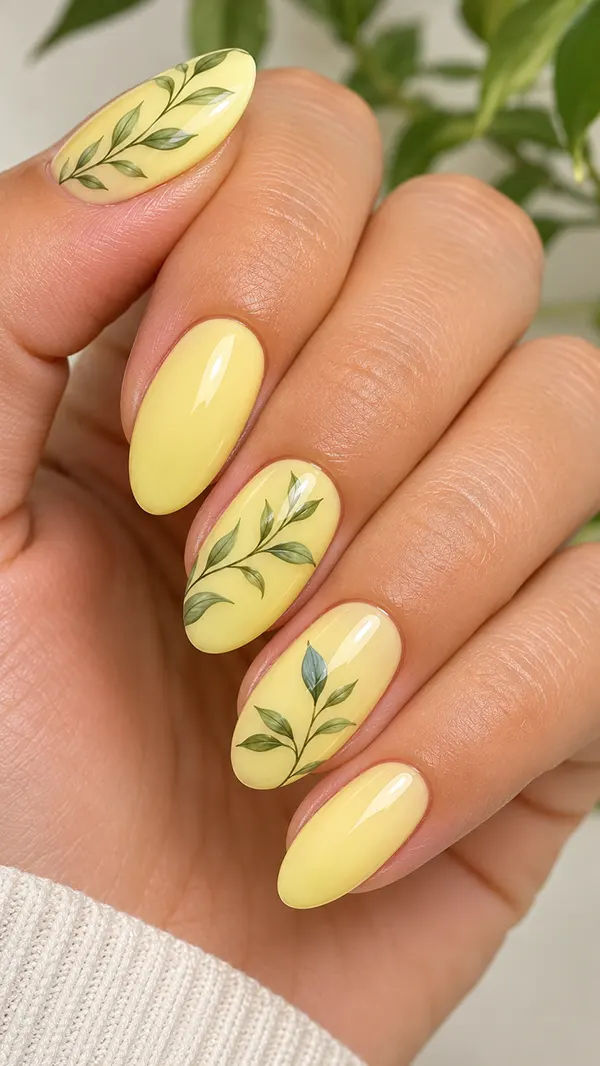
Butter yellow and sage botanical nails pair sunshine with greenery, creating a garden-in-spring feel. Delicate sage green leaves and tiny stems are painted over a butter yellow base, sometimes with a few sage accent nails mixed in, creating a design that is fresh, natural, and quietly artistic. The sage softens the yellow, and the yellow warms the sage, so neither colour dominates.
Botanical painting rewards a light hand. A thin liner brush and a muted sage green—not a bright mint—will give you leaves that look elegant rather than cartoonish. Paint two or three leaves per accent nail, varying their size and direction, and leave plenty of butter yellow showing, because the negative space is part of the design’s beauty. Oval nails suit botanical art well because their soft shape matches the organic leaves.
This design works because it borrows from nature without copying it literally. It suits spring weddings, outdoor events, and anyone who loves botanical prints in fashion, and it feels more refined than a floral design because the palette stays muted. It also works beautifully with gold jewellery and linen clothing, which share a natural, earthy feel.
Color Note
Choose a sage green with a grey undertone rather than a bright or blue-green, because a muted sage harmonises with butter yellow’s warmth while a bright green will clash with it. Test the two colours together on a nail wheel before painting your full manicure, and adjust the sage until it feels like a companion to the yellow rather than a competitor.
If you want to add a third colour, cream is the safest choice, because it bridges butter yellow and sage without introducing a new temperature. A cream accent nail or a cream leaf vein will tie the palette together and stop the design from feeling like two separate colours.
13. Butter Yellow Half-Moon Manicure
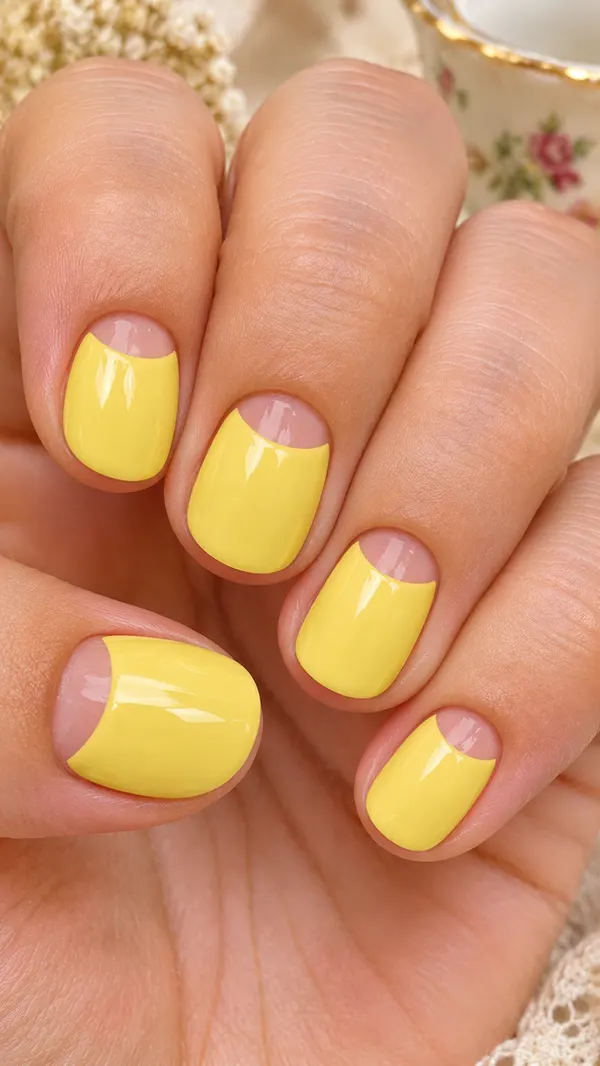
The butter yellow half-moon manicure is a vintage design with a modern twist. The half-moon at the base of the nail is left bare or painted in a contrasting shade, while the rest of the nail is butter yellow, creating a crescent shape that frames the cuticle beautifully. This design has been popular since the 1920s, and it still feels fresh today because the crescent shape is both decorative and flattering.
There are two ways to wear it. A bare half-moon, where your natural nail shows through at the base, feels airy and modern, and it has the practical advantage of hiding regrowth, since the new nail blends into the bare crescent. A contrasting half-moon, in cream, gold, or white, feels more decorative and vintage. Round nails suit the half-moon best because the crescent echoes the natural curve of the cuticle, but the design works on any shape if the moon is sized proportionally.
This design works because it draws the eye to the base of the nail, which makes fingers look longer and nails look more elegant. It suits people who love vintage style, classic fashion, and refined details, and it is a wonderful choice for anyone who wants nail art that feels special without being obvious from across the room.
Salon Advice
Ask your technician to use a half-moon guide sticker or a French manicure stencil to create the crescent, because a freehand half-moon is difficult to make symmetrical across ten nails. The guide ensures that each crescent is the same size and curve, which makes the design look professional rather than homemade. Check the size against your cuticle shape before they start, since a moon that is too large will overwhelm a short nail.
If you choose a bare half-moon, ask for a ridge-filling base coat over the whole nail first, because the bare crescent will show every ridge and imperfection. A smooth base makes the natural nail look polished even where it is unpainted, and a glossy top coat over the entire nail ties the bare and painted sections together.
14. Butter Yellow Negative Space
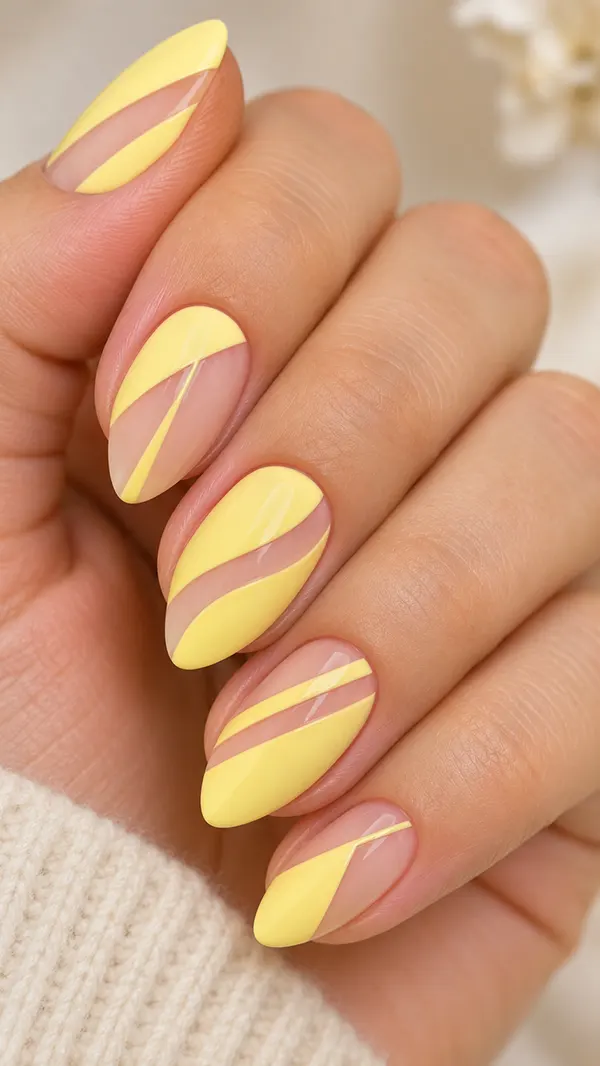
Butter-yellow negative-space nails are the most modern design in this collection. Sections of the nail are left bare, showing your natural nail through geometric shapes, stripes, or abstract cut-outs, while butter yellow fills the remaining space. The result feels airy, architectural, and fashion-forward, like a manicure designed by someone who loves negative space in art and interiors.
The design works best when the butter yellow is bold, and the bare sections are clean. A diagonal stripe of bare nail across a butter base, a bare triangle at the tip, or a butter crescent floating on a bare nail all create striking contrast without any additional colour. Almond nails suit negative space well because their length gives you room to create shapes, but the design also works on short nails if you keep the shapes simple and large.
This design works because it uses restraint as decoration. The bare nail is not unfinished; it is part of the pattern, and that distinction is what makes negative space feel modern rather than incomplete. It suits people who love minimal fashion, contemporary art, and clean lines, and it is surprisingly practical because regrowth blends into the bare sections and the design stays looking fresh longer than a full-colour manicure.
Why It Works
Negative space works on butter yellow because the colour is soft enough that the contrast with bare nails feels gentle rather than harsh. A black negative-space design can feel graphic and severe, but butter yellow against a natural nail feels light and breathable. That softness is what makes this design wearable every day rather than only for fashion events.
Keep the bare sections large and simple, because tiny bare details will look like mistakes rather than intentional design. One clear shape per nail—whether a stripe, a triangle, or a crescent—is more striking than several small cut-outs competing for attention.
15. Butter Yellow Micro-French with a Gold Line
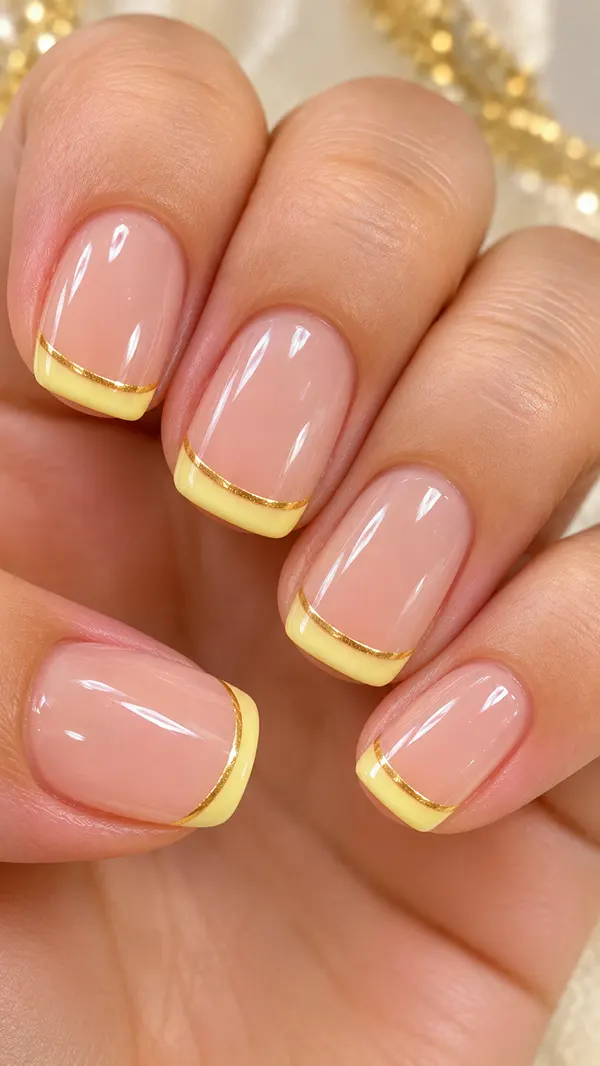
A butter-yellow micro-French with a gold line is jewellery for your nails. The tip is painted in a whisper-thin line of butter yellow, far narrower than a classic French tip, and a fine gold line traces just beneath it, separating the tip from the nude base. The effect is delicate, precise, and quietly luxurious, like the difference between a simple gold band and a band with a tiny diamond.
This design lives or dies on precision. The butter line should be no more than a millimetre or two wide, and the gold line should be even finer, painted with a striping brush or a metallic liner. Short square nails suit this design beautifully because the straight tip gives the thin lines a clean edge to follow, and they work on any short-to-medium shape. The nude base should closely match your natural nail, so the thin lines stand out without a harsh boundary.
This design works because it takes two classic ideas—the French tip and gold detailing—and refines them to their most delicate form. It suits weddings, formal events, and anyone who loves fine jewellery, and it is the butter yellow design most likely to earn compliments from people who notice details. It also suits shorter nails perfectly, because the thin lines do not overwhelm a smaller nail.
Design Detail
Use a metallic gold liner polish rather than gold glitter for the line, because glitter will look textured and uneven at such a fine width. A smooth metallic liner gives you a clean, continuous gold line that reads as jewellery rather than decoration. Apply the gold line after the butter tip has dried completely, and seal with a glossy top coat to protect both lines from chipping.
If freehand lines feel too precise, a striping tape guide will help you paint a straight line with a butter tip, and a gold nail art pen will give you a controlled, even line. Practice on one nail first, and if the line wobbles slightly, a second thin layer of top coat will smooth it visually.
16. Butter Yellow Pastel Skittle Mix
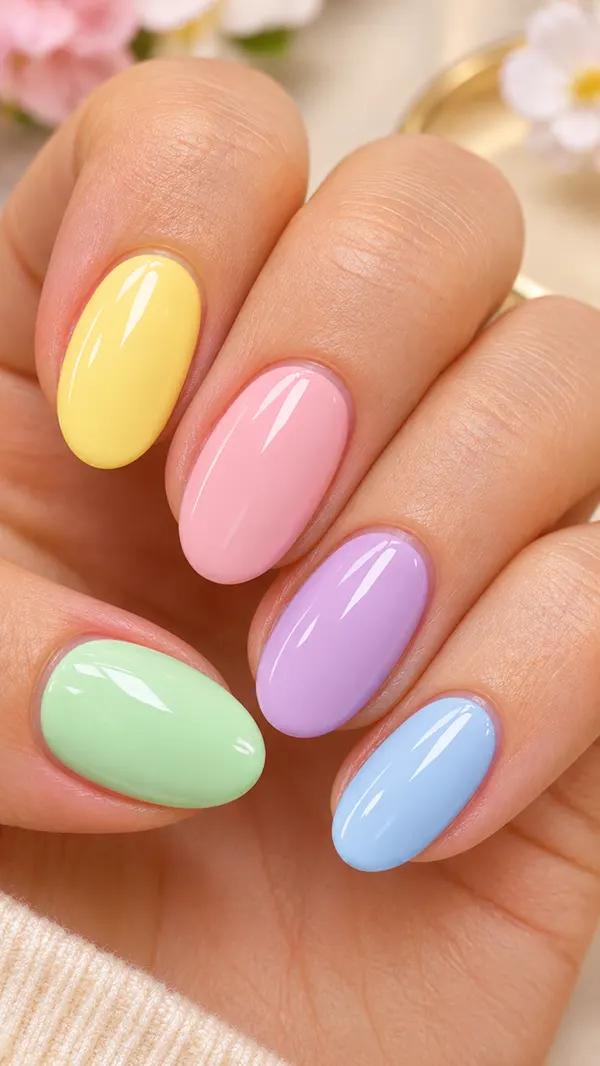
A butter-yellow pastel Skittle mix is the happiest design in this collection. Each nail is painted a different pastel—butter yellow, blush pink, lilac, mint, and baby blue—creating a rainbow of soft colours that feels like a box of macarons. Butter yellow anchors the mix because its warmth balances the cooler pastels, and the overall effect is cheerful, fresh, and impossible to feel bored by.
The key to a good skittle manicure is choosing pastels with the same intensity. If one colour is much brighter or paler than the rest, it will stick out and break the harmony. All five pastels should feel like they belong to the same family: soft, creamy, and muted. Oval nails suit a skittle mix well because their soft shape matches the soft palette, but the design works on any shape and length. Keep the finish glossy across all nails, so the colours look cohesive rather than mismatched.
This design works because it lets you wear five colours at once without the manicure feeling chaotic. It suits spring, summer, holidays, and anyone who loves colour but finds a single bright shade too much. It is also a wonderful way to try butter yellow if you are not sure it suits you, as it pairs well with colours you already love.
Color Note
Place butter yellow on your ring finger or middle finger, where it will be most visible, and arrange the remaining pastels so that warm and cool colours alternate rather than clustering together. Alternating warm butter yellow and blush pink with cool lilac, mint, and blue creates a balanced rhythm across the hand, while grouping all the warm colours on one side will make the manicure feel lopsided.
If five pastels feel like too many, a three-colour skittle in butter yellow, blush pink, and lilac is just as pretty and slightly more refined. The principle is the same: soft, creamy pastels at the same intensity, with butter yellow as the warm anchor.
17. Butter Yellow Gingham Check
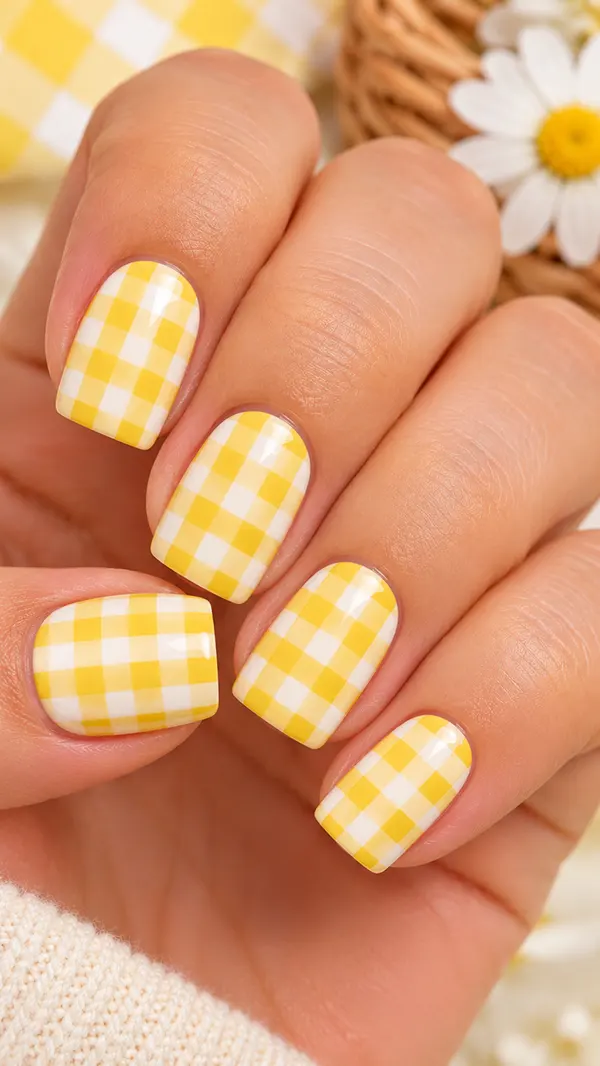
Butter-yellow gingham-check nails are picnic-chic in manicure form. A fine white-and-butter-yellow checked pattern, like a gingham tablecloth, covers the nails in a crisp, retro grid that feels both nostalgic and fresh. The pattern is graphic, but the butter palette keeps it soft, so it reads as charming rather than loud, and it pairs perfectly with summer dresses, denim, and white linen.
Gingham is painted by layering: a butter-yellow base, then white stripes in one direction, then white stripes in the other, with a second layer of translucent butter over the intersections to create the checked effect. It sounds complicated, but striping tape and a steady hand make it achievable, and the pattern is forgiving, because small imperfections read as handmade charm rather than mistakes. Square nails suit gingham well because their straight edges echo the grid, but the design works on any medium length.
This design works because it borrows a beloved fabric pattern and translates it to nails, which makes it feel both familiar and surprising. It suits summer picnics, garden parties, country weddings, and anyone who loves retro style, and it is a wonderful choice if you want nail art that feels like an outfit rather than a decoration.
DIY Tip
Use striping tape to create the gingham grid, because freehand straight lines across ten nails are difficult to keep even. Paint your butter base and let it dry completely, then apply thin strips of tape in one direction, paint white over the exposed sections, remove the tape, and repeat in the other direction. A final layer of sheer butter polish over the whole nail will soften the grid into a true gingham check.
Work one nail at a time and let each layer dry before adding the next, because wet layers will smudge the grid. It takes patience, but the result is worth it, and a glossy top coat at the end will smooth the layers into a single, polished surface.
You May Also Love: 20 Pink Nail Designs for a Pretty and Feminine Look
18. Butter Yellow with Pearls and a Bow
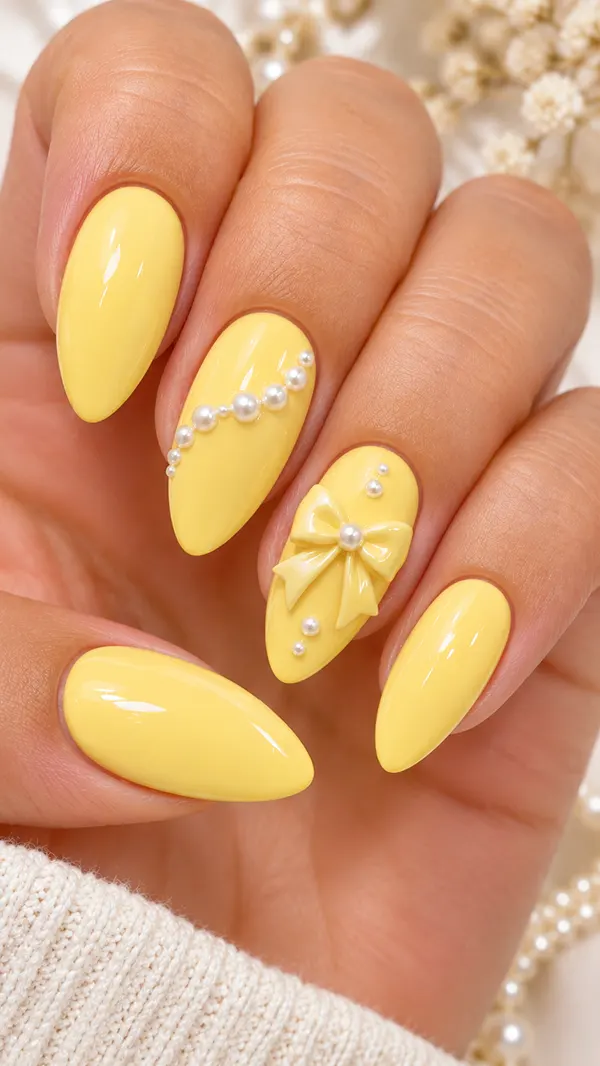
Butter yellow with pearls and a bow is the most romantic design in this collection, and it is made for special occasions. Tiny pearl studs scattered across butter-yellow nails, with a small 3D bow on one accent nail, create a manicure that feels like a celebration. The pearls add a soft, luminous texture; the bow adds a playful, feminine detail; and the butter-yellow base keeps the whole design sweet rather than saccharine.
3D nail art needs careful application to last. Pearls and bows are attached with nail glue or embedded in a thick layer of gel, then sealed around the edges with top coat, but never covered completely, or they will lose their dimension. Place the bow on the ring finger, where it will be most visible, and scatter three or four pearls on the remaining nails, varying their size slightly for a natural, organic feel. Almond nails suit this design best because their shape gives the 3D elements room to sit without overwhelming the nail.
This design works because it combines butter yellow’s softness with textures that catch the light in different ways: the matte pearl, the glossy bow, and the creamy base. It suits weddings, bridal showers, anniversaries, and any occasion where you want your nails to feel like part of your outfit rather than an afterthought. It is also a design that photographs beautifully, which matters for events you will remember.
Wear It For
Save this design for special occasions rather than everyday wear, because 3D elements catch on fabric and hair and need more care than a flat manicure. If you wear it to a wedding or a party, apply an extra layer of top coat around the base of each pearl and bow before you leave, and carry a small tube of nail glue in your bag for emergency repairs. With that preparation, the design will survive a full evening of celebrating.
For a more wearable version, skip the bow and keep only the pearls, or use flat pearl decals instead of 3D studs. You will keep the romantic, luminous feeling with far less maintenance, and the manicure will last several days longer.
Choosing the Right Butter Yellow Design for Your Personal Style
The best butter yellow design is the one that fits your nails, your skin, your lifestyle, and your taste—not the one that looks best in a photograph. Use the table below to narrow your eighteen options down to the few that will actually work for you.
| Situation | Recommended Choice | Why It Works |
| Short nails, low maintenance | Classic glossy, matte, or micro-French | Simple designs chip less and grow out gracefully |
| Long nails, love nail art | Glazed chrome, glitter gradient, swirls | Length gives art room to develop |
| Warm or olive skin | Classic butter, gold foil, lemon accent | Warm gold undertones harmonise with skin |
| Cool skin | Milky butter, daisy florals, pearl accents | Softer, milkier butter flatters cool tones |
| Work or formal events | French tips, half-moon, micro-French | Refined designs suit professional settings |
| Weddings and parties | Pearls and bow, glitter gradient, glazed chrome | Festive finishes suit celebrations |
| Love vintage style | Polka dots, gingham, half-moon | Retro patterns feel nostalgic and chic |
| Prefer minimalist style | Classic glossy, matte, negative space | Clean designs let the colour speak |
| Want something playful | Daisies, lemons, Skittle mix | Cheerful designs suit holidays and summer |
| DIY at home | Classic glossy, polka dots, gold foil | Forgiving techniques suit beginners |
Skin tone deserves a special note because butter yellow’s warmth interacts with it directly. If your skin has warm or golden undertones, a golden butter yellow will look like it belongs on your hands. If your skin has cool or pink undertones, a milkier, paler butter yellow will flatter you more. Neither is wrong; the right butter yellow is the one that makes your hands look healthy and bright rather than washed out or clashing.
Occasion and maintenance should honestly shape your choice. A 3D pearl-and-bow design is beautiful for a wedding, but it will frustrate you if you type all day or wash dishes without gloves. A classic glossy manicure is less exciting in a photograph, but it will still look good on day seven. Choose the design that fits the week you are actually living in, not the week you wish you were living in.
How to Recreate These Butter Yellow Manicure Designs
Whether you visit a salon or paint your nails at home, the same foundation makes every butter yellow design look better. Follow these steps, and adapt them to the specific design you have chosen.
- Prepare your nails properly. Remove old polish completely, file your nails in one direction rather than sawing back and forth, and gently push back your cuticles after a shower or warm soak. Do not cut your cuticles, because that invites infection and ragged regrowth. A smooth, even nail shape is the foundation of every design in this guide.
- Apply a base coat. Use a ridge-filling base coat if your nails are uneven, or a strengthening base coat if they are weak or peeling. Let the base coat dry completely before moving on, because a tacky base will drag the colour and create streaks, which pastel yellows show more than darker shades.
- Apply butter yellow in thin coats. Two thin coats are better than one thick coat, and three thin coats are better than two thick ones if your polish is sheer. Let each coat dry for at least a minute before adding the next, and cap the free edge of the nail with polish to reduce chipping.
- Add your design. Paint your art, apply your foil, place your pearls, or add your glitter gradient while the base is dry but the design layer is workable. For freehand art, use a liner brush and practice the motion first. For stickers or decals, press them down firmly and smooth out any air bubbles before sealing.
- Seal with a top coat. Apply a generous layer of top coat, or two layers for glitter and 3D designs, and cap the free edge again. A glossy top coat suits most butter yellow designs, while a matte top coat creates a powdery finish for the matte design. Let the top coat dry completely before using your hands.
- Finish and protect. Apply cuticle oil to the skin around your nails, being careful to keep it off the matte finish, and avoid water, cleaning products, and harsh chemicals for at least an hour after painting. Wear gloves when doing housework, and reapply the top coat every two to three days to extend the life of your manicure.
If you are visiting a salon, bring a reference photo of the exact design you want, and tell your technician your nail shape, length, and any allergies or sensitivities. A good technician will advise you if a design needs longer nails than you have, or if a technique like chrome requires gel rather than regular polish. That conversation is part of getting the manicure you actually want.
Making Your Manicure Last Longer
A butter-yellow manicure deserves to last, and a few realistic habits will keep it looking fresh for a full week or more. The first habit is protection: wear gloves for washing dishes, cleaning, and gardening, because water and chemicals are the fastest way to dull a pastel and lift polish from the nail edge. It sounds simple, but it makes more of a difference than any expensive top coat.
The second habit is a regular top coat. Reapply a thin layer of top coat every two to three days, capping the free edge each time, and your manicure will stay glossy and chip-resistant far longer. This is especially important for butter yellow, because chips show more clearly on a pale colour than on a dark one, and a fresh top coat seals small chips before they spread.
The third habit is cuticle care. Apply cuticle oil daily, massaging it into the skin around your nails, because hydrated cuticles look neat and prevent the ragged edges that make a manicure look old. Keep your nails at a consistent length by filing rather than clipping, which is gentler on the nail, and avoid using your nails as tools to open cans, scrape labels, or pick at things.
If a chip does appear, do not peel the polish off, because that damages the nail surface and makes the next manicure worse. Instead, dab a small amount of butter yellow onto the chip with a fine brush, seal it with top coat, and the repair will be nearly invisible. For gel manicures, visit your salon for a repair rather than attempting it at home, since gel requires proper curing.
Building Your Own Butter Yellow Manicure Formula
With eighteen designs behind you, the most useful thing you can do is build a personal formula you can return to again and again. Start with your base: the butter-yellow shade that flatters your skin, whether golden or milky. Then choose your shape: the nail shape that suits your hands and lifestyle, whether short oval, almond, or square. Then choose your finish: glossy for everyday freshness, matte for sophistication, or chrome for occasions.
Next, choose your detail level. If you love minimalism, stop at the base and finish, and let the colour speak. If you love art, add one detail—a daisy, a gold line, a foil flake, or a swirl—and keep the rest of the nails plain. If you love statement nails, choose one accent nail for your boldest detail and keep the remaining nails simple, so the statement has room to shine.
That formula —shape plus finish plus one detail — will create a butter-yellow manicure for every occasion in your life. Change the detail with the season, change the finish with the event, and keep the base and shape that you know suit you. Over time, you will develop a signature butter yellow look that people recognise as yours, and that is far more chic than chasing every new design.
Butter yellow is not a trend that demands you reinvent yourself. It is a colour that invites you to play gently with finishes, patterns, and details until you find the version that feels like you. Start with the classic, then try a daisy or a gold line, and let your manicure evolve from there.
Frequently Asked Questions
Does butter yellow suit all skin tones?
Butter yellow suits most skin tones, but the undertone matters. A golden, butter-yellow flatters warm and olive skin beautifully, while a milkier, paler butter-yellow suits cool skin better. If a butter yellow has ever looked harsh on you, try a different undertone rather than giving up on the colour family. Hold a few swatches against your hand in natural light, and choose the one that makes your skin look bright and healthy rather than washed out.
Is butter yellow a spring colour only?
Butter yellow is most associated with spring, but it works all year. In summer, it pairs with lemons, gingham, and daisies for a fresh, holiday feeling. In autumn, a matte butter yellow looks soft and sophisticated with knitwear. In winter, butter yellow with gold foil or glitter feels festive and warm. The colour adapts to the season through its finish and its accompanying designs, so you do not need to retire it when spring ends.
What nail shape works best for butter yellow nail ideas?
Short oval nails are the most versatile shape for butter yellow because they look neat, practical, and flattering on most hands. Almond nails give butter yellow a more elegant, elongated feeling, and they provide room for detailed art like daisies and swirls. Square nails suit graphic designs like colour-blocking and gingham. The best shape is the one that suits your hands and lifestyle, because butter yellow looks good on every shape when the colour and finish are right.
How do I stop butter yellow polish from looking streaky?
Apply butter yellow in thin coats rather than one thick coat, because pastel yellows streak when applied heavily. Use a ridge-filling base coat to create a smooth canvas, let each coat dry for at least a minute before adding the next, and finish with a glossy top coat to even out the surface. Two or three thin coats will give you a creamy, opaque result, while a single thick coat will almost always look patchy.
Can I wear butter yellow nails to work?
Absolutely, and butter yellow is one of the most work-appropriate pastels you can choose. A classic glossy butter manicure, a butter French tip, or a matte butter design all look polished and professional without being distracting. If your workplace is conservative, choose a shorter length, a simple design, and a glossy or matte finish rather than glitter or 3D accents, and your butter yellow manicure will fit any professional setting.
How long does a butter yellow manicure last?
A regular polish butter yellow manicure typically lasts five to seven days with proper care, while a gel version lasts two weeks or more. Butter yellow shows chips more clearly than darker colours, so reapply top coat every two to three days, wear gloves for housework, and avoid using your nails as tools. If a chip appears, dab a small amount of polish onto it and seal with top coat for a nearly invisible repair.
What colours pair best with butter yellow nails?
Butter yellow pairs beautifully with cream, white, sage green, blush pink, lilac, and gold, all of which appear in the designs in this guide. For clothing, butter-yellow nails look lovely with white linen, denim, beige, navy, and soft floral prints because the warm pastel complements neutrals without competing with them. Gold jewellery is the natural partner for butter yellow nails, since both share a warm, sunny undertone.