
The first time I wore almond-shaped nails, a stranger on the train asked if my hands were always this long. They were my own nails, filed into a soft oval with a gentle point, and the shape alone made my fingers look slimmer and more graceful. That small compliment convinced me that shape deserves as much attention as color.
That is why almond nail designs keep appearing in salon menus and Pinterest boards. The tapered tip lengthens the finger, the rounded sides feel comfortable, and the shape works with almost every color and finish. A plain milky pink looks elegant on an almond nail, and a detailed floral design looks even more artistic.
Many people hesitate because they worry about maintenance. Almond nails can feel long; they can snag, and their pointed tips need careful filing. I have had all those worries, and I learned that a slightly shorter almond with a rounded tip is strong, comfortable, and easy to wear every day. You can choose the length that fits your life.
In this guide, I share 23 almond nail designs, including soft, minimal looks; French tips; classic colors; chrome and glitter; floral art; and bold seasonal ideas. For each one, you will find the base color, the finish, the best length, and a clear way to recreate it at home or ask for it at the salon.
Read the first sections to understand what makes this shape so flattering. Then save your favorites and use the steps near the end to keep your manicure fresh.
Understanding the Beauty of Almond Nail Designs
An almond nail has narrow sides that taper gently toward a softly rounded tip, like the nut it is named after. The shape follows the cuticle’s natural curve, so it looks natural even when the nails are long. This is why almond nail designs suit both minimalist and elaborate manicures.
Color works differently on an almond canvas. Pale shades such as milky white and sheer pink look soft and clean, while deep colors like burgundy and navy look rich and polished. The tapered tip also gives gradients, French tips, and chrome finishes more room to show their lines.
Here are the elements that shape the final look:
- Length: Short almonds look neat and practical, medium almonds look balanced, and long almonds look dramatic
- Base color: Sheer, milky, deep, or metallic bases change the mood completely
- Finish: Glossy looks fresh, matte looks velvety, chrome looks futuristic, and jelly looks glassy
- Details: Lines, dots, flowers, and foil add personality
- Level of design: Minimal looks stay quiet, while layered art makes a statement
Undertone matters too. Warm skin glows in peach, caramel, and gold. Cool skin looks bright in lilac, berry, and silver. Neutral skin carries both groups well. I swatch one nail before I commit to a full set.
Prep matters more on almond nails than on square ones. The tapered shape shows uneven filing quickly, so I always shape every nail to the same length and curve. That small step makes almond nail designs look professional.
Quick Comparison of the Almond Design Directions
Use this table to find the direction that fits your mood, then jump to the full designs.
| Design Direction | Base Color | Finish | Best Length | Overall Look |
| Soft and minimal | Milky white, sheer nude, baby pink | Glossy or jelly | Short to medium | Clean, quiet, and easy to wear |
| French tip variations | Sheer pink or nude with white or colored tips | Glossy | Medium to long | Classic with a modern twist |
| Elegant classic colors | Mocha, burgundy, champagne, navy | Cream or pearl | Medium | Rich, polished, and timeless |
| Chrome, foil, and glitter | Pearl, gold, rose, or sheer | Mirror, foil, or sparkle | Medium to long | Glamorous and eye-catching |
| Floral and artistic details | Pale pastel or nude | Glossy with fine lines | Medium to long | Artistic, romantic, and soft |
| Bold seasonal designs | Terracotta, red, icy blue | Matte or glossy | Short to medium | Mood-driven and expressive |
Soft and Minimal Almond Nail Designs for Everyday Wear
If you want a manicure that looks expensive without any complicated art, start here. Soft shades on an almond canvas feel clean and quiet, and they pair with almost every outfit I own. These four looks also grow out gracefully, so you can wear them for a week or more without a visible gap.
Thin coats matter most with sheer and milky polish. I apply three light layers and wait two minutes between each. That patience gives a smooth, glassy surface that looks like a salon gel set.
These designs suit short, medium, and long lengths. A short almond looks tidy and practical, while a long almond looks graceful and elegant. Choose the length you can live with.
1. Milky White Almond Nails
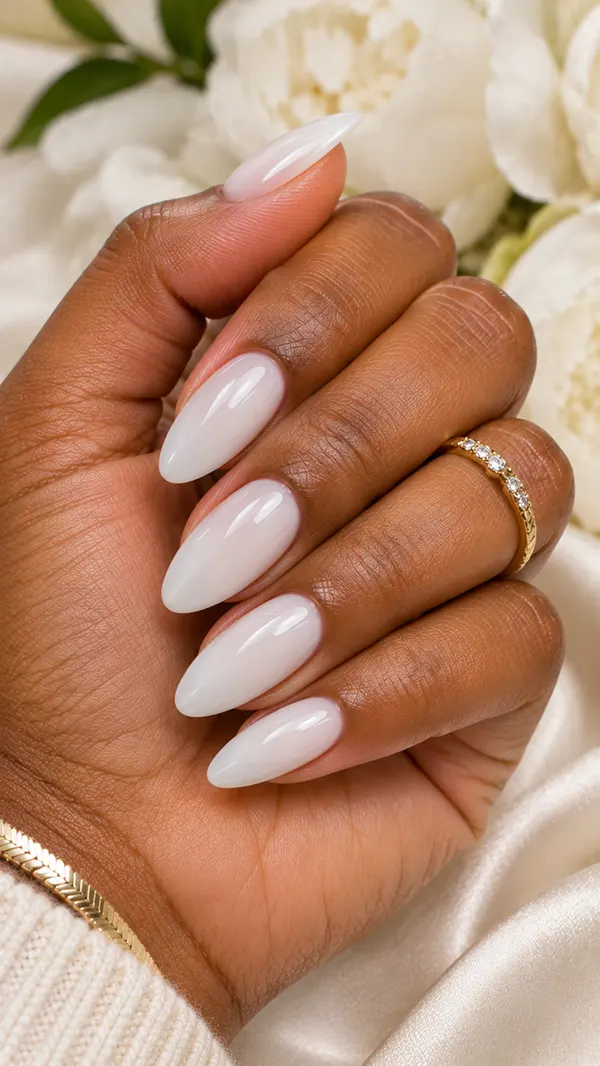
Milky white looks like fresh cream on a tapered nail. The color is soft and slightly sheer, so your natural nail glows through, and the finish looks healthy and calm. It is the simplest of all almond nail designs, and it looks lovely on every skin tone.
To get a smooth surface, I apply a thin base coat, then three thin layers of milky white polish. The first layer looks streaky, and that is normal. By the third layer, the color evens out into a creamy finish. I cap the free edge each time to seal the tip, then finish with a thick, glossy top coat.
The tapered tip looks especially graceful in this shade because the soft color follows the curve of the nail without breaking the line. Short almonds look clean and sweet, while long almonds look sleek and elegant.
Finish Tip
A glossy top coat gives milky white its best look. It adds a wet shine that makes the color look fresh. Skip the matte finish unless you want a chalky effect.
If your polish looks too sheer, add one more thin layer instead of one thick layer. Thick coats can look cloudy and take longer to dry.
2. Sheer Nude Almond Nails
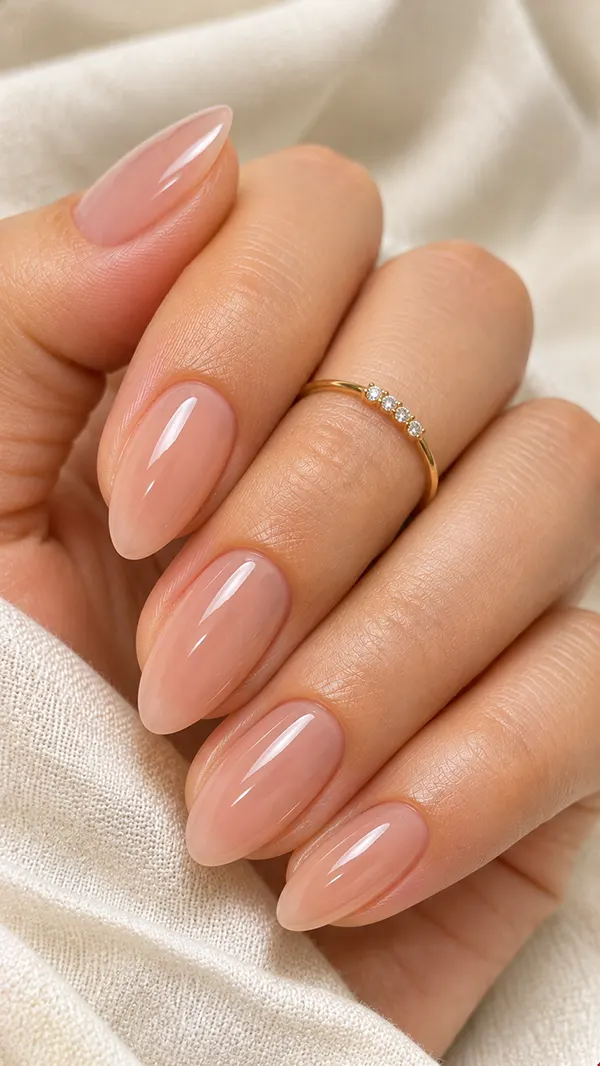
Sheer nude almond nails look like your own nails, but polished and perfected. The color is a soft beige or pink-beige with a translucent finish, and it hides small imperfections without hiding the natural nail. This is the manicure I wear when I want to look put together with almost no effort.
Choose a nude shade that closely matches your skin tone, or one shade lighter for a flattering contrast. Apply two thin coats of sheer nude and finish with a glossy top coat. The effect looks like a smooth, healthy nail, and it makes the fingers look longer.
On almond nails, the nude shade elongates the finger, as the color blends into the skin. This look suits office days, weddings, and travel. Medium almonds look balanced, and long almonds look refined.
Color Note
Match the nude to your undertone. Warm skin looks lovely in peachy beige, cool skin looks fresh in pink-beige, and neutral skin works with most shades.
Test the shade on one nail and hold your hand next to your face in daylight. If the color looks gray, move to a warmer nude. If it looks orange, try a pinker one.
3. Baby Pink Jelly Almond Nails
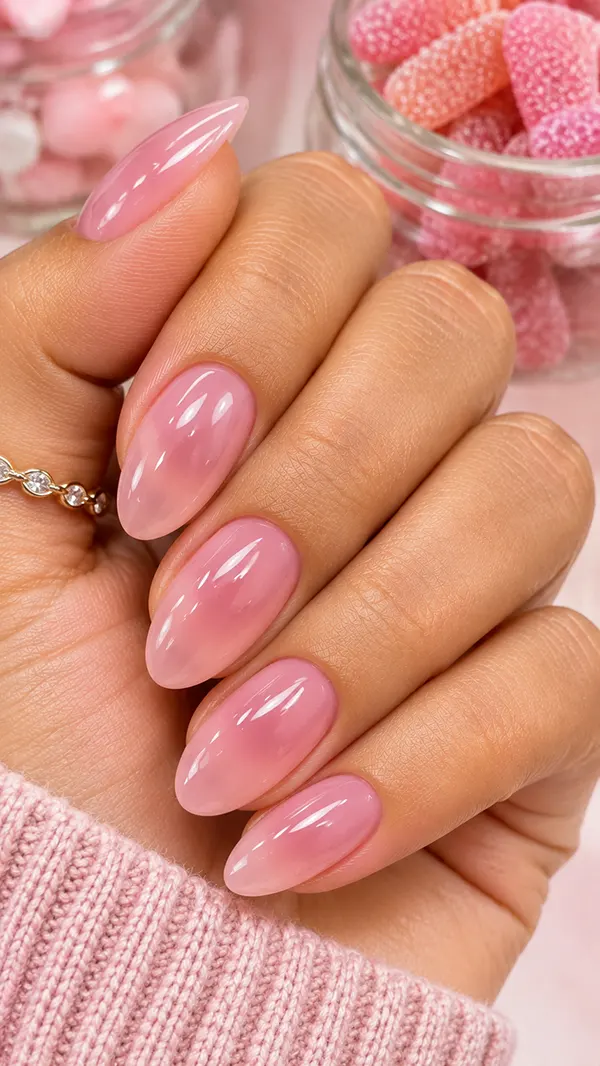
Baby-pink jelly nails look like pale gummy candy. The color is see-through, so the shape of your natural nail shows beneath, and the layers create depth that solid polish cannot match. On an almond shape, the tapered tip catches light and glows.
I paint one thin layer of pink jelly polish and let it dry. Then I add a second and a third layer, one at a time. Each coat deepens the shade a little, so I stop when the pink looks right on my hand. A thick, glossy top coat gives the finish its glassy look.
This design suits short and medium almond nails with clean cuticles. Jelly polish hides small chips well, which makes it practical for busy weeks. It feels modern and soft, and it works with almost every outfit.
DIY Tip
Work in a well-lit room, and keep the brush light. Jelly polish pools easily near the cuticle, so I leave a tiny gap and let the color spread naturally.
Wipe the brush on the bottle’s rim after each dip. Less polish on the brush gives thinner, more even layers.
4. Blush Almond Nails with a Gold Dot
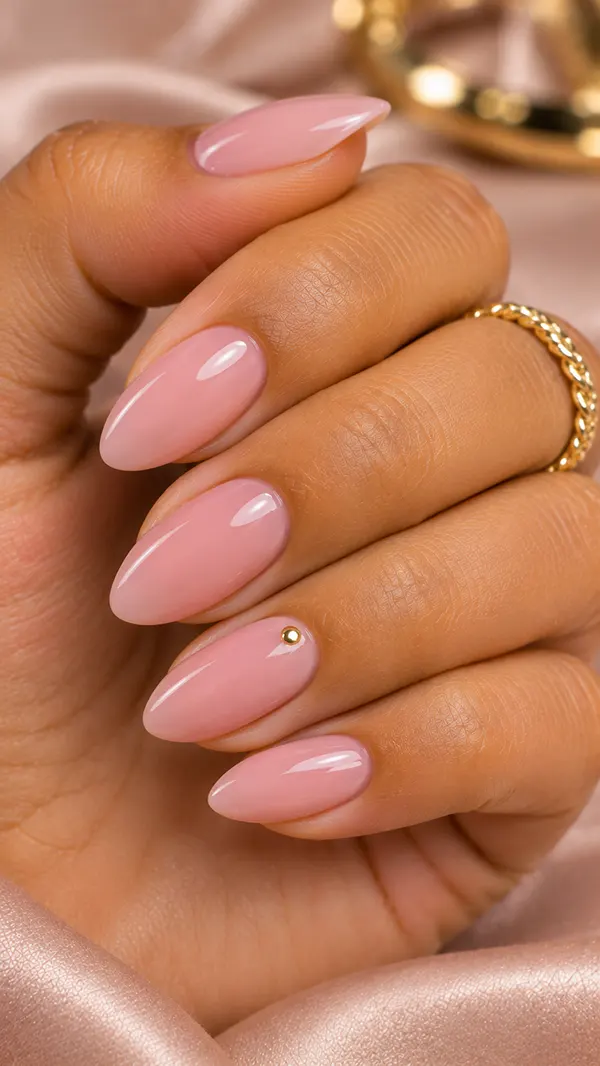
Blush almond nails with a single gold dot feel quiet and thoughtful. The base is a soft pink with a hint of beige, and the tiny gold dot near the cuticle acts like a small piece of jewelry. It is one of the easiest almond nail designs to wear to the office.
Paint two thin coats of blush pink and let them dry fully. Then dip a small dotting tool into gold polish and press one dot near the cuticle of each ring finger. A single dot keeps the look minimal and takes about thirty seconds per nail. Seal everything with a glossy top coat.
The tapered shape gives the dot room to breathe, and the clean space above it makes the detail stand out. Medium almonds look neat, and short almonds look sweet. The manicure suits job interviews, brunches, and family dinners.
Design Detail
Use the very tip of the dotting tool for a tiny dot. A smaller dot looks delicate, while a large dot looks heavy.
Place the dot slightly off-center for a modern feel. Even spacing looks classic, but a small shift looks more artistic.
French Tip Variations That Make the Almond Shape Shine
A French tip follows the curve of an almond nail beautifully. The tapered end gives the tip a longer, softer line, and the whole manicure looks graceful. These four French looks keep the classic idea but update it with new proportions and colors.
Clean lines matter most. I use a thin brush or French tip guides, and I keep a small cup of remover on hand for touch-ups. Rest your wrist on a table when you draw the curve, and sweep slowly from one side to the other.
These almond nail designs suit weddings, offices, and everyday wear. The nude base keeps them professional, and the tip adds a bit of personality.
5. Classic White Almond French Tips
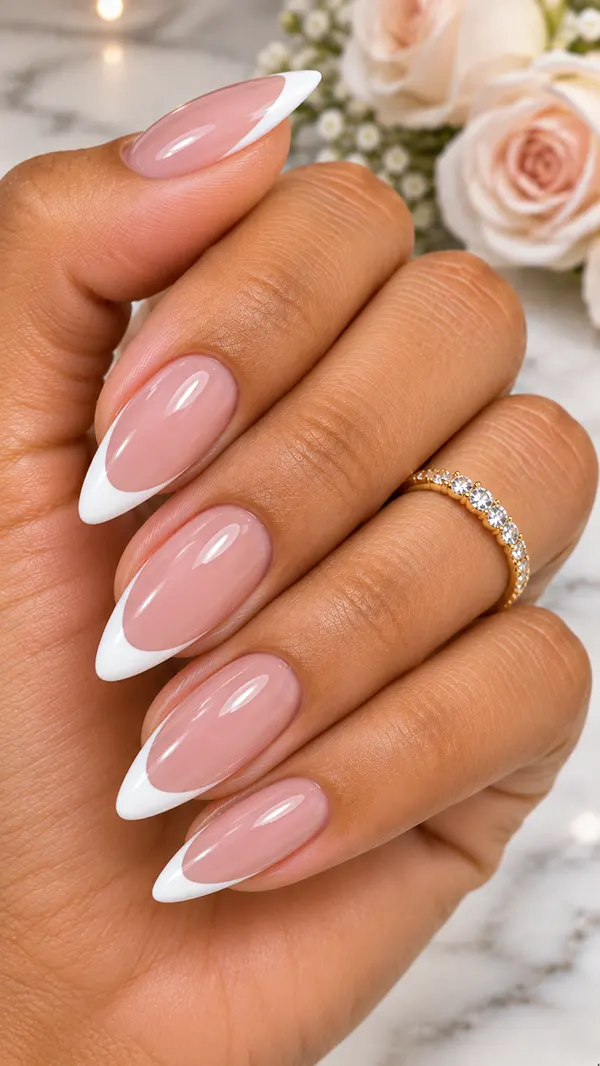
The classic French manicure looks timeless on an almond nail. A sheer pink or nude base, a crisp white tip, and a glossy finish create a clean and elegant look. The tapered shape softens the tip, so the white line appears as a gentle curve rather than a hard stripe.
I paint a sheer pink base and let it dry. Then I draw a thin white line along the free edge with a fine brush, following the nail’s natural curve. I keep the tip around two millimeters thick for a refined look, and I seal everything with a thin glossy top coat.
This design works on medium and long almonds, where the tip has space to curve. Short nails also look neat when the white line stays thin. Wear it with white shirts, black dresses, and pearl earrings.
Salon Advice
Ask your nail tech for a “soft French” on almond nails. The tip should follow the shape of your nail rather than being cut straight across.
Bring a photo to show the thickness of the white line. A thinner line looks modern, and a thicker line looks traditional.
6. Micro French Almond Nails
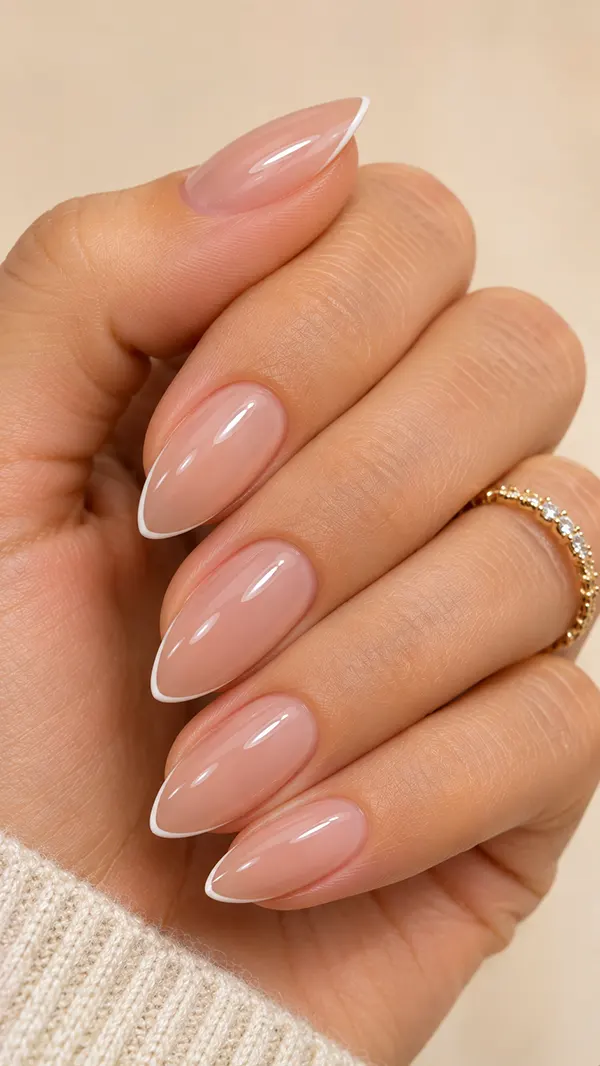
The micro French is a very thin tip line, almost a whisper of color at the edge of the nail. In an almond shape, it looks refined and modern. I choose it when I want the French look without the weight of a full tip.
Paint a sheer base in nude or pale pink, then draw a hairline curve in white, soft pink, or a muted color with a fine striping brush. The line should look like a pencil mark, about one millimeter thick. Rest your wrist on a table for support, and sweep slowly. Seal with a thin top coat so the line stays crisp.
Thin lines make almond nails look longer, since the eye follows the tip without a heavy break. This design suits long and medium almonds, and it looks lovely with silk blouses and gold jewelry.
Why It Works
The fine line adds detail without adding weight. It outlines the nail shape, so the almond curve becomes part of the design.
It also looks intentional. A thin line cannot look accidental, so even a small amount of color feels planned.
7. Pastel Colored French Almond Nails
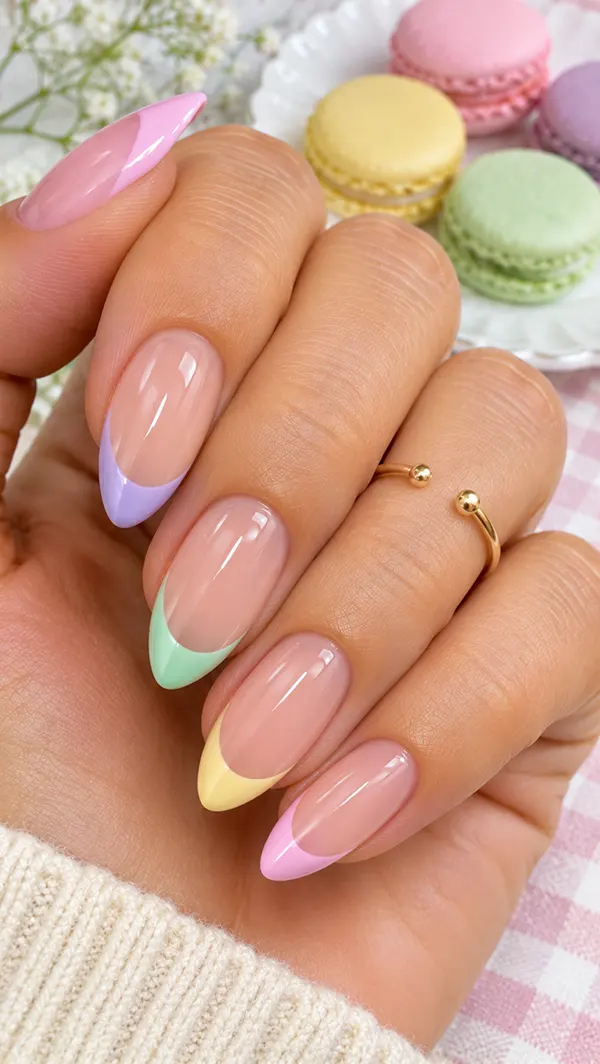
Colored French tips replace the white line with a soft shade. I like baby pink, lilac, mint, and butter yellow over a sheer nude base. The result feels playful but still polished, and it shows how flexible almond nail designs can be.
Use a thin brush to sweep a curve across the free edge of each nail. You can use one color for all ten nails, or mix two or three shades across your fingers. Mixed colors feel cheerful, while a single color feels calm. Striping tape or French tip guides help if your hand feels unsteady.
The tapered almond shape gives each color a graceful point, so the tips look like little petals. This design suits spring dresses, brunch dates, and vacations. Medium and long almonds show the colors best.
Color Note
Choose pastel shades with a creamy base. Sheer pastels can look weak against a nude base, while creamy ones show clearly.
Keep all shades at the same softness. A neon tip next to a pastel tip looks uneven, so match the intensity across all nails.
8. Reverse French Almond Nails
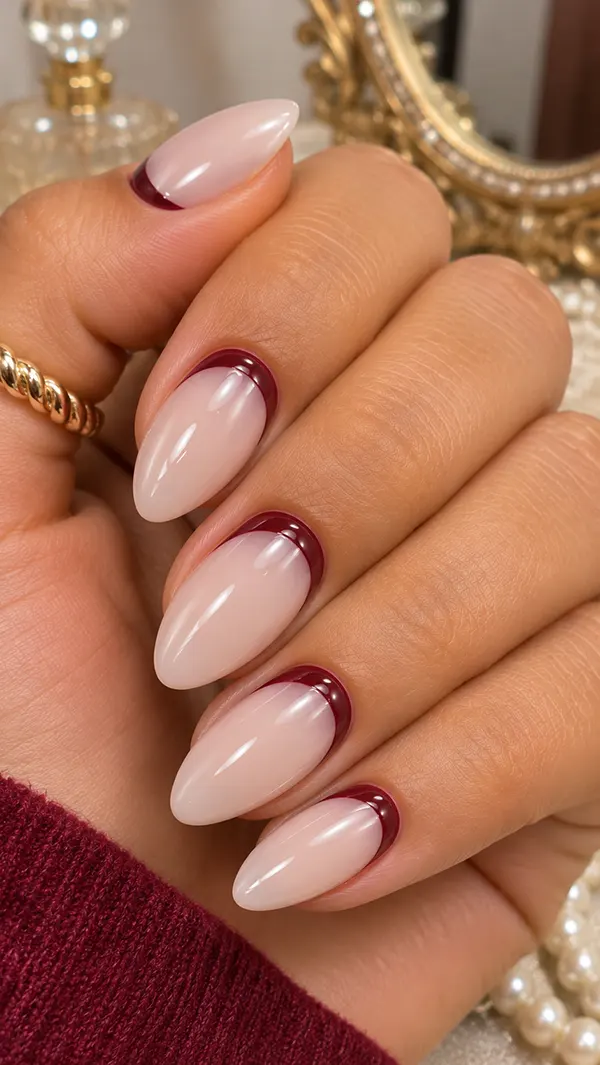
A reverse French, also called a half-moon manicure, colors the small curve at the base of the nail. It looks retro and artistic, like a vintage manicure from an old film. On an almond nail, the curved shape sits beautifully along the cuticle line.
To make it, I use a half-moon sticker or a thin brush to paint a curve at the base of each nail. A sheer pink or milky base looks lovely behind a deeper color like burgundy or gold. I keep the curve even on all ten nails, because small differences show clearly.
This design also grows out neatly, since the grow-out gap hides at the cuticle. Medium almonds work well. Wear it with simple outfits, cream sweaters, and gold rings.
Manicure Tip
Use a hole reinforcement sticker as a free guide. Press it at the base of the nail, paint inside the edge, and peel it off before the polish dries.
Choose a color that contrasts with the base. A pale shade can blur into the nude and lose its shape.
Elegant Classic Colors That Suit Every Occasion
Some shades never go out of style. Deep browns, wine reds, champagne, and navy look rich on almond nails and suit dinners, weddings, and office days. I reach for these colors when I want my hands to look polished with minimal decoration.
Application matters. Dark, rich shades show streaks and thick edges, so I use thin coats and a flat brushstroke. A good base coat also prevents staining, especially with red and brown pigments.
These almond nail designs work on every length, but they look especially elegant on medium almonds. The tapered tip frames the deep color like a jewel.
Worth a Look: 20 Stunning Short Square Nail Designs for a Chic and Elegant Look
9. Mocha Brown Almond Nails
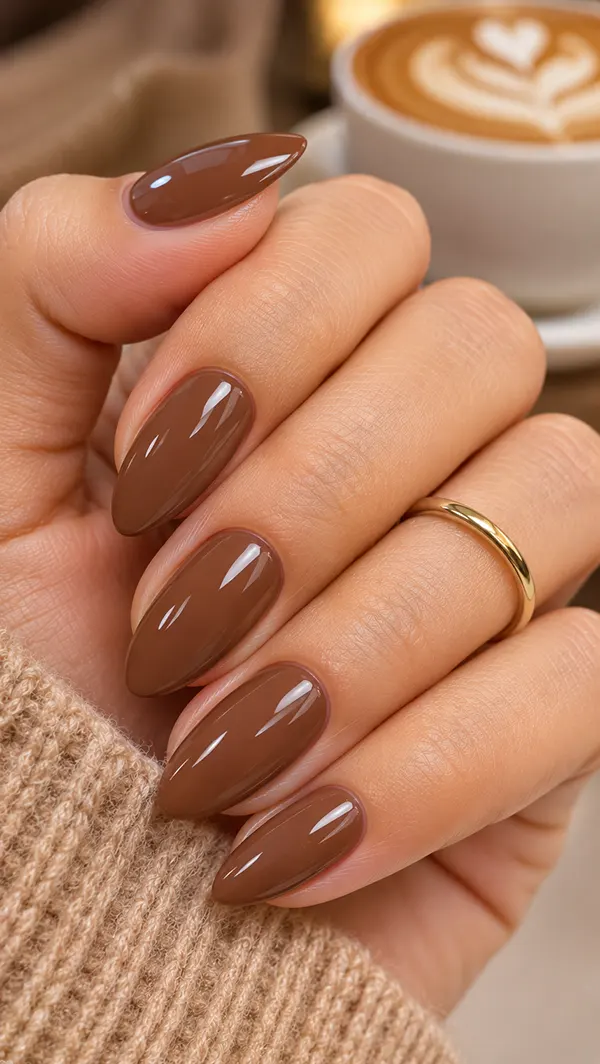
Mocha brown is a warm, creamy shade that looks like a latte. It is richer than nude and softer than chocolate, and it suits warm, olive, and deep skin tones beautifully. On an almond nail, the color looks smooth and grounded.
I apply two thin coats of creamy mocha polish after a thin base coat. The shade can look patchy on the first coat, so I never judge it until the second layer. A glossy top coat adds a rich shine, making the color look like polished wood.
Mocha pairs well with camel coats, cream knits, and gold jewelry. It looks lovely in autumn and winter, but it also works in spring with linen. Medium almonds look balanced, and long almonds look luxurious.
Undertone Guide
Warm and golden skin tones glow in mocha with a slight orange or red base. Cool skin looks better in a taupe-leaning brown.
If your hands look dull next to brown, try a lighter caramel shade. The brightness helps the skin look fresh.
10. Black Cherry Burgundy Almond Nails
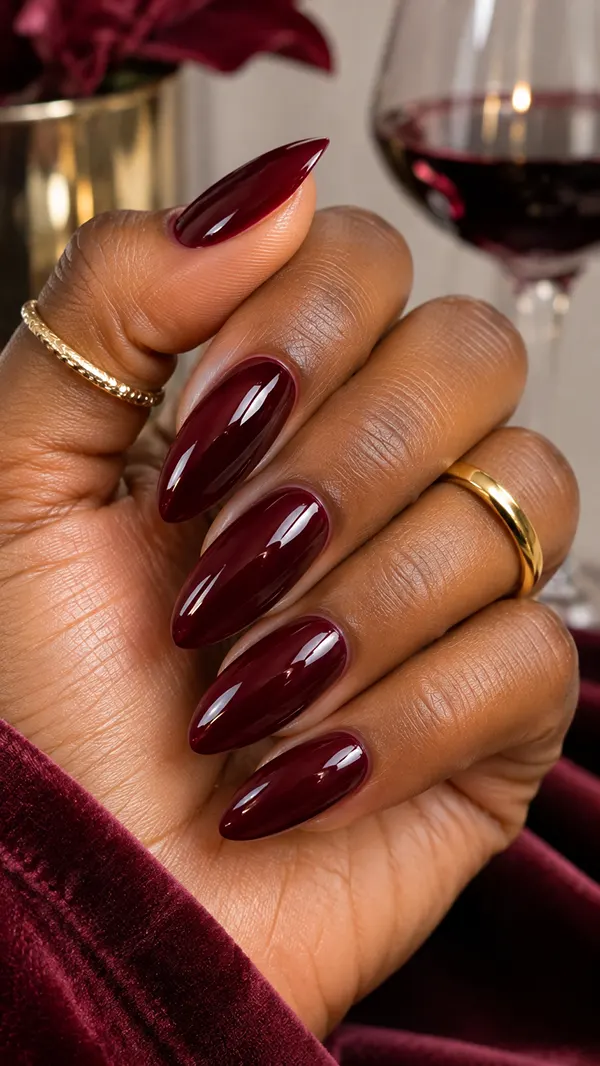
Black cherry burgundy is a deep red with a purple edge, and it looks moody and elegant. It reminds me of dark fruit and velvet, and it suits dinners, parties, and cooler months. On an almond nail, the color looks rich and defined.
For a smooth finish, I paint two thin coats and wait until the surface feels dry before adding the top coat. Burgundy can look almost black in low light, so I check the color near a window. A thick, glossy top coat brings out the red undertone and gives the nails a jewel-like shine.
This shade pairs well with black dresses, leather jackets, and silver jewelry. It suits medium and long almonds, and it photographs beautifully in warm indoor light. It also hides small flaws well, which helps if you paint your own nails.
Nail Care Note
Dark shades can stain bare nails, so always use a base coat. Without one, burgundy pigment can leave a faint tint.
Remove the polish with an acetone-free remover and a cotton pad pressed on each nail for a few seconds. Gentle removal keeps the nail surface healthy.
11. Champagne Pearl Almond Nails
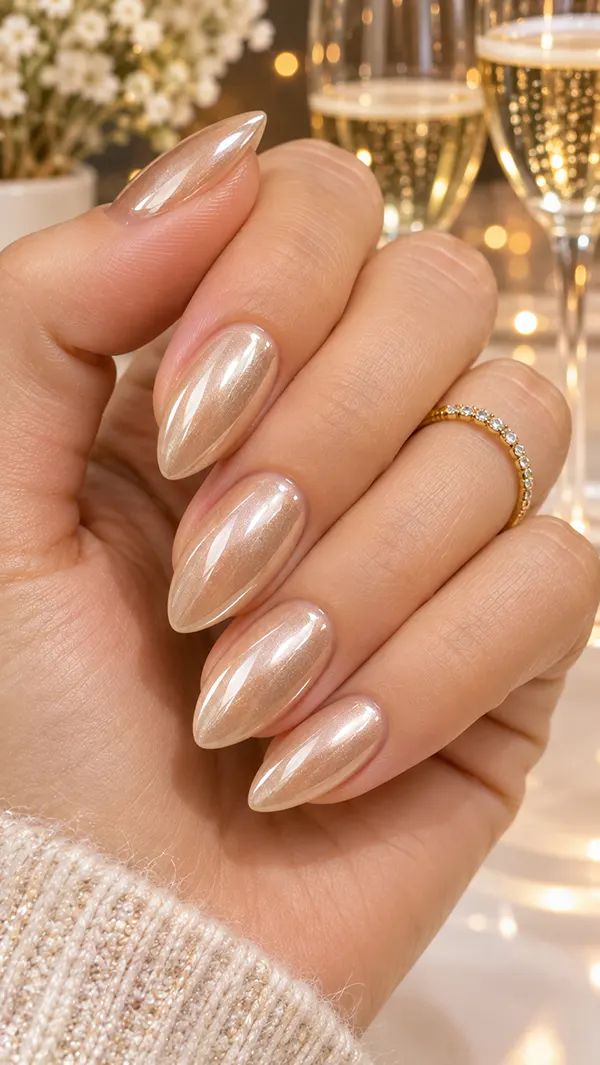
Champagne pearl nails have a soft golden glow, like light on a glass of bubbly. The base is a pale beige-gold, and a pearl powder or shimmer adds a creamy shine. It feels festive without looking loud, and it suits weddings and anniversaries.
I paint two thin coats of a champagne-cream base, then press pearl powder onto a tacky top coat with a soft applicator. I rub it gently in small circles and brush away the extra. A final thin top coat seals the finish. The surface should glow softly and never look like a mirror.
The tapered almond shape catches light along the length of the nail, so the pearl effect looks luminous. This design works on medium and long almonds, and it pairs with satin dresses and gold jewelry.
Finish Tip
Press the powder lightly instead of rubbing hard. Too much pressure can scratch the surface and leave streaks.
Seal the pearl with a thin top coat. A thick top coat can dull the glow and make the finish look cloudy.
12. Navy Blue Almond Nails
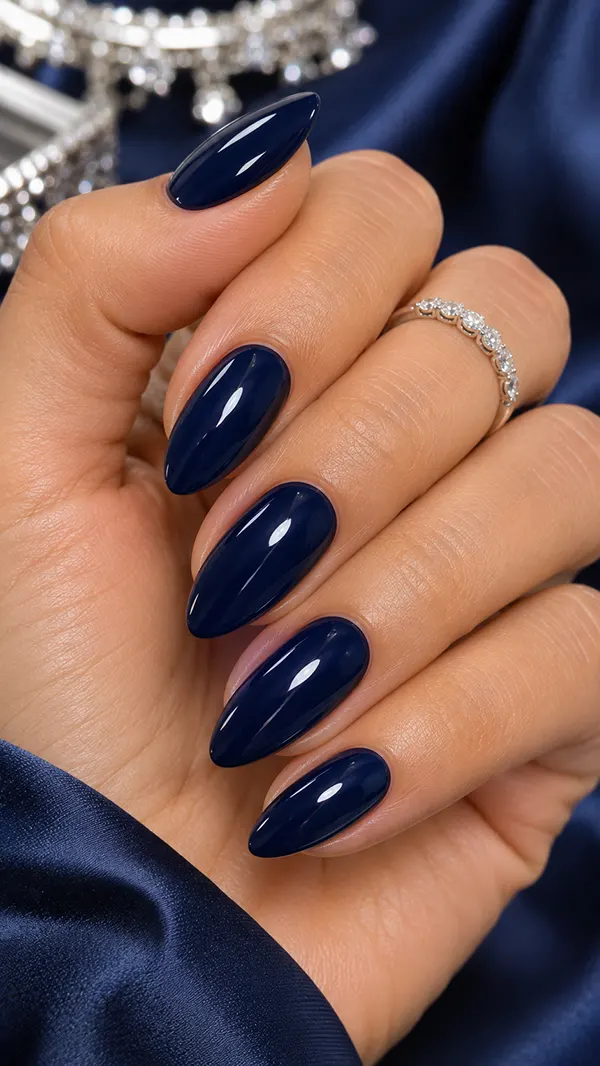
Navy blue is a classic shade that looks sophisticated and calm. It reads almost like black in low light and like deep ink in daylight. On an almond nail, it looks sleek and polished, and it suits many outfits.
I apply a thin base coat, then two thin coats of creamy navy polish. A flat brush stroke keeps the surface even. After the second coat dries, I add a thick glossy top coat. The finish looks like polished stone.
Navy pairs well with white shirts, camel coats, and silver jewelry. It also works with gold, which warms the cool shade. This color looks beautiful on medium and long almonds, and it suits office days and evening plans.
Wear It For
Wear navy for dinners, meetings, and cooler weather. It looks smart without drawing too much attention, which makes it a flexible choice.
If you want a softer look, choose a navy with a slight gray base. If you want more drama, try a navy with a faint blue shimmer.
Chrome, Foil, and Glitter Finishes for a Little Sparkle
Some days call for more light on your hands. Chrome, foil, cat-eye, and glitter effects catch the sun and candlelight, adding glamour to a simple almond shape. I use one special effect per manicure so the set stays elegant.
These finishes need smooth prep. Buff the nail surface gently and use a good base coat, because ridges show more under chrome and glitter. A thick top coat smooths the final result.
The long taper of an almond nail gives these effects plenty of room to show. Light travels along the nail, and the design feels bigger and more dramatic.
13. Pearl Chrome Almond Nails
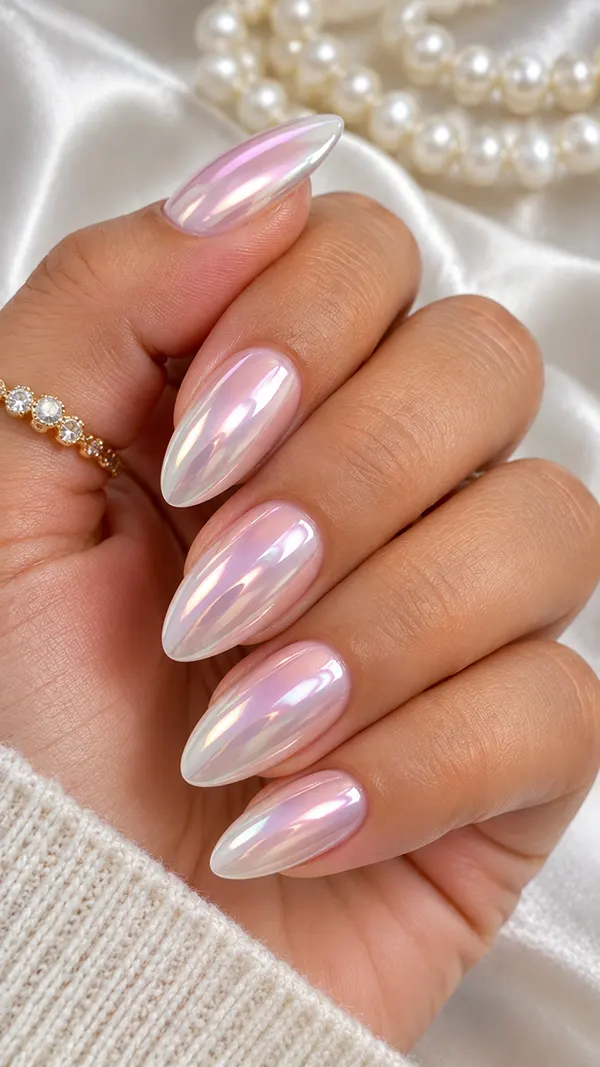
Pearl chrome nails have a soft, mirror-like shine in a creamy white or pink tint. The effect resembles the inside of a seashell, turning an ordinary base into something luminous. On an almond nail, the curve enhances the glow.
To make it, I paint a white or pale pink base, cure or dry it fully, then apply a no-wipe top coat. After it turns tacky, I press pearl chrome powder onto the surface with a sponge applicator and buff in small circles. A final layer of top coat seals the shine.
The finish looks gentle in daylight and brighter at night. It suits weddings, parties, and special dinners. Medium and long almonds show the shine best, and the look pairs well with delicate jewelry.
Salon Advice
Ask your nail tech for a “pearl chrome over a milky base.” The base color changes how the pearl looks, so be specific.
Chrome works best on a smooth surface. If you have ridges, ask for a gentle buff or a smoothing base before the chrome.
14. Gold Foil Accent Almond Nails
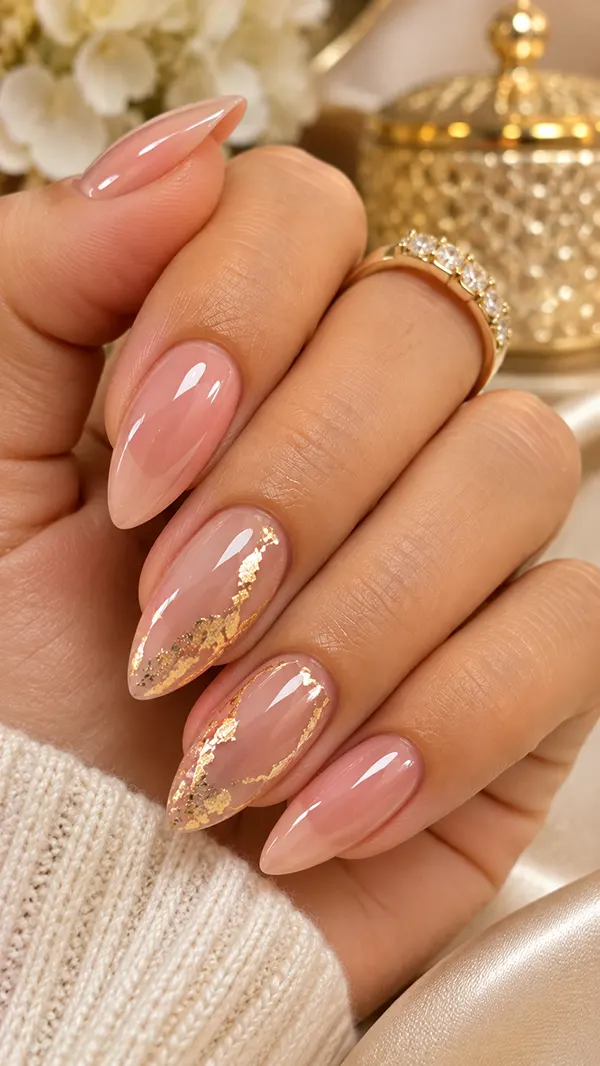
Gold foil adds a fine, metallic touch to an almond nail. Small flecks of foil sit on a sheer or nude base like tiny sparks, and each piece lands differently, giving the design a handmade look. It feels luxurious and a little festive.
I paint a sheer pink or nude base and let it dry. Then I dab a thin layer of foil adhesive on one or two spots, wait until it turns tacky, and press a small piece of gold foil onto it. After peeling away the film, I seal everything with a thick top coat.
Keep the foil on one or two accent nails, or near the tip. The tapered almond shape draws the eye to the foil, so a little goes a long way. This design suits holiday parties, anniversaries, and dinners.
Why It Works
Gold foil catches light from many angles. As your hand moves, the flecks flash and fade, so the nail looks alive.
The sheer base keeps the foil from looking heavy. Without a solid color behind it, the gold looks like a delicate accent.
15. Rose Cat Eye Almond Nails
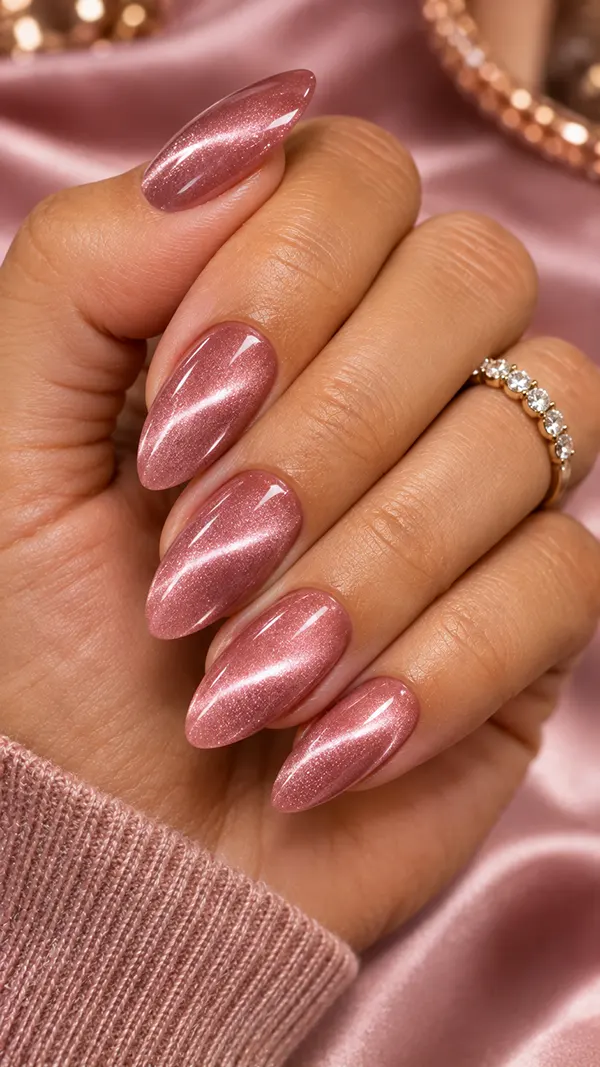
Cat-eye nails use magnetic polish to create a glowing line across the nail. In a rose or soft pink shade, the effect looks like a ribbon of light inside a gemstone. On an almond nail, the line follows the length, making the shape look even more graceful.
I paint one thin coat of rose magnetic polish, then hold a small magnet close to the nail for about ten seconds without touching it. The metallic particles gather into a line that follows the magnet. I cure or dry the nail right away so the line stays in place, then add a thin top coat.
The line shifts as your hand moves, so the manicure seems alive in the light. Medium and long almonds work best, since the line needs room to shine. It suits evening dresses and soft makeup.
DIY Tip
Hold the magnet at the same angle on every nail. A consistent angle keeps the lines parallel, which makes the set look neat.
Use a thin top coat. A thick layer can blur the line, and a thin one keeps it crisp.
16. Glitter Ombre Almond Nails
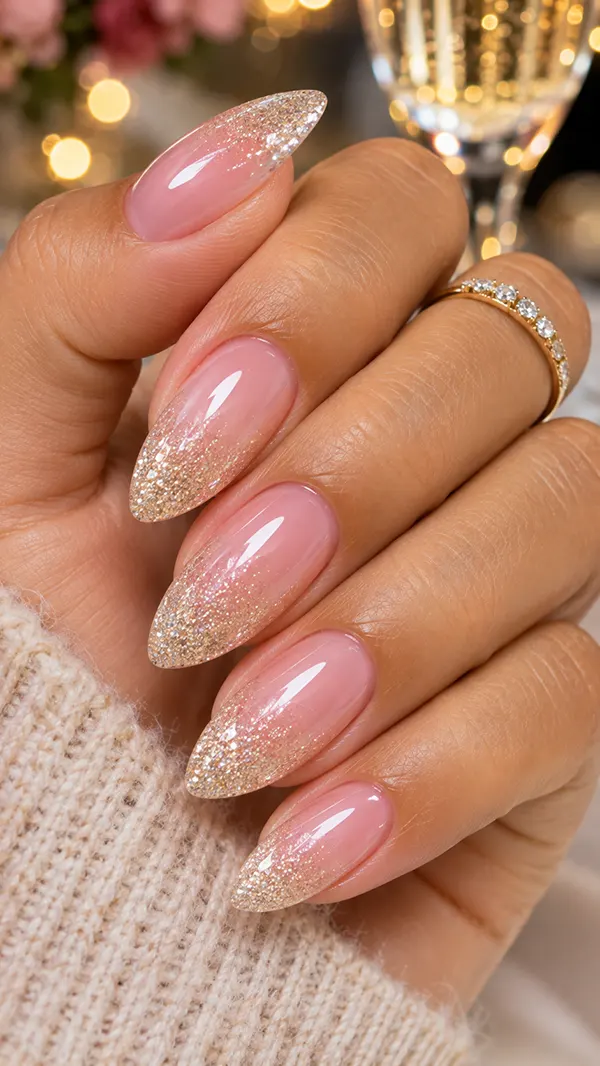
A glitter ombre adds sparkle in a gentle, controlled way. The glitter is thickest at the tips and fades toward the cuticle, so the nail looks like it has been dusted with sugar. It suits party season and feels festive without covering the whole hand.
I paint a soft pink or nude base, then use a sponge to dab fine glitter polish near the tip. I press lightly and add a second layer for more sparkle. Fine glitter looks smoother than chunky pieces and gives a cleaner gradient. A thick, glossy top coat smooths the surface.
The tip of an almond nail catches light first, so the glitter looks natural there. This design works well on medium- and long-length nails and pairs with black dresses and metallic jewelry. The fade also hides grow-out lines.
Manicure Tip
Use a sponge instead of a brush for the glitter. Dabbing gives a smooth fade, while brushing can leave hard lines.
Choose glitter in a tone close to the base. Pink glitter on pink and gold glitter on beige look soft, while contrasting colors look louder.
Floral and Artistic Details for a Romantic Almond Manicure
Almond nails make beautiful canvases for small art. The long, narrow surface gives flowers, lines, and gradients space to breathe, and the soft shape matches delicate drawings. I keep these designs light and place them on accent nails.
You need only a dotting tool, a thin brush, and a steady wrist. I practice on a sticky note first, and my hand warms up quickly. A cup of remover and a clean brush fix small mistakes.
These almond nail designs suit spring weddings, garden lunches, and creative evenings. They look best on medium and long lengths, where the art has room to show.
17. Delicate Daisy Almond Nails
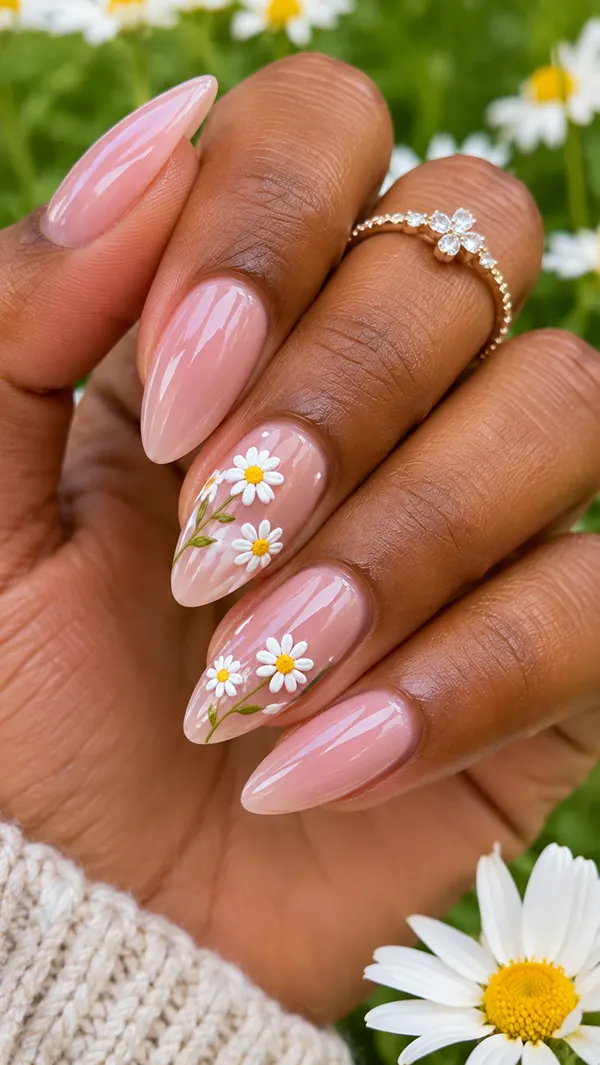
Daisy nails bring a tiny flower garden to your fingertips. White petals around a yellow center sit on a pale pink, sage, or sheer base. The design feels fresh and gentle, and the almond shape gives the flowers a graceful frame.
To draw a daisy, I place five small white dots in a circle with a dotting tool, then add one yellow dot in the middle. The dots should touch lightly so they look like petals. I add two or three tiny daisies on one or two accent nails, and I leave the rest plain.
Different tool sizes give petals more natural variety. A thin green line can add a stem if you want. A glossy top coat finishes the set. It suits spring and summer and pairs well with sundresses and straw bags.
Best Length
Daisies look best on medium almonds, where the nail has enough surface for several flowers. Short almonds suit one or two tiny daisies.
On long almonds, space the flowers along the length instead of clustering them. The spacing follows the shape, keeping the design balanced.
18. Abstract Swirl Almond Nails
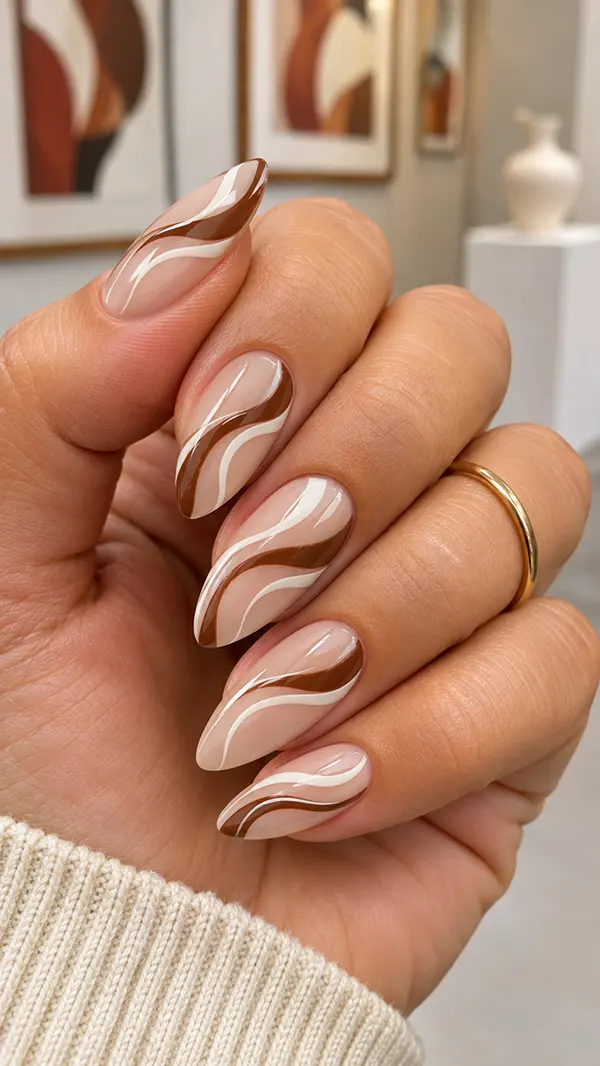
Abstract swirl nails use flowing lines to create a sense of movement across the nail. I paint a nude or cream base, then draw gentle curves in a second color, such as soft brown, lilac, or white. The lines look loose and artistic, following the shape of the almond.
I use a long, thin striping brush and rest my wrist on a table for support. Dip the brush lightly, then draw one smooth curve from one side of the nail to the other. A second curve beside it creates the swirl. A small wobble adds character, so I never aim for perfection.
The curved lines echo the nail’s curve, so the design feels natural. This look suits long almonds especially well, but medium lengths work too. Wear it with creative outfits and simple jewelry.
Design Detail
Use two or three curves per nail. More lines make the design crowded, while fewer lines keep it airy.
Choose two colors that sit close in tone. A soft brown on cream or a pale lilac on white looks calm, while strong contrast looks bold.
Need More Ideas? 20 Stunning Black Nail Ideas for a Bold and Elegant Manicure
19. Soft Marble Almond Nails
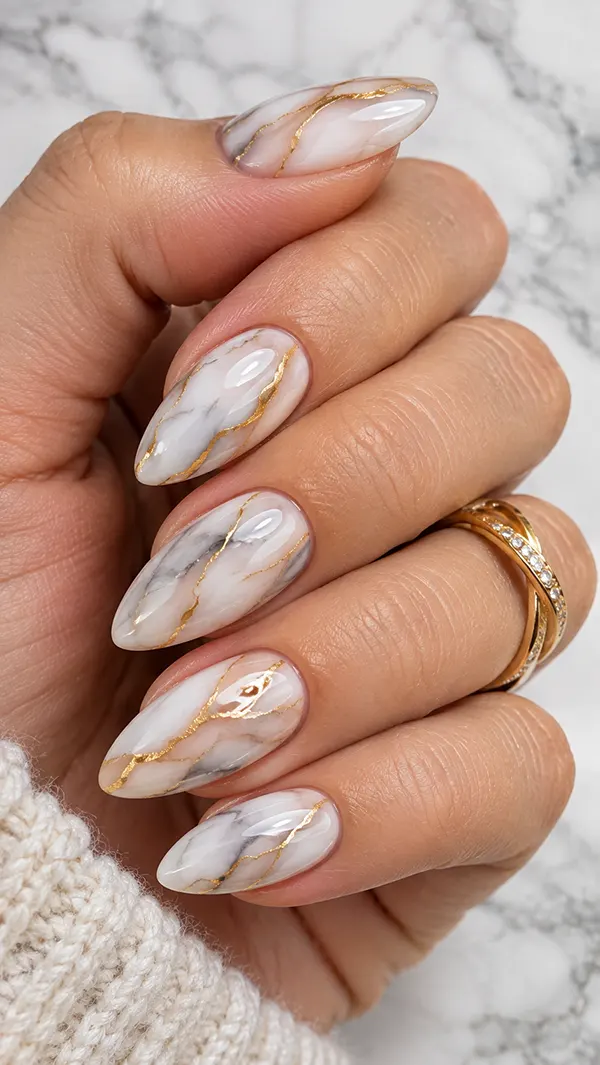
Marble nails look like polished stone, with soft veins running across a pale base. On an almond nail, the veins flow along the length of the shape, so the design looks elegant and natural. No two nails look the same, which adds charm.
I paint a milky-white or pale-gray base and let it dry. While a top coat is still slightly tacky, I draw thin, wavy lines in gray, gold, or soft pink with a fine brush. Then I gently dab the lines with a soft sponge to blur them into a marble effect. A glossy top coat seals the design.
Keep the veins loose and uneven, since real marble never has perfect lines. This look suits long almonds, but one marble accent nail also looks lovely on shorter lengths. Pair it with neutral outfits and gold jewelry.
Why It Works
Marble works because its irregular lines feel organic. The eye reads them as natural, so the design looks expensive and calm.
The pale base also keeps the art light. Soft veins on a white nail look like a delicate detail rather than a heavy pattern.
20. Soft Aura Almond Nails
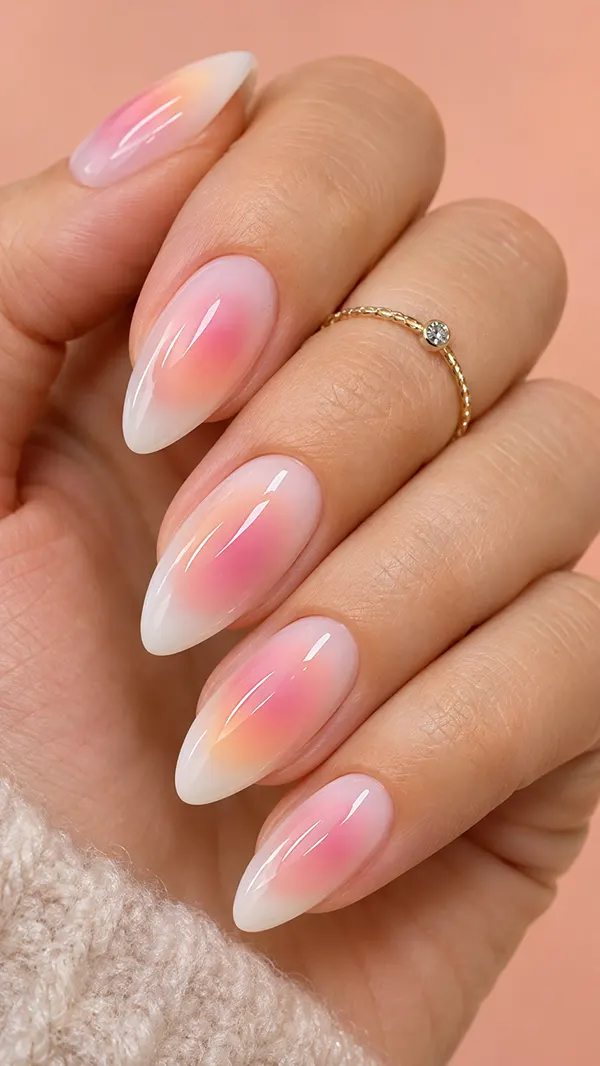
Aura nails create a glowing, blurred circle of color in the center of each nail. The effect looks like a soft halo, and it feels dreamy and modern. On an almond nail, the oval shape follows the circular fade, so the design looks smooth and balanced.
I paint a pale base, such as milky white or sheer pink, then dab a small circle of color in the center of the nail. With a clean, dry brush, I blend the outer edge until it fades into the base. A second shade, like peach or lilac, adds more depth. A glossy top coat brings out the glow.
Work in thin layers and wait between them, because heavy polish can turn the blend muddy. This look suits medium and long almonds, and it looks beautiful in photos. It is lovely for parties and summer evenings.
Color Note
Choose analogous colors for the best blend. Pink with peach, lilac with blue, or yellow with orange blend smoothly without turning muddy.
Keep the base pale. A white or sheer pink base makes the aura glow like a lamp behind paper.
Bold Seasonal Almond Nail Designs for Cooler Months and Special Days
Some manicures capture a mood or a season. A warm terracotta in autumn, a velvety red in winter, and an icy blue snowflake design all feel connected to the weather. These three looks add personality without needing complicated skills.
Texture and contrast carry these designs. Matte finishes, small gold details, and fine white lines add depth. They also look beautiful by candlelight and in cozy indoor settings.
Pair them with wool, velvet, satin, and leather. The fabrics echo the richness of the colors, and your whole outfit feels planned. These are the almond nail designs I reach for when the weather turns.
21. Terracotta Almond Nails with Gold Dots
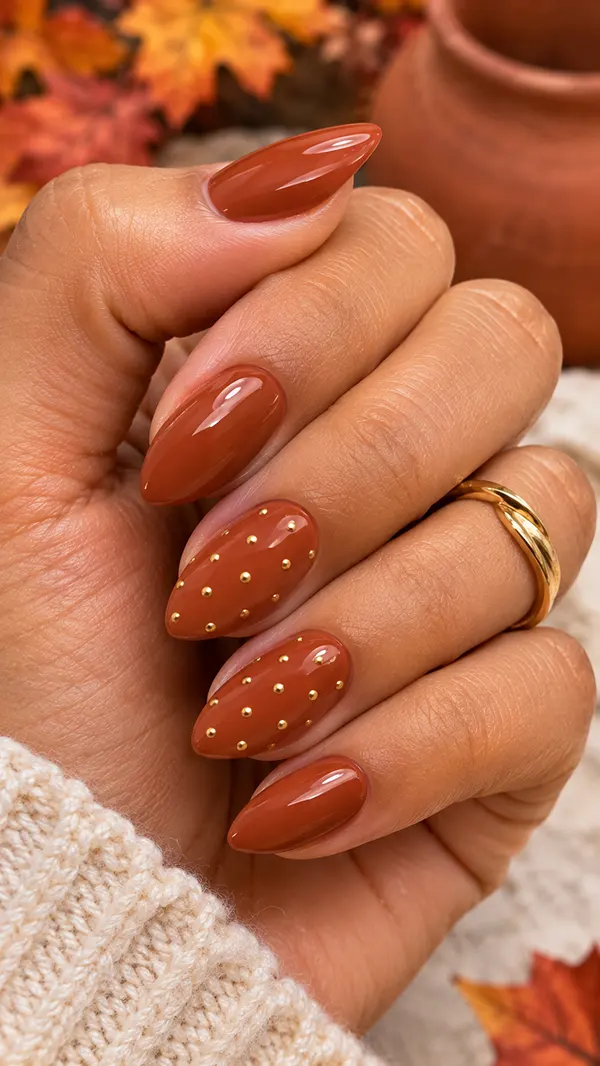
Terracotta is a warm, earthy orange-brown that looks like baked clay. It feels cozy and modern, and it suits autumn better than almost any other color. Adding tiny gold dots gives it a small touch of shine.
I paint two thin coats of creamy terracotta and let them dry. Then I use a dotting tool to place two or three tiny gold dots near the cuticle or tip of one or two accent nails. A satin or glossy top coat finishes the look. Satin softens the shine and gives the color a clay-like look.
The tapered shape draws the eye to the gold detail. This design works on short and medium almonds, and it pairs with camel coats, cream knits, and brown boots. It looks lovely on warm and deep skin tones.
Wear It For
Wear terracotta for autumn walks, harvest dinners, and cozy weekends. It looks natural with earth tones and denim.
If you want a dressier version, add a gold foil line along the cuticle. The extra shine turns it into an evening manicure.
22. Red Velvet Matte Almond Nails
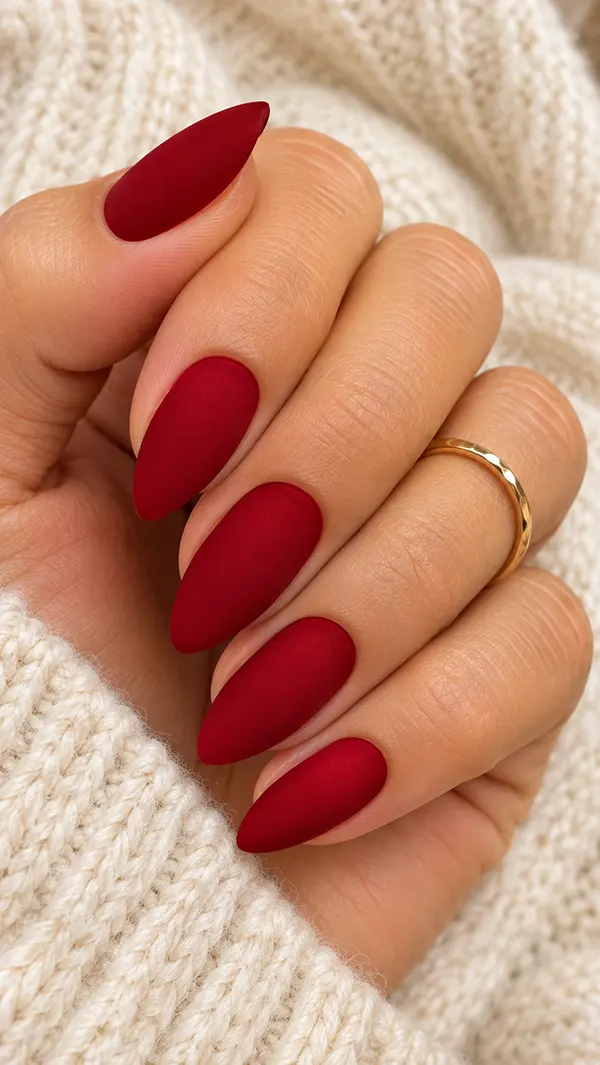
Red velvet matte nails turn a bold red into something soft and powdery. A matte top coat removes the shine, so the color looks like velvet fabric instead of glossy candy. On an almond nail, the finish looks modern, quiet, and a little vintage.
I paint two coats of a creamy red and let them dry fully. Then I add one thin layer of matte top coat. A thick layer can look chalky, so I keep it light. The surface should look smooth and soft, not dry.
Matte nails pick up oil and fingerprints quickly, so I carry a small tissue to wipe them. This design suits medium almonds, and it pairs beautifully with knitwear, wool coats, and cozy winter outfits. It also looks striking in photos.
Nail Care Note
Wash your hands with a gentle soap, and avoid heavy hand cream right before an event. Oil can make matte polish look patchy.
Reapply a thin matte top coat every three days. It refreshes the finish and protects the red color.
23. Icy Blue Snowflake Almond Nails
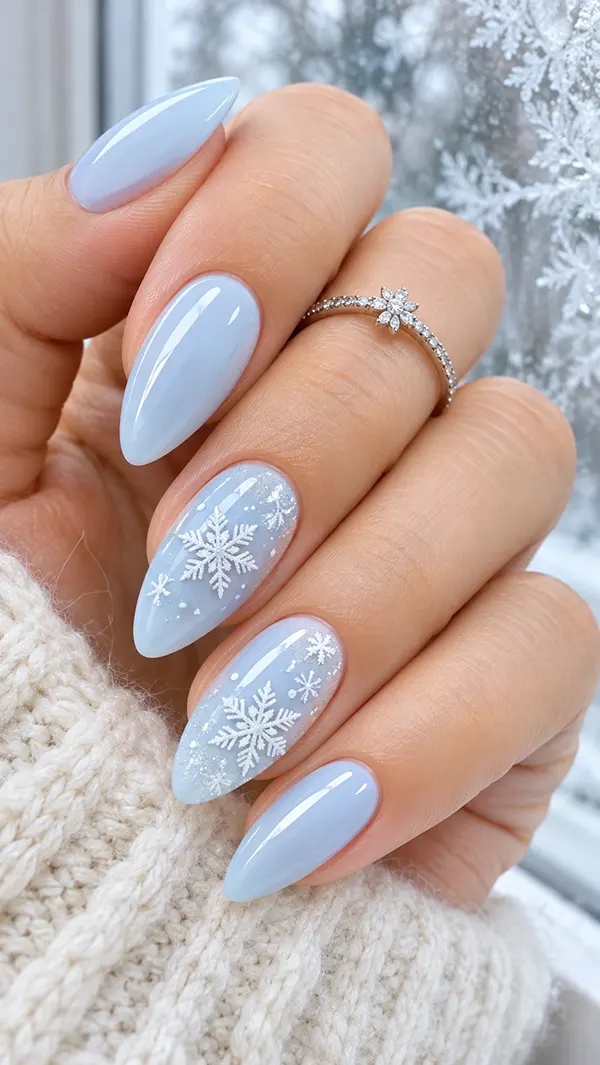
Icy blue snowflake nails capture a quiet winter morning. The base is a pale blue or sheer white with a cool glow, and tiny white snowflakes sit on one or two accent nails. The effect feels crisp, delicate, and festive.
I paint two thin coats of icy blue and let them dry fully. Then I draw small snowflakes with a thin brush, starting with a tiny plus sign and adding an X over it to make eight points. A dot in the center and short lines at each tip complete the shape. Two or three snowflakes per nail look balanced.
The long taper of an almond nail gives the snowflakes room to breathe. This design suits medium and long lengths and pairs well with white coats, silver jewelry, and cozy scarves. It looks especially lovely in the holiday season.
Manicure Tip
Draw snowflakes with a very thin brush and a tiny amount of polish. Thick lines look heavy, while thin lines look delicate.
Seal the design with a thin glossy top coat. A thick layer can smudge the lines and blur the points.
Choosing the Right Almond Design for Your Hands and Your Week
A beautiful photo does not always translate to your own hands. Your nail length, skin tone, job, and habits all change what works. I find it helpful to choose a design based on how you live, not only on how it looks.
Start with length. Short almonds suit simple colors and tiny details. Medium almonds handle most designs well. Long almonds give the most room for detailed art, French tips, and chrome. If you type all day or work with your hands, choose a shorter, rounder almond that feels strong.
Then think about skin tone and color. Warm skin glows in peach, caramel, and gold. Cool skin looks bright in lilac, berry, and silver. Neutral skin carries both. Test one nail before you commit.
| Your Situation | Design I Recommend | Why It Works |
| Office job with a neat dress code | Sheer nude, micro French, or blush with a gold dot | Quiet colors and thin lines look professional |
| Weekend brunch or picnic | Baby pink jelly, daisies, or pastel French tips | Soft shades match relaxed outfits |
| Wedding or formal dinner | Champagne pearl, classic French, or pearl chrome | Gentle shine suits formal settings |
| Very short almond nails | Milky white, sheer nude, or tiny dots | Simple designs fit a small canvas |
| Long almond nails | Marble, swirls, aura, or cat eye | Longer nails give art more room |
| Cooler months | Mocha, burgundy, terracotta, or red velvet | Rich shades suit wool and velvet |
Maintenance matters too. If you prefer a low-effort manicure, choose a sheer shade with a pale base, because grow-out lines stay hidden. If you enjoy frequent changes, bold colors, and art, it’s fun to refresh. Budget also shapes your choice. Simple polish costs less and works well at home, while chrome and cat-eye often look best at a salon.
How to Recreate These Almond Manicures at Home
You do not need a salon to enjoy almond nail designs. A few tools and a steady routine give clean results. I have used this method for years, and it works for every look in this guide.
- Shape the nails. File each nail into a soft almond, with narrow sides and a rounded tip. Use a fine file and move in one direction.
- Prep the cuticles. Gently push them back and wipe each nail with remover to remove oil.
- Apply a thin base coat. This protects the natural nail and helps the color stay smooth.
- Paint two thin coats of color. Wait about two minutes between coats, and cap the free edge to seal the tip.
- Let the base dry fully. A damp base smears when you add lines, dots, or flowers.
- Add your design. Use a dotting tool for dots, a thin brush for lines, and a sponge for ombre or aura.
- Clean the edges. Dip a small brush in remover and fix any rough lines around the nail.
- Seal with a top coat. Use one thin layer, wrap it over the tip, and let it dry.
- Finish with cuticle oil. The oil makes the skin look fresh, and the polish look glossier.
If you plan to visit a salon, bring two or three photos. Tell your nail tech the length, shape, and finish you want. Point out small details, such as the thickness of a French tip or the size of a flower. Clear instructions give better results.
Making Your Almond Manicure Last Longer
A good manicure deserves good care. Almond nails have a tapered tip that can feel delicate, so a few habits can help them stay strong and neat.
Apply a thin layer of top coat every two or three days. It restores shine and protects color. Wear gloves for washing dishes and cleaning, since hot water and detergents can weaken polish. Use your fingertips, not your nails, to open cans or press buttons.
Moisturize your cuticles daily. Cuticle oil keeps the skin soft and the nail healthy, and it makes the polish look glossier. Avoid picking at chips, because small tears can damage the nail surface. If a chip appears, smooth it with a file and cover it with a tiny drop of top coat.
Remove old polish gently. Use an acetone-free remover when you can, and press a soaked cotton pad on each nail for a few seconds before wiping. Give your nails a break between gel manicures, and use a strengthening treatment if they feel thin.
Building Your Own Signature Almond Nail Style
The last step is turning these ideas into a manicure that feels like yours. I do not believe in a single perfect design, only the one that suits your life. Use the questions below to decide.
Think about your daily routine first. If you type, cook, or work with your hands, choose a shorter almond shade. If you spend most days in an office, pick a quiet color with a thin French line. If you love dressing up, add chrome, foil, or a soft glow.
Choose a base color that pairs with most of your wardrobe. Milky white, sheer nude, and mocha work with almost everything. Then add one detail that feels personal, such as a tiny gold dot, a micro French line, or a small flower. That one detail becomes your signature.
Finally, keep a small repair kit in your bag with a mini top coat and a thin brush. A quick touch-up keeps your manicure neat between appointments. With a few good habits, your favorite almond nail designs can look beautiful from the first day to the last.
Frequently Asked Questions
What are the best almond nail designs for beginners?
Milky white, sheer nude, and baby pink jelly are the easiest almond nail designs to start with. They need only thin coats and a glossy top coat. Once you feel comfortable, try a single gold dot, a micro French line, or a simple daisy.
Which nail length looks best for almond nails?
Medium length looks balanced and suits most people. Short almonds feel neat and practical, while long almonds look dramatic and graceful. Choose a length that matches your daily routine, and keep the tip slightly rounded for extra strength.
Do almond nails make fingers look longer?
Yes. The tapered shape lengthens the finger, and nude or pale shades blend with the skin to extend the line. Almond nail designs with thin French tips or vertical lines also create a longer look. The effect works on most hand shapes.
Are almond nails strong enough for daily life?
They can be, especially when you keep the length moderate and the tip slightly rounded. A very pointed tip is more fragile. Use a base coat, wear gloves for chores, and moisturize your cuticles to keep your nails healthy.
What colors look best on almond nails?
Soft shades like milky white, sheer pink, and champagne look elegant. Deep shades like burgundy, navy, and mocha look rich. The shape suits almost every color, so choose based on your undertone and your wardrobe.
How do I file my nails into an almond shape?
File the sides inward toward the center so they taper gently, then gently round the tip. Use a fine file and move in one direction, not back and forth. Check the shape in a mirror, and keep both sides even. File slowly, since you can always take more off but cannot add it back.
How long do almond nail designs last?
Regular polish with a good base and top coat lasts five to seven days. Gel polish can last two to three weeks with proper prep and curing. Adding a thin top coat every few days and protecting your nails from water and chemicals helps any manicure last longer.