
No accessory says Christmas as quickly as a manicure. A cherry-red nail catches the light on a gift ribbon; a tiny snowflake looks like part of the scenery on a snowy day, and a touch of gold makes a plain sweater feel like a party outfit. If you are planning your December nails, this is the guide I wish I had every year.
What makes Christmas nail designs so fun is how many directions you can take. You can keep it quiet with a glossy red, go soft with milky white and a single snowflake, or go all out with candy canes, bows, and chrome ornaments. The season gives you permission to try something you would not wear in March.
Shape and length matter more than most people expect. A short square or round nail suits a classic red and keeps things practical when you are wrapping gifts and cooking. Almond and oval shapes make green and gold look elegant, while long coffin nails give detailed art enough room to shine. I will point out the best shape for each design as we go.
Before the designs, I will explain what makes a festive manicure work: color undertones, finishes, how much detail is too much, and how to choose a style that fits your outfits and your life.
You can show any of these to your nail technician or try the simpler ones at home. I have added salon requests and DIY notes along the way, so you can leave with nails that look like the picture rather than a vague memory of it.
Understanding the Beauty of Christmas Nail Designs
A good festive manicure is built from a few simple decisions: the color family, the finish, the shape, and the amount of decoration. Once you understand them, choosing a design becomes much easier, and you can adapt any idea in this article to your own taste.
These are the elements I look at first:
- Color family. Reds range from bright cherry to deep burgundy. Greens run from emerald to forest and olive. Whites and creams feel snowy, while gold, champagne, and silver bring warmth or cool sparkle.
- Undertone. Blue-based reds look crisp and suit cool or fair skin. Orange-based reds look warm and flatter golden and deep skin. Emerald suits almost everyone, and champagne gold looks beautiful on medium and deep tones.
- Finish. Glossy gel looks fresh and juicy. Matte velvet looks modern and cozy. Chrome and cat-eye finishes shift in the light, and glitter adds quick sparkle.
- Shape. Square and round shapes are practical. Almond and oval shapes look graceful. Coffin and stiletto shapes make a statement.
- Length. Short nails look neat and polished with small art. Medium nails suit French tips and accent designs. Long nails give room for bows and scenes.
- Decoration. Minimal designs use one color and one accent. Elaborate designs layer foil, rhinestones, 3D charms, and hand-painted art.
Festive nails also have a practical side. Red and green hide small chips better than pale shades, and glitter masks regrowth, which helps if you are too busy in December to rebook. Pick a design that you will still enjoy on day twelve, not only on day one.
Quick Reference: Festive Designs at a Glance
Use this table to find the mood you want before reading the full descriptions. The numbers match the designs later in the article.
| Nail Design | Base Color | Finish | Nail Shape | Overall Look |
| 1. Classic Cherry Red | Bright cherry red | High gloss | Medium almond | Timeless and polished |
| 3. Snowy Milky White | Milky white with silver snowflake | Glossy | Short round | Soft and delicate |
| 5. Burgundy Velvet | Deep burgundy | Matte velvet | Short square | Cozy and modern |
| 7. Red and Gold French | Sheer pink with red and gold tips | Glossy | Medium almond | Elegant and festive |
| 11. Red Chrome | Red with mirror chrome | Reflective | Medium oval | Glazed and bold |
| 13. Candy Cane Stripes | White with red stripes | Glossy | Short square | Playful and bright |
| 17. Buffalo Plaid | Red and black check | Glossy | Medium square | Cozy and graphic |
| 21. Silver Glitter Gradient | Clear with silver glitter | Sparkle | Medium almond | Glittery and light |
| 25. Rhinestone Bows | Deep red with crystal bows | Glossy with gems | Long coffin | Glamorous and dramatic |
| 30. Chrome Ornaments | Mirror gold and red | Chrome | Medium oval | Bright and detailed |
Explore Different Design Directions
I have grouped the 30 designs into five directions, so you can go straight to what suits you. Each direction answers a different question: how quiet, how classic, how playful, how sparkly, and how bold do you want your nails to be?
If you want an easy first step, begin with the minimalist group. These are one-color manicures with a single accent, and they work with every outfit you own. If you love a theme, the playful section has candy canes, gingerbread, and plaid, and if you want the biggest impact, the statement section has bows and long chrome ornaments.
| Direction | Designs | Best If You Want |
| Minimalist and soft festive nails | 1 to 6 | A clean, wearable color that fits every outfit |
| Elegant and classic holiday manicures | 7 to 12 | A polished look for dinners, parties, and church |
| Playful festive art | 13 to 18 | Fun themes and cozy patterns |
| Snow, sparkle, and winter magic | 19 to 24 | A glowing, wintry look with glitter and chrome |
| Bold statement manicures | 25 to 30 | Dramatic detail and a manicure that gets noticed |
The Complete Nail Design Collection: Minimalist and Soft Christmas Nails
Quiet designs are not boring. A perfect red or a deep green can look more expensive than a crowded design, and the finish does most of the work. These six manicures suit short nails, busy hands, and anyone who wants to feel festive without much fuss.
1. Classic Cherry Red Almond Nails
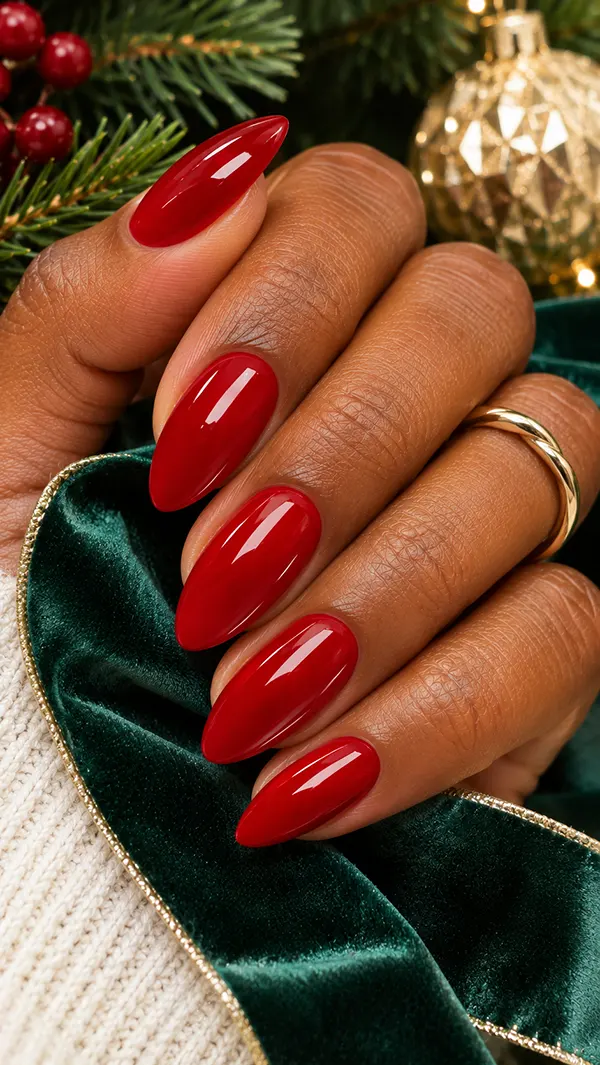
A bright cherry red is the Christmas nail color that never goes out of style. It is cheerful and confident, and on a medium almond shape, the glossy finish looks like polished glass. The color reads as festive on its own, so you do not need any art to make the manicure feel seasonal.
Choose a red with a creamy formula that covers in two thin coats, and ask your technician for a soft almond with a rounded tip. A blue-based red looks crisp against fair and neutral skin, while an orange-based red glows on golden and deeper skin tones. Finish with a high-shine top coat, and ask for the free edge to be sealed for longer wear.
Color Note: Test Your Red in Daylight
Reds can look very different under salon lights and in natural light. Before you commit, ask your technician to paint a swatch on a tip, and look at it near a window. If your hand looks warm and bright, the red suits you. If it looks gray or harsh, try a shade with a little more orange or a little more blue.
If you wear a lot of black or white clothing, a blue-based red looks sharp. If you wear camel, cream, or olive, a warmer red tends to feel more harmonious. A red manicure also pairs well with gold jewelry, so take your favorite ring or bracelet with you and notice how it looks together.
You May Also Love: 23 Stunning Almond Nail Designs for a Gorgeous and Elegant Manicure
2. Sheer Red Jelly Nails
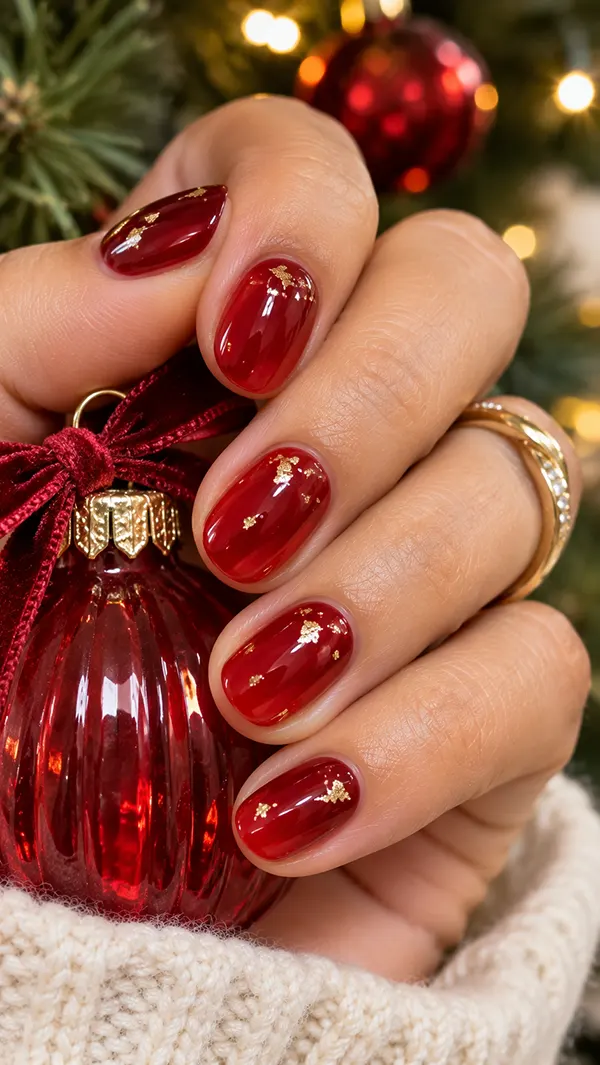
Sheer red jelly nails look like cranberry candy. The polish is translucent, so the color has depth and a soft glow, and the natural nail shows through just enough to look light and fresh. It is one of the most wearable Christmas nail designs for people who do not like heavy color.
This finish looks lovely on short rounded nails and on natural-length ovals. Ask for a jelly gel or a tinted red top coat over a clear or sheer pink base, and build the color with two or three thin layers. The more layers you apply, the deeper the shade, so you can stop at the level that feels right for you.
Finish Tip: Keep the Surface Smooth
Because the color is translucent, any ridge on the natural nail will show. Ask your technician to buff gently and to use a ridge-filling base before the jelly. A smooth base makes the polish look like a clear, glossy gumdrop instead of a streaky stain.
A tiny gold foil flake or a single clear rhinestone near the cuticle adds festive detail without breaking the soft look. At home, apply each thin coat, cure or dry it fully, and finish with a thick glossy top coat. Clean your brush well, since any stray dust will be visible through the sheer color.
3. Snowy Milky White Nails with a Tiny Snowflake
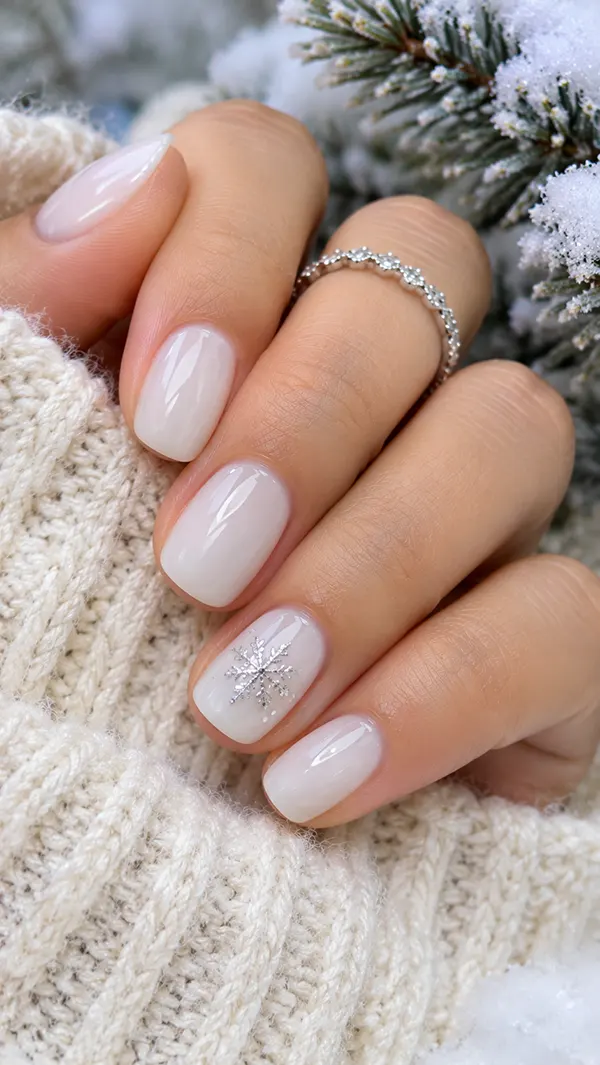
Milky white nails feel like fresh snow. The color is soft and opaque but not stark, so it looks gentle against most skin tones. A single tiny silver snowflake on the ring finger is enough to turn the manicure into one of those subtle Christmas nail designs that people notice up close.
Choose a short round or soft square shape, which keeps the look clean and the snowflake easy to see. Ask for a creamy, milky white rather than a harsh white, and request a fine snowflake in silver or pearl white. Keep the art small and delicate, since a large snowflake can look heavy on a short nail.
Design Detail: Draw the Snowflake in Three Lines
A snowflake looks complicated, but it starts with three crossing lines. Ask your technician to draw a plus sign and a diagonal cross with a thin brush, then add tiny branches and a dot at each tip. A fine nail art brush and a slightly thinned gel make the lines crisp.
If you try this at home, use a dotting tool and a thin liner brush, and practice on a nail tip or a piece of paper first. Silver looks cooler and more icy, while pearl white looks soft and subtle. Seal the art with a thin top coat, so the lines do not smudge.
4. Forest Green Glossy Short Squares
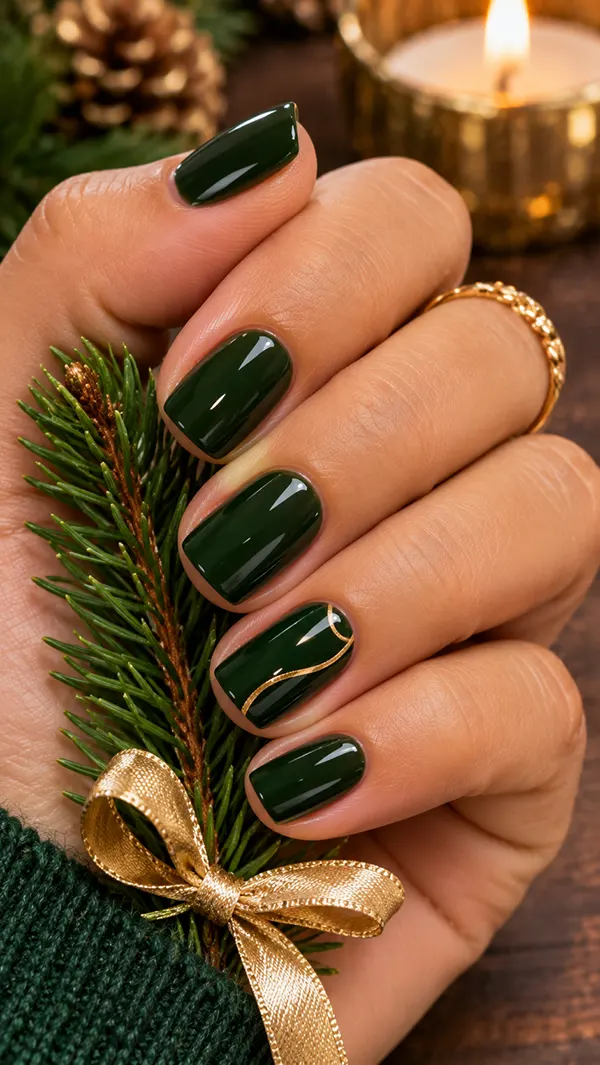
Forest green is the cozy Christmas tree shade. It is deep, a little mysterious, and very flattering on short square nails. With a glossy finish, it looks like a polished pine needle and pairs beautifully with gold and silver jewelry.
Ask for a creamy forest green with a slight blue or gray undertone, since very bright greens can look too costume-like. Two thin coats and a glossy top coat are enough, and a short square shape keeps the manicure sleek. This is one of the easiest Christmas nail ideas for everyday wear, since it pairs well with neutral coats, red sweaters, and black dresses.
Manicure Tip: Avoid Streaks With Dark Green
Dark shades can show streaks if the layers are too thick or too thin. Apply the polish in three strokes, one in the center and two on the sides, and avoid going back over an area that has begun to dry. Wait a minute between coats, and keep the brush slightly loaded.
If you want a tiny detail, ask for a single gold foil accent at the base of one nail or a thin gold line near the cuticle. This adds a festive hint without making the manicure busy. Dark green also hides small chips, so it is a forgiving choice during a busy holiday week.
Find Your Next Favorite: 20 Stunning Short Square Nail Designs for a Chic and Elegant Look
5. Burgundy Velvet Matte Nails
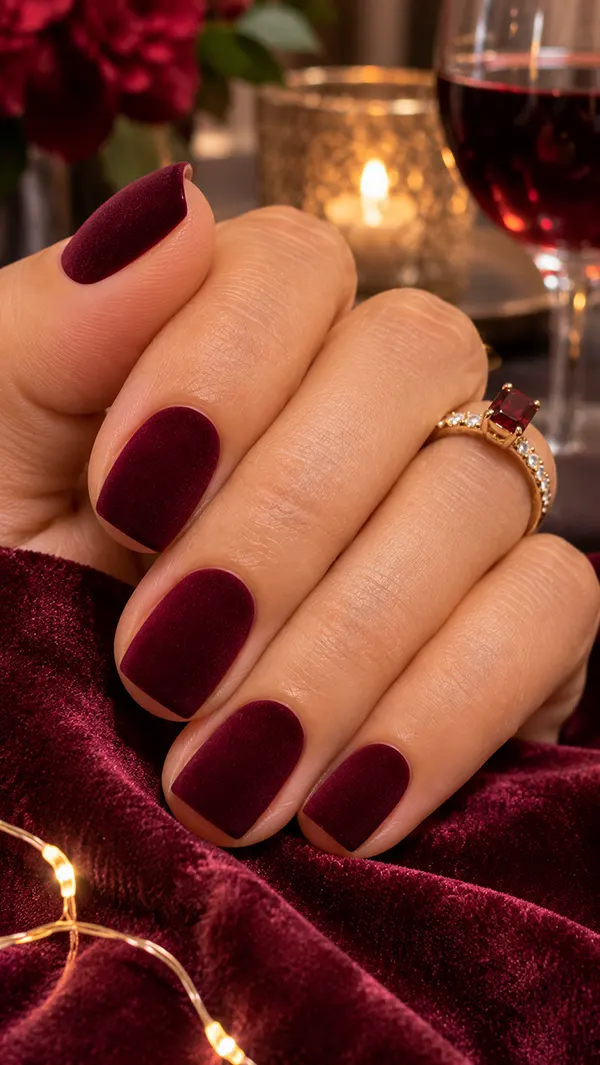
Burgundy velvet nails have a matte finish that looks soft and expensive, almost like the fabric on a holiday dress. The deep wine color is rich and warm, and the matte surface keeps it modern. It is one of the Christmas nail designs I would pick for a cozy sweater and candlelit dinners.
A short square or short oval shape suits this finish best, since very long matte nails can look heavy. Ask for two coats of a deep burgundy polish, followed by a matte top coat. If you like a hint of shimmer, ask for a velvet magnetic polish, which gives a soft glow when it catches the light.
Salon Advice: Ask for a Matte Top Coat Only
Matte finishes can look chalky if a technician applies a matte top coat over a glossy gel without enough care. Ask them to use a thin, even layer and to wipe off the sticky layer gently. Avoid touching the surface with oily hand cream for the first hour.
Matte nails show fingerprints and oils more than glossy ones, so keep a soft cloth and a little rubbing alcohol on a cotton pad for quick clean-ups. If you want a little gloss, ask for a glossy accent on the ring finger for nice contrast.
6. Champagne Gold Shimmer Short Ovals
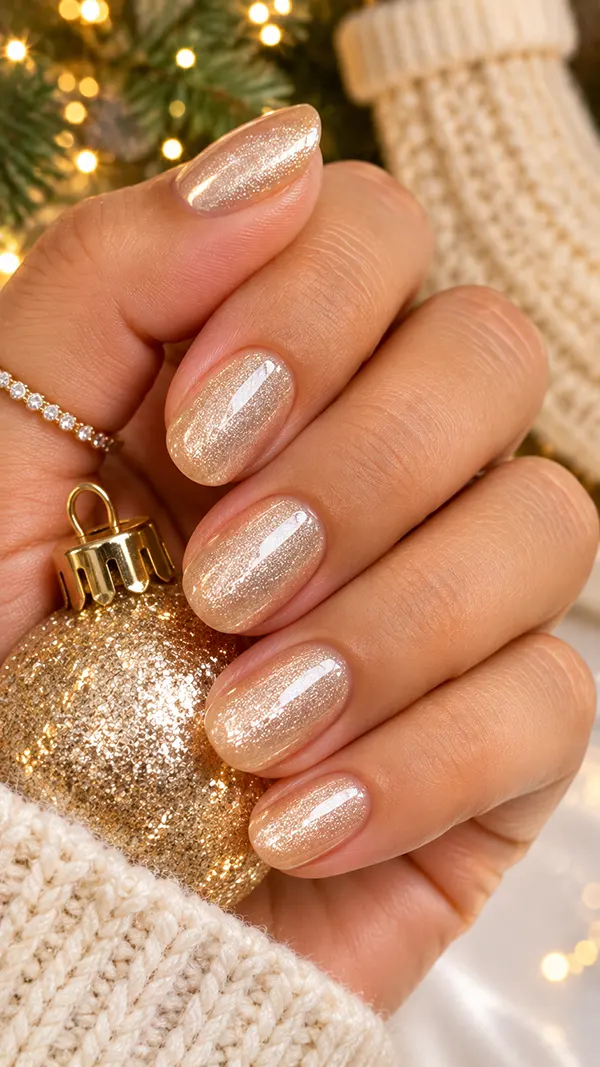
Champagne gold is the softest way to bring sparkle to Christmas nails. It sits between beige and gold, with a fine shimmer that looks like candlelight on glass. On short oval nails, it feels refined and gentle, and it goes with almost every outfit from a red sweater to a black velvet dress.
The key is a fine, evenly distributed shimmer rather than chunky glitter. Ask your technician for a champagne polish with a pearl or metallic finish, applied in two thin coats over a clean base. A short oval shape keeps the sparkle neat, and a glossy top coat makes the shimmer look dewy rather than gritty.
Undertone Guide: Warm and Cool Champagne
Champagne comes in a golden version and a pinker, cooler version. The golden shade flatters olive, golden, and deeper skin tones, and it looks rich with gold jewelry. The pinker champagne suits fair and cool tones and looks lovely with silver and rose gold.
If you are unsure, hold a swatch against your hand in daylight and notice which one makes your skin look even. A champagne manicure also works as a base for tiny details, such as a single white snowflake or a thin red line at the cuticle. It is a friendly choice if you want a festive look that still feels neutral.
Elegant and Classic Holiday Manicures for Dinners, Parties, and Church
When you want a manicure that looks polished in every photo, these six designs are a good place to start. They use classic Christmas colors in refined ways, with gold, pearls, and mirror finishes that look rich without feeling busy. I would choose one of these for a dinner party, a family portrait, or a service.
The common thread is control. Every design has a clear structure, such as a clean tip line, a single accent nail or a carefully applied foil, and a smooth, glossy finish. If you like order and polish, this is your section.
7. Red and Gold French Tips
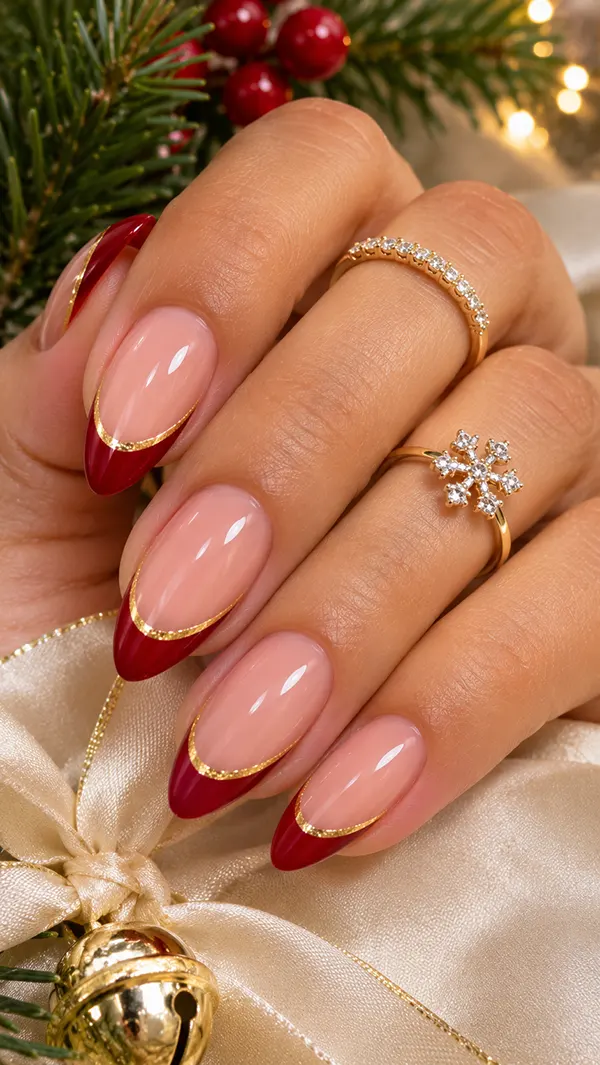
A red-and-gold French tip takes the classic manicure and dresses it up for the holidays. A sheer pink or nude base keeps the nail looking natural, while the red tips, with a thin gold line beneath, add a festive frame. It looks elegant on medium almond nails and feels special without being loud.
This is one of my favorite Christmas nail designs for people who like French manicures. Ask for a soft, curved smile line in a glossy cherry or deep red, followed by a fine metallic gold line along the edge. A thin brush and a steady hand give the cleanest result, so choose a technician who does neat line work.
Design Detail: Keep the Gold Line Thin
The gold line should be the thinnest part of the manicure, almost like a hairline. A thick gold stripe can look heavy and compete with the red. Ask for a fine-line brush and gold gel paint, and request that the line follows the curve of the red tip rather than sitting straight across.
If you want a simpler version, apply gold only to the ring finger and keep the others in plain red tips. At home, use a striping tape for the red tip, remove it before the polish is fully dry, and add the gold line with a fine liner. Seal everything with a glossy top coat for a smooth finish.
8. Emerald Green with Gold Foil Accent
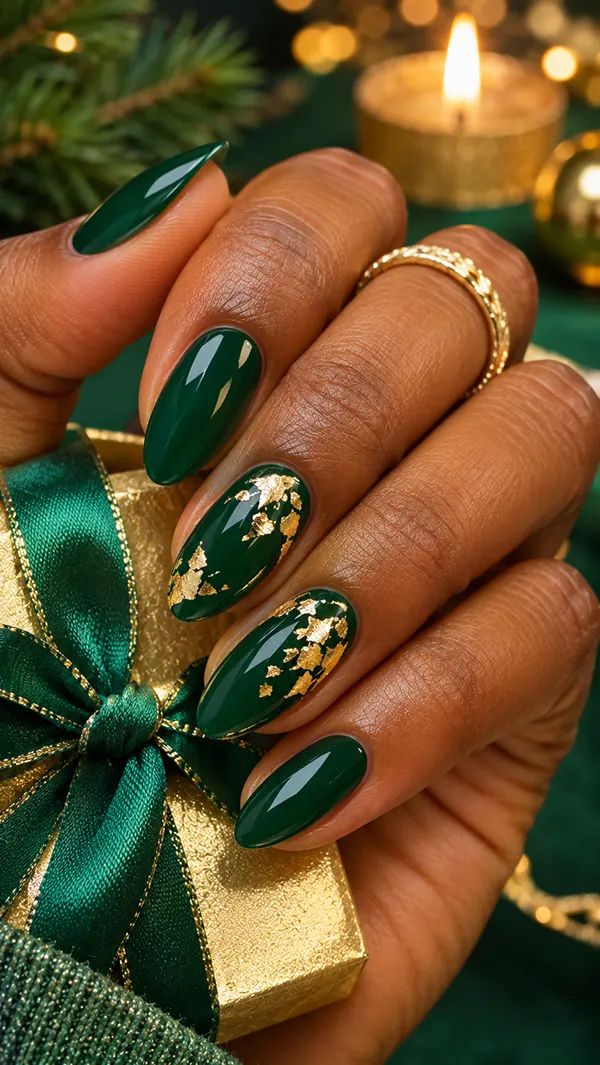
Emerald green is richer and brighter than forest green, and with gold foil, it looks like a jewel box. The foil is torn into tiny irregular pieces and pressed onto one or two nails, so it looks like flakes of gold leaf catching the light. The result feels luxurious and a little theatrical.
Choose a glossy emerald polish with a hint of blue, and ask your technician to apply gold foil over a tacky layer on the ring finger and thumb. A medium almond or short oval shape gives the foil room and keeps the manicure elegant. Seal the foil with a no-wipe top coat so the edges stay smooth and do not snag on sweaters.
Why It Works: Foil Adds Texture Without Bulk
Gold foil gives you metallic shine and subtle texture without the weight of glitter or 3D charms. The irregular shape of the flakes feels organic, and the emerald background makes the gold look warmer. It is a simple way to add depth to a plain polish.
To keep the look refined, restrict the foil to one or two nails and keep the others solid. If you are doing it at home, use a small piece of foil on a tacky base coat and press gently with a silicone tool. Avoid using too many layers, which can make the surface bumpy and difficult to seal.
9. Deep Cherry Nails with Pearl Accents
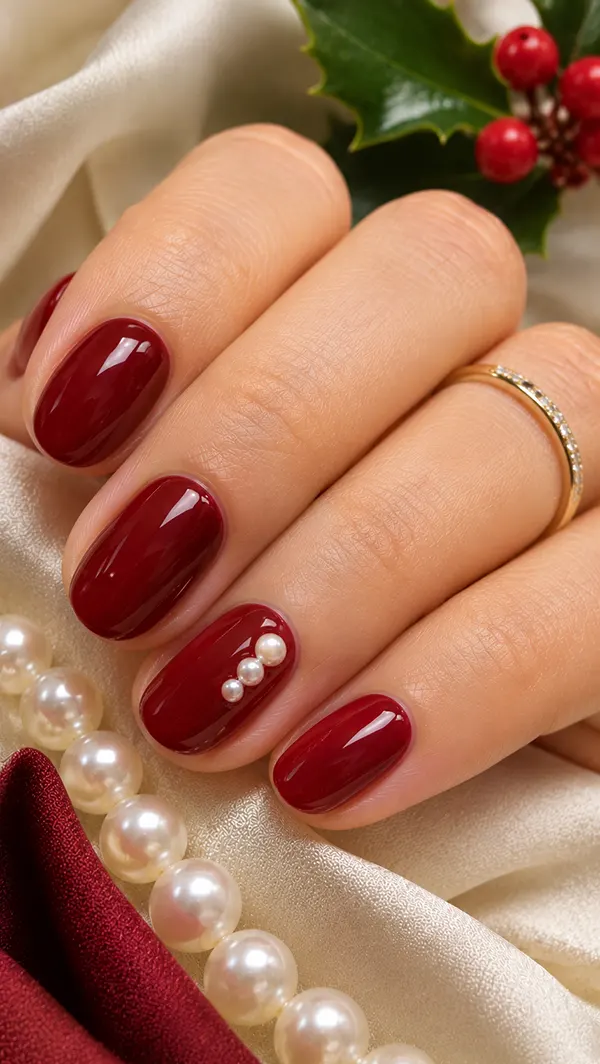
A deep cherry polish has more depth than a bright red, and with a few pearl accents, it looks like a holiday necklace for your hands. The pearls sit near the cuticle or on a single nail, adding a soft 3D detail to the manicure. It suits short ovals and short squares, and it looks very feminine.
For Christmas nail designs that feel romantic rather than playful, this one is worth trying. Ask your technician to apply a deep cherry gel and place two or three small pearls in a diagonal line on the ring finger. A thick top coat around the pearls holds them in place, and a glossy finish makes the cherry look juicy.
Manicure Tip: Secure the Pearls Properly
Pearls can catch on sweaters and hair, so ask your technician to cure them with a builder gel or a strong adhesive. Choose small pearls, since large ones can snag, and place them away from the tip of the nail. If you work with your hands, limit the pearls to one nail.
At home, press the pearls into a bead of gel, cure them, and cover the edges with a thin layer of top coat. Check them each day, and press loose ones back with a small dot of nail glue. Remove the pearls gently with a soak-off; never pick them.
10. Emerald Velvet Cat-Eye Nails
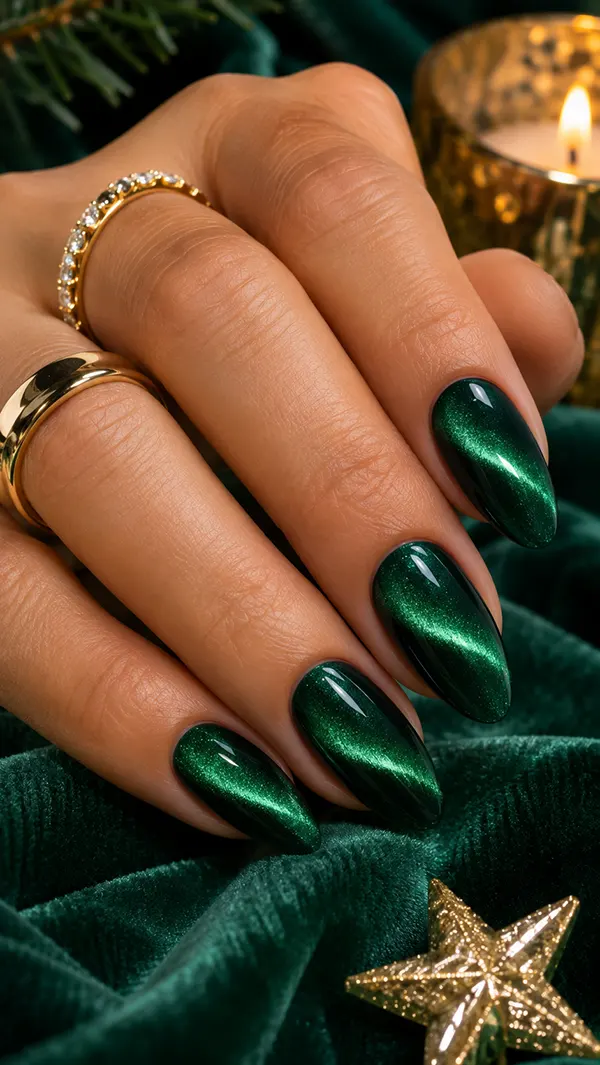
A velvet cat-eye finish uses magnetic polish to create a shimmering band of light that moves as your hand moves. In emerald, it looks like deep green velvet with a glowing stripe, and it feels luxurious and mysterious. It works beautifully on medium almond or oval nails.
Ask for a magnetic emerald gel and request that the magnet be held at an angle for a diagonal glow, or placed at the center for a classic stripe. The finish is created in the salon with a small magnet, so the position matters. A glossy top coat preserves depth, while a matte top coat gives a soft, velvety effect.
Salon Advice: Choose the Magnet Direction
A diagonal cat-eye looks modern, and a vertical stripe looks elegant, so decide which you prefer before you sit down. Show your technician a photo, and ask them to test the magnet on one nail first. The direction changes how the light moves across the nail.
Cat-eye gel needs a dark base to show the effect, so a technician may apply a black or deep green base first. This is normal, and it makes the shimmer more visible. Plan for a slightly longer appointment, since each nail needs its own magnet time.
11. Red Chrome Mirror Nails
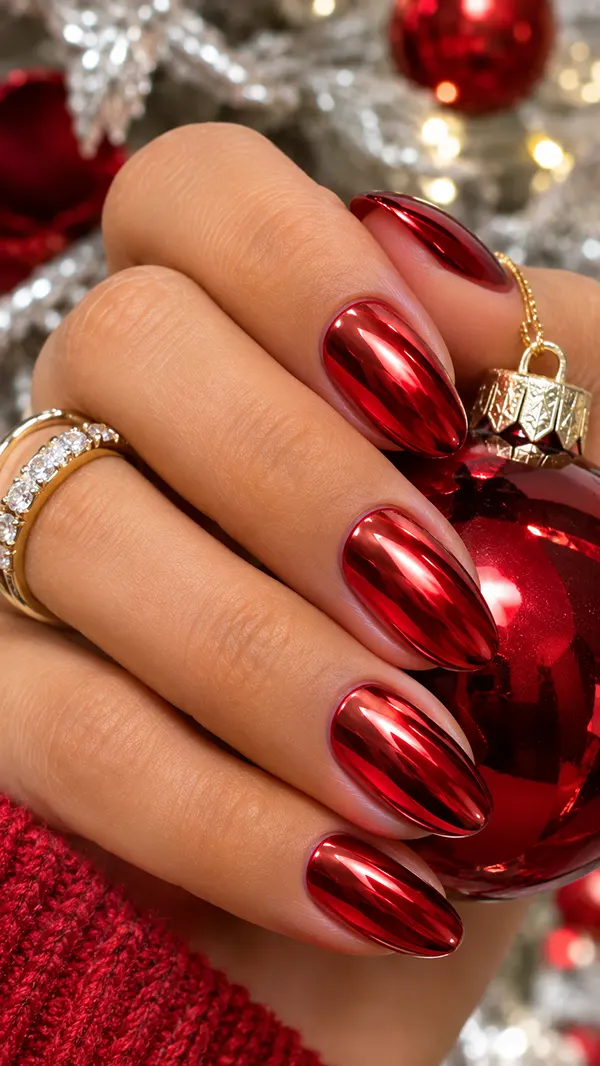
Red chrome nails look like polished ornaments. A mirror powder is rubbed over a red gel base, which creates a reflective, glazed finish that shifts from bright red to deep ruby depending on the light. It is bold, glossy, and very photogenic.
Medium oval and almond shapes show off the reflection best, and the finish looks striking on both short and long nails. Ask your technician to apply the chrome over a no-wipe top coat and to seal it with another layer so it lasts. A deep red base gives a richer mirror than a bright one.
Finish Tip: Choose the Base Color First
The color under the chrome changes the final result. A black base makes the mirror look deep and metallic; a red base gives a warm, ruby effect; and a white base makes it brighter and silvery. Tell your technician the finish you want, and let them choose the base accordingly.
Chrome can scratch if it is not sealed well, so avoid using your nails as tools. Apply cuticle oil regularly, and reapply a top coat if the shine dulls. If you prefer a softer effect, ask for a sheer chrome, which leaves some of the base color showing.
12. Ivory and Gold Marble Nails
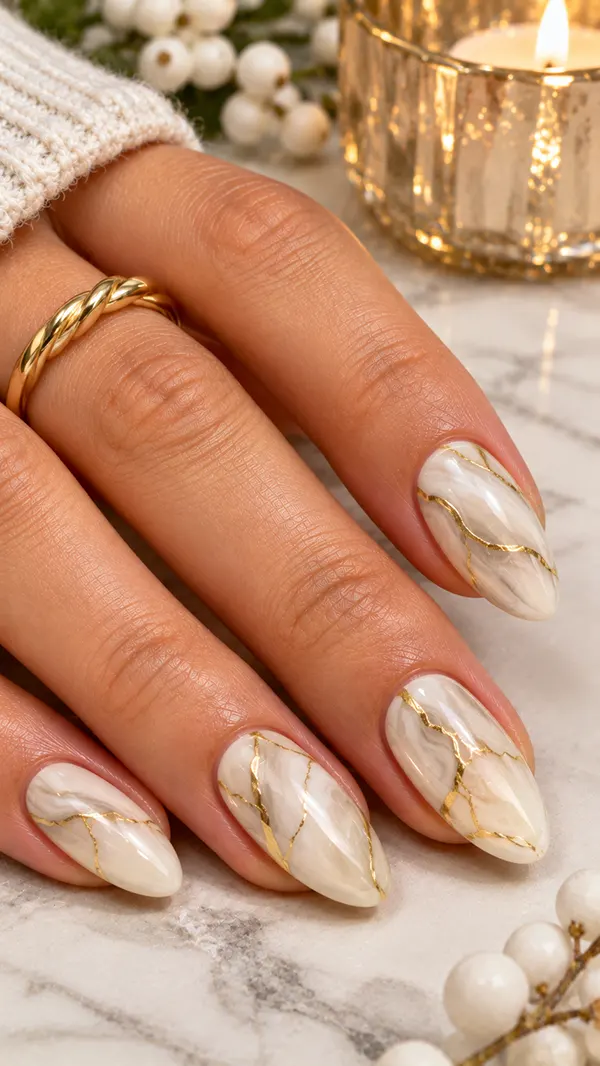
Ivory-and-gold marble nails look like carved stone with veins of metal. The base is a soft ivory, and thin swirls of gold and a touch of gray create a marble effect. It feels elegant, wintry, and a little regal, and it works for people who want Christmas nail art without red and green.
Choose a medium square, almond, or coffin shape, which gives the marble room to flow. Ask your technician to apply a milky ivory base, then drag fine lines of gold gel across it with a thin brush, blending them gently with a clear gel. Finish with a glossy top coat to make the veins look liquid.
Design Detail: Keep the Veins Irregular
Real marble has veins that vary in thickness and direction, so avoid making the lines too neat. Ask for a few thick strokes and several thin ones, and let them cross at different angles. A tiny touch of gray adds depth, and a gold foil fleck can mimic mineral flecks.
If you try this at home, use a small brush and a very thin gel, and let the lines flow rather than controlling them too much. Blend slightly with a clean brush, and cure the layers separately. A glossy top coat finishes the effect and makes the gold look more luminous.
Playful Festive Art for Cozy Days and Family Gatherings
This is the section for people who love a theme. Candy canes, gingerbread, Santa hats, and plaid are the kind of Christmas nail designs that make children point at your hands and friends ask where you had them done. They are cheerful and easy to wear, and they pair beautifully with knit sweaters.
I would keep the art simple and choose one or two accent nails, since a handful of tiny scenes can look crowded. A neutral or red base with a single playful nail often looks more stylish than a full set of characters, and it is easier to grow out after the holidays.
13. Candy Cane Stripe Nails
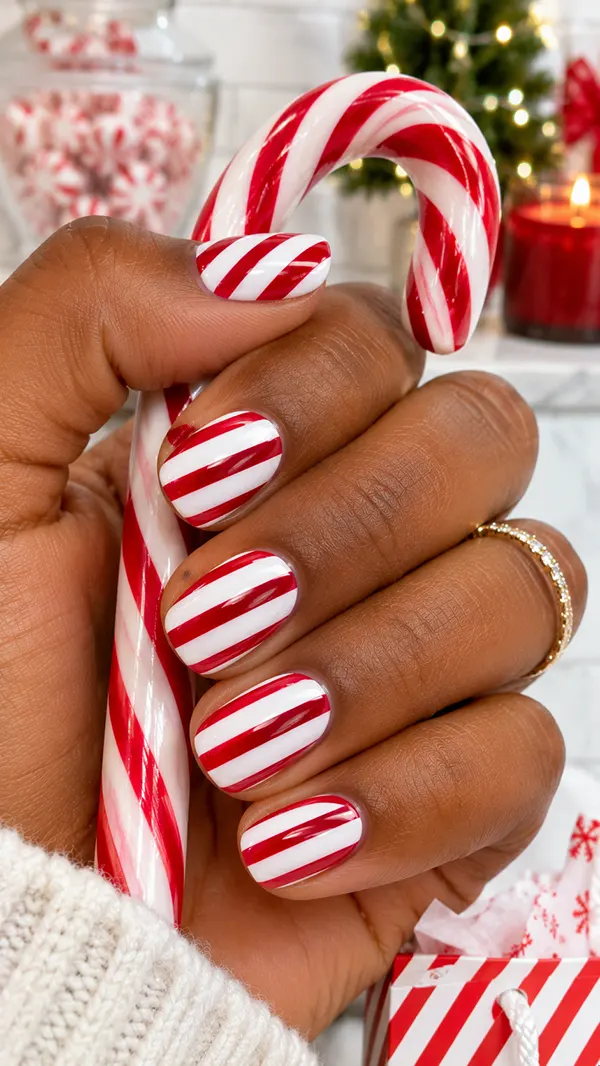
Candy cane stripes are the happiest Christmas nail design. The red-and-white diagonal stripes look crisp and cheerful, and on a short square nail, they look like a perfect peppermint. It is an easy-to-recognize design, and it fits any outfit that has red, white, or green in it.
Choose a clean white base and ask for diagonal red stripes with a glossy polish, either on all nails or as a single accent nail. A fine brush or striping tape yields the sharpest lines, while a pale pink or sheer base offers a softer alternative. Short square and short round shapes keep the stripes neat and easy to read.
Manicure Tip: Use Striping Tape for Clean Lines
Striping tape is the easiest way to get straight, even stripes at home. Apply the white base, let it dry completely, place thin strips of tape at an angle, and paint the red between them. Remove the tape while the polish is still slightly wet to avoid peeling.
If you prefer a hand-painted look, use a thin liner brush and slightly wobbly lines for a vintage candy feel. Seal with a glossy top coat, and clean up the edges with a small brush dipped in remover. Keep the stripes the same width, and the manicure will look professional.
14. Gingerbread Man Accent Nails
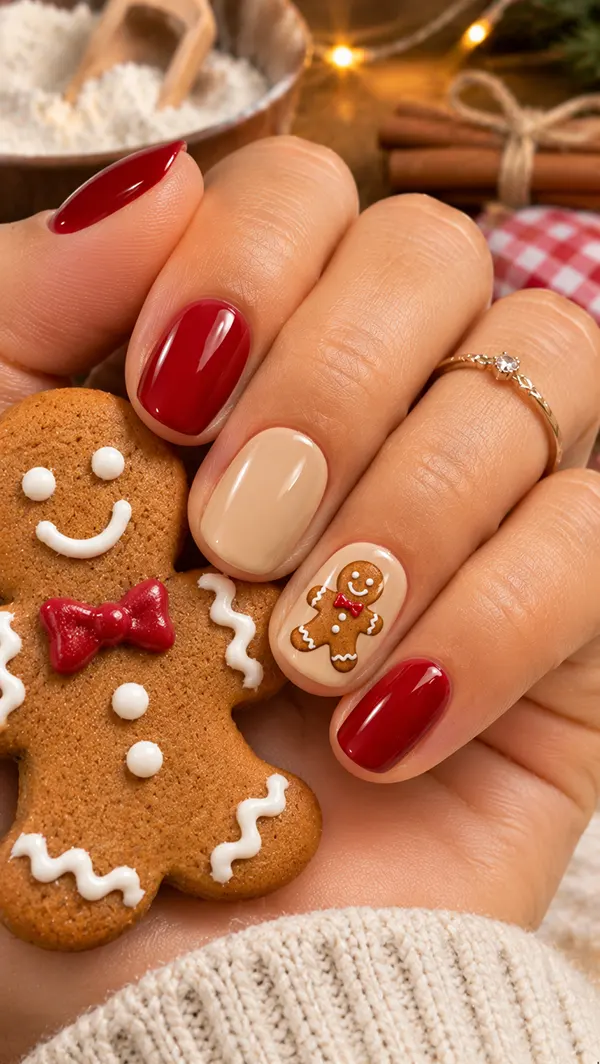
A little gingerbread man on the ring finger makes the whole manicure feel like a bakery in December. The cookie is painted in warm brown with white icing details, and the other nails stay solid in cream, red, or soft brown. It is a sweet, nostalgic design that looks charming on short oval and short round nails.
Ask for a hand-painted gingerbread figure with a simple smile, two dots for eyes, and a white icing outline. Keep the figure small and place it slightly off-center for a modern look. The other nails can be a creamy tan or a glossy red, and a few tiny white dots add icing detail.
Why It Works: One Character Is Enough
A single character keeps the design playful without looking childish. The solid nails give your eyes a place to rest, and the figure becomes the focal point. If you add a character on every nail, the manicure can look busy and harder to coordinate with outfits.
If you try this at home, use a dotting tool and a thin liner brush, starting with the head, then the body, arms, and legs. Practice on paper first, and use a thin gel or acrylic paint for control. A glossy top coat makes the cookie look glazed, and a matte top coat gives it a baked look.
15. Santa Hat Accent Nails
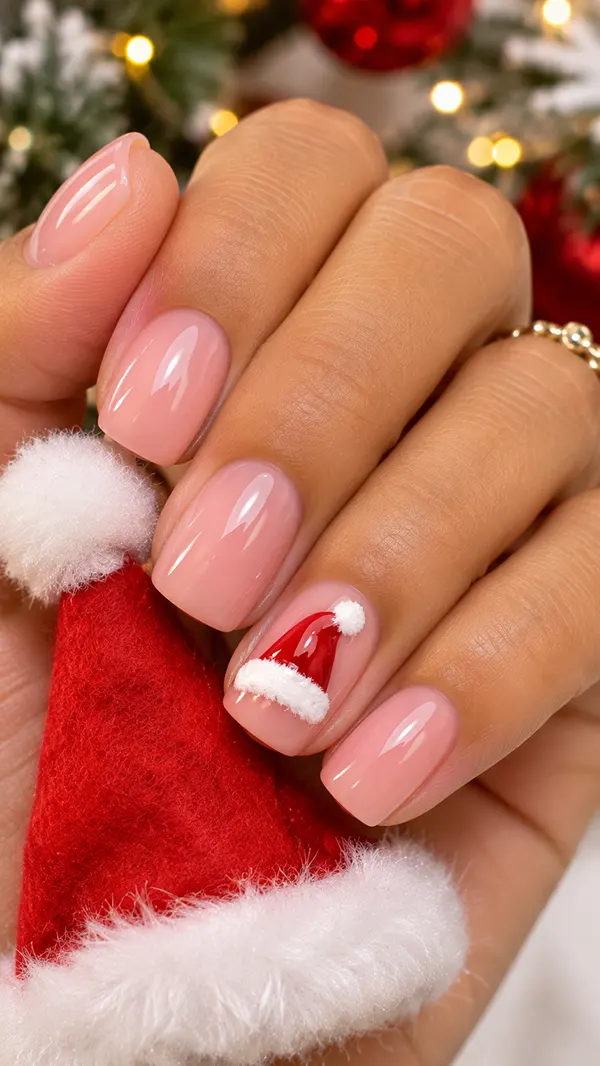
A Santa hat painted across the tip of the ring finger is one of the cutest Christmas nail ideas. The red cap, white fur trim, and tiny pom-pom sit on a nude or sheer base, so the design feels playful but light. On short square or short round nails, it is easy to read and easy to wear.
Ask your technician to paint the hat glossy red, with a fluffy white band and a small pom-pom at the tip. A thick white gel gives the fur trim a soft, raised look. Keep the other nails in a sheer pink, milky white, or solid red, and the hat becomes a charming focal point rather than a costume.
DIY Tip: Build the Hat in Three Shapes
A Santa hat is made of only three simple shapes: a red triangle, a white band, and a white dot. Paint the triangle first with a thin brush, add the band across the base, and place the pom-pom with a dotting tool. Let each layer dry before the next, so the colors stay clean.
A thicker white gel gives the trim a plush texture, but keep it neat at the edges. If the shape feels too tricky, use a nail sticker and seal it with a top coat. Check the design from the front and side, since small proportions can look different on a curved nail.
16. Tiny Christmas Tree Nails
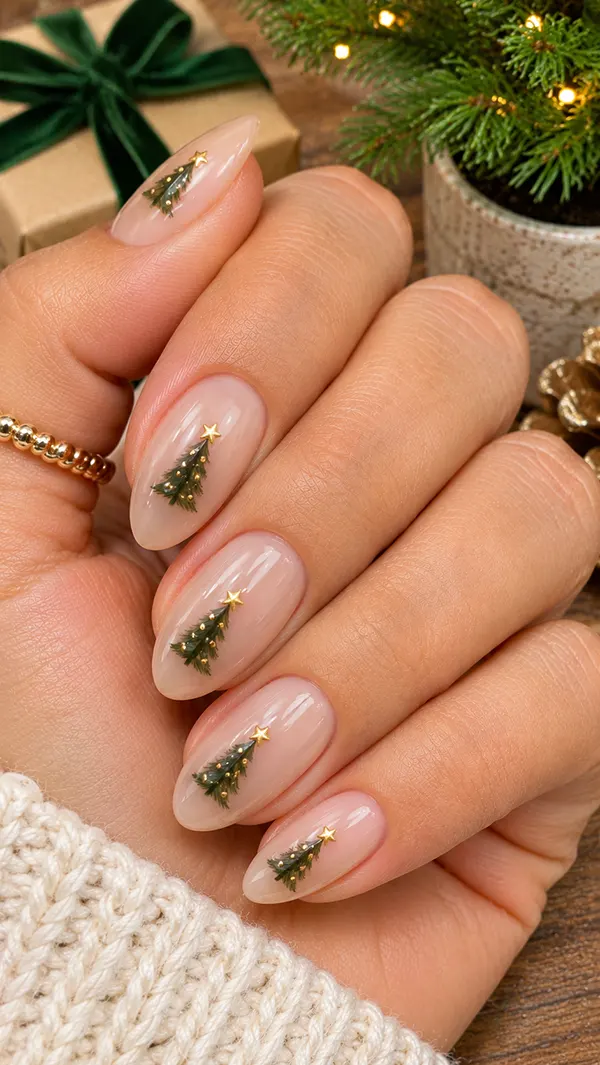
Tiny Christmas trees on a nude base are the manicure I would suggest to anyone who wants a scene without the clutter. Each tree is a small green triangle with a gold star on top and tiny colored dots for ornaments, and the rest of the nail stays clean. The effect feels like a miniature forest on your fingertips.
Choose medium oval or almond nails for this design, since the longer shape gives the trees room to grow. Ask your technician to paint the trees in a slightly layered shape, with a thin brown trunk and a gold star. A sheer beige base makes the green stand out, and a glossy top coat gives the trees a polished finish.
Design Detail: Use Negative Space
Leaving most of the nail bare makes the tree look bigger and more graceful. Keep the tree on one side of the nail, and let the rest be clear or nude. A few tiny gold dots can suggest ornaments without crowding the design.
For a modern version, ask for trees made from simple vertical lines in different shades of green, which look like a minimalist forest. If you are painting at home, use a thin brush and begin at the top of the triangle, widening as you go down. A dotting tool makes perfect ornaments, and a thin top coat seals the art.
17. Buffalo Plaid Nails in Red and Black
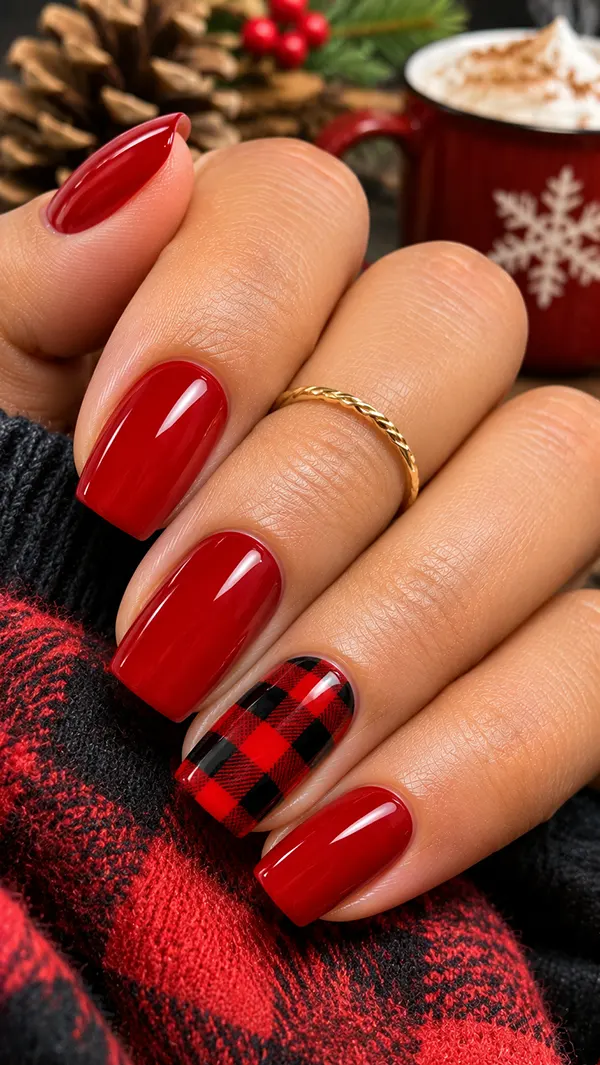
Buffalo plaid is the pattern of cozy cabins and flannel shirts, and on nails, it looks bold and graphic. Red and black checks form a grid that feels warm and familiar, and a single plaid accent nail with plain red or black nails looks stylish and manageable. It suits medium square and short square shapes well.
These Christmas nail designs work best when the grid is clean and the squares are evenly sized. Ask your technician to paint a red base, then lay black stripes in both directions, with a thin line of lighter red or white for the weave. A glossy top coat keeps the colors crisp, and a matte top coat gives a soft flannel look.
Why It Works: Pattern on One, Solid on the Rest
Plaid is busy, so it looks best on one or two nails, with the others in solid red or black. This keeps the manicure cohesive and lets the plaid stand out. If you like a pattern, you can do plaid on the ring finger and thumb.
To recreate it at home, paint a red base, let it dry, and use a thin striping brush to draw vertical lines, followed by horizontal lines. Allow each layer to cure before adding the next, so the lines stay sharp. A small brush dipped in remover can clean up any messy edges before you seal the design.
Worth a Look: 20 Stunning Black Nail Ideas for a Bold and Elegant Manicure
18. Cozy Sweater Knit Texture Nails
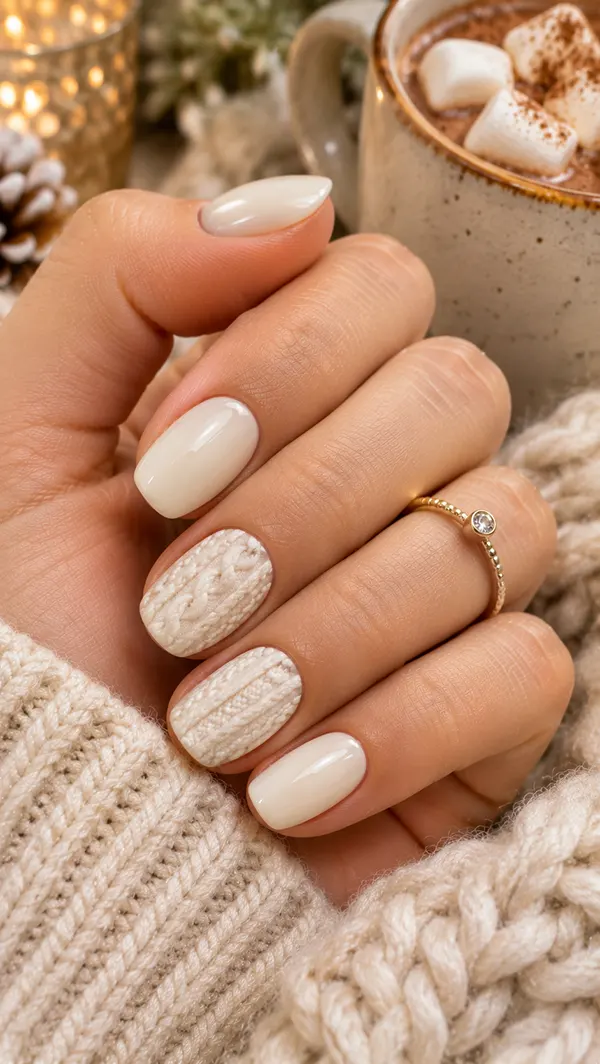
Sweater nails have a raised, knitted texture that looks like a cozy winter jumper. In cream, oatmeal, or soft red, the ribbed pattern is made with a thick builder gel and a fine tool, and the result feels almost tactile. It is a charming choice for people who love the idea of a manicure that looks like knitwear.
Short oval and short square shapes suit this design best, since the texture is the star and the shape should stay simple. Ask your technician for a cream or light gray base and a raised pattern of small V-shapes or cables, finished with a matte topcoat to mimic wool. Keep it on one or two nails for a softer effect.
Salon Advice: Book Extra Time for Texture Work
Sweater texture is labor-intensive, since each line is built layer by layer with a thick gel. Tell your technician you want a knit design when you book, so you have enough time. Bring a photo of the pattern you like, since there are many kinds of knit stitches.
The raised texture can catch on hair and clothing, so ask for a smooth, rounded finish at the edges. Avoid very long nails with heavy texture, which can feel awkward. Keep the surface clean with a soft brush, and use cuticle oil around the edges rather than on the texture itself.
Snow, Sparkle and Winter Magic: Glittery Christmas Nails for Parties and Cold Nights
If you love shimmer, this is where the season gets really fun. Snowflakes, icy blues, silver gradients, and starry skies look wonderful with winter coats and party dresses. They catch every string of lights, and they photograph beautifully at night.
I like to keep glitter in one zone of the nail, such as the tip or a gradient, so it looks intentional. A fully glittered nail can feel heavy and is difficult to remove, while a controlled sparkle gives the same festive feeling with less effort. These designs also help you hide regrowth, which is useful in a busy month.
19. Snowflake French Tips
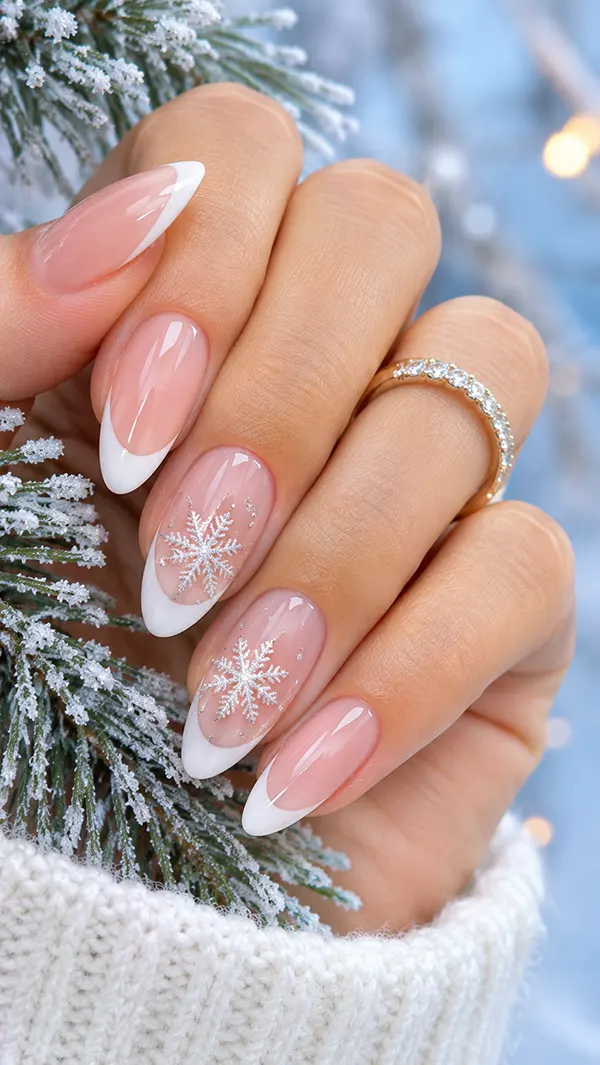
Snowflake French tips mix a classic manicure with tiny winter art. The base is a sheer pink or milky white; the tips are painted white or silver, and a small snowflake sits on a couple of accent nails. It looks delicate and polished, and it suits medium almond and oval shapes.
Ask your technician to paint a clean, soft French tip in white or pale silver, then add a fine snowflake on the ring finger and thumb. The snowflakes can be drawn with a thin liner brush in white or pearl. A glossy top coat keeps the design sharp, and a hint of fine glitter in the clear top coat can mimic a light dusting of snow.
Style Tip: Match the Snowflake to Your Jewelry
Choose silver snowflakes if you wear silver or white gold jewelry, and pearl white if your jewelry is soft or neutral. A gold snowflake feels warmer and pairs with gold rings. This small choice makes your hands look cohesive, and it helps the manicure feel like part of your whole outfit.
If you are not sure, take a favorite ring or bracelet to the salon and hold it against the polish swatches. Keep the snowflakes small, and place them at the base of the tip or just above it. A single large snowflake can look dramatic on a long nail, but small ones look more elegant on shorter shapes.
20. Icy Blue Glitter Ombre
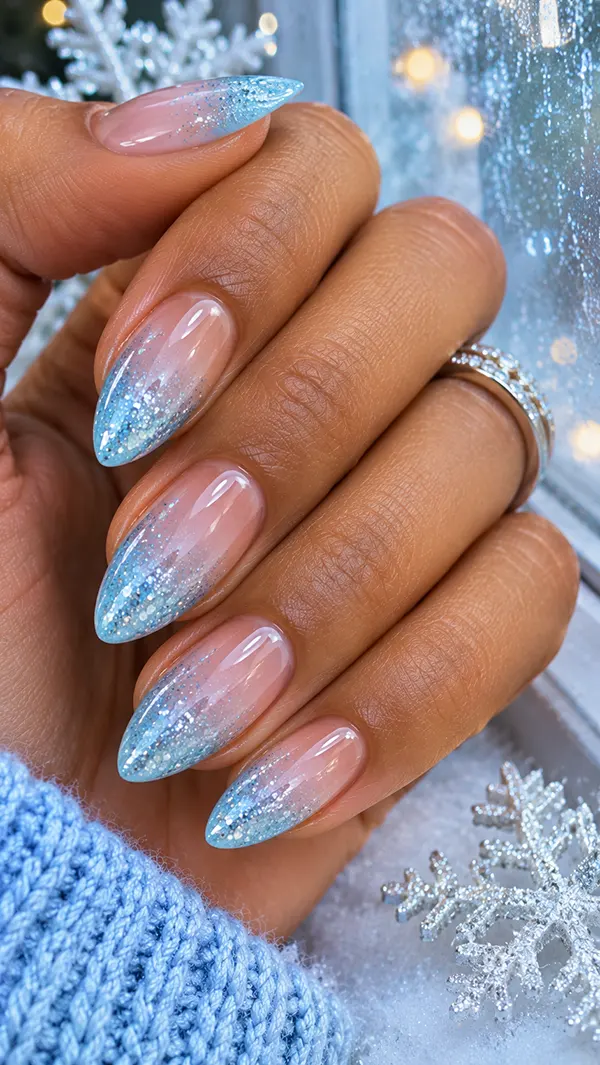
An icy blue glitter ombre fades from clear at the cuticle to a pale blue shimmer at the tip. It looks like frost on a window, and the gradient feels light, modern, and very wintery. This is one of the most wearable Christmas nail designs if you want sparkle that isn’t red or green.
Medium almond and coffin nails show the gradient beautifully, since there is space for the color to fade. Ask your technician to build the ombre with a sponge or a brush, using a pale blue gel and fine silver glitter concentrated at the tip. A glossy top coat smooths the glitter and keeps it from feeling rough.
Finish Tip: Smooth the Glitter
Glitter can feel gritty if it is not sealed properly. Ask your technician to apply two thin layers of top coat and to cure each one fully. Run a finger along the nail to check for rough spots, and ask for a third layer if needed.
If you are doing it at home, use a sponge to dab glitter onto the tip, then sweep the polish upward in a soft gradient. Fine glitter blends more naturally than chunky glitter. Remove it with a soak-off method rather than scraping, since glitter gel can be stubborn and may damage the nail if you pull.
21. Silver Glitter Gradient Nails
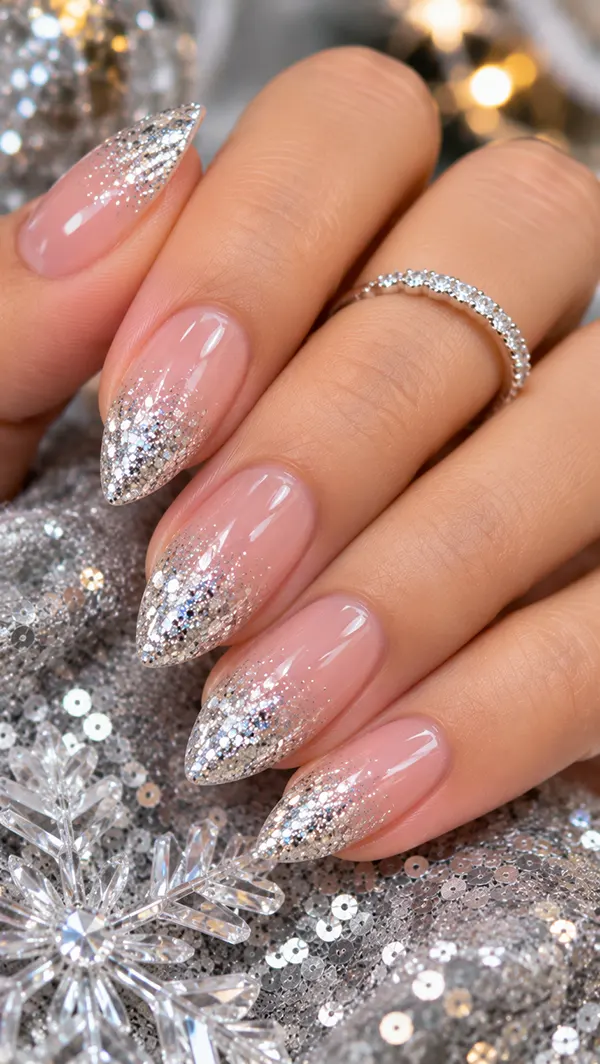
Silver glitter gradient nails look like moonlight on snow. The glitter is heaviest at the tip and fades toward the middle of the nail, so the base color stays visible. It works over clear, nude, red, navy, or green, and it is a great way to add sparkle to any base color.
Choose a fine silver glitter and ask your technician to apply it in thin layers with a sponge or a brush. Short ovals and medium almonds look best, since the glitter highlights the shape. A glossy top coat prevents the surface from feeling rough, and a clear base lets the glitter float.
Copy This Look: Try It Over Any Base Color
The silver gradient is a flexible design because it works over any color. A navy base looks like a night sky, a red base looks like holly berries with frost, and a nude base feels soft and bridal. Choose the base that matches your outfits for the season.
If you want a subtle version, ask for glitter only on the tip and keep the gradient short. For a bolder look, extend the glitter halfway down the nail. A silver glitter polish also pairs well with other designs, such as a French tip or a snowflake, which gives you many ways to adapt it.
22. Starry Night Navy with Gold Stars
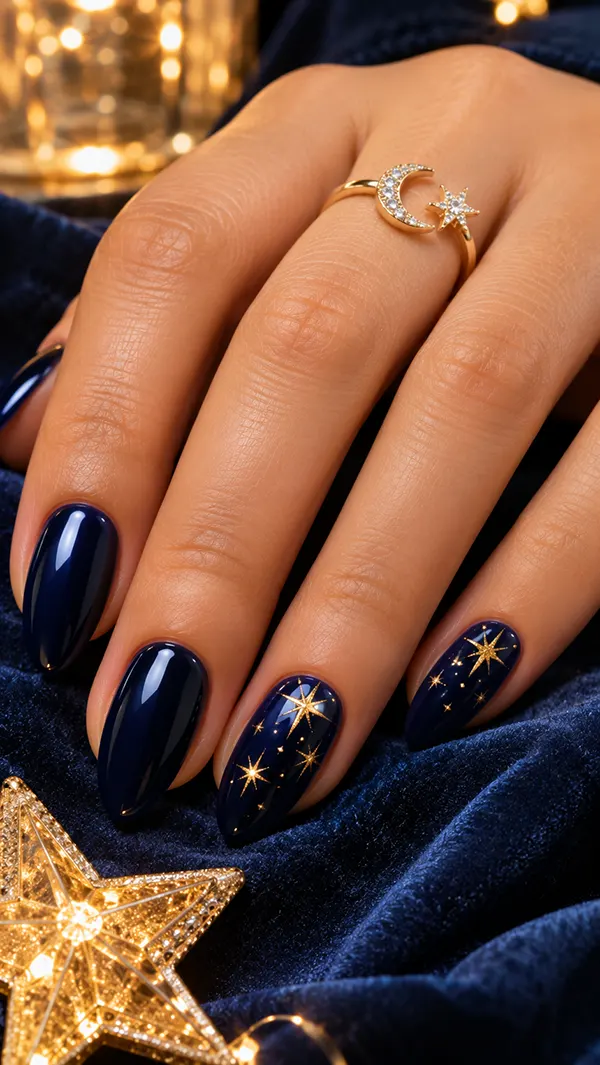
Deep navy nails with tiny gold stars feel like a clear winter sky. The base is a rich midnight blue, and the stars are scattered across one or two nails in gold foil or hand-painted dots. It is a refined alternative to red and green, and it suits medium almond and oval shapes.
Ask for a glossy navy polish in two thin coats, then place small gold stars with tweezers or a fine brush. A few tiny dots of gold or white between the stars add depth, and a glossy top coat seals everything. Keep the stars small and varied in size, and avoid grouping them too neatly.
Color Note: Navy Is Softer Than Black
Navy gives the same depth as black without the severity, and it flatters most skin tones. It looks especially nice on fair and olive skin, and it makes gold jewelry glow. If you prefer a warmer look, choose a navy with a hint of purple, and if you prefer a cooler look, choose a pure midnight blue.
Gold foil stars look metallic and bright, while hand-painted stars look soft and handmade. If you use stickers, press them gently and seal the edges with a top coat to prevent them from lifting. A navy base hides chips better than lighter shades, which helps the design last through a busy week.
23. Snowy Pine Branch Nails
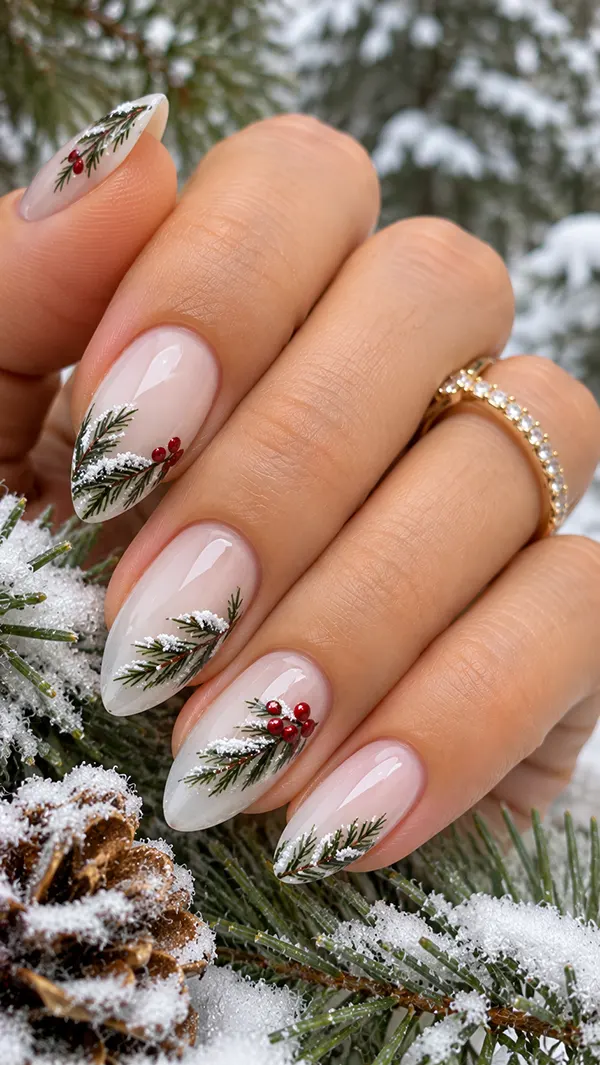
A snowy pine branch on a sheer base looks like a bit of forest on your fingertip. The branch is painted in deep green with fine needles, and a dusting of white at the tips suggests snow. It is a graceful, natural design that is festive without any bright color.
Ask your technician for a clear or milky base and a thin pine branch painted along one side of the ring finger nail. A small cluster of white dots can mimic snow, and a tiny red berry adds a final touch. Medium almond and oval shapes suit this art best, since they give the branch room to curve.
Design Detail: Let the Branch Curve
A branch looks natural when it follows the nail’s curve. Ask for a gentle diagonal line with needles fanning out in different lengths. A thin brush and a very small amount of paint give the best control, and varying the pressure creates natural-looking needles.
If you are doing this at home, start with the stem, add the needles in short strokes, and finish with white dots of snow on the upper needles. Practice on a sheet of paper first, since the movement is quick. Seal the design with a thin glossy top coat, and avoid pressing too hard so the needles do not smudge.
24. Aurora Chrome Nails
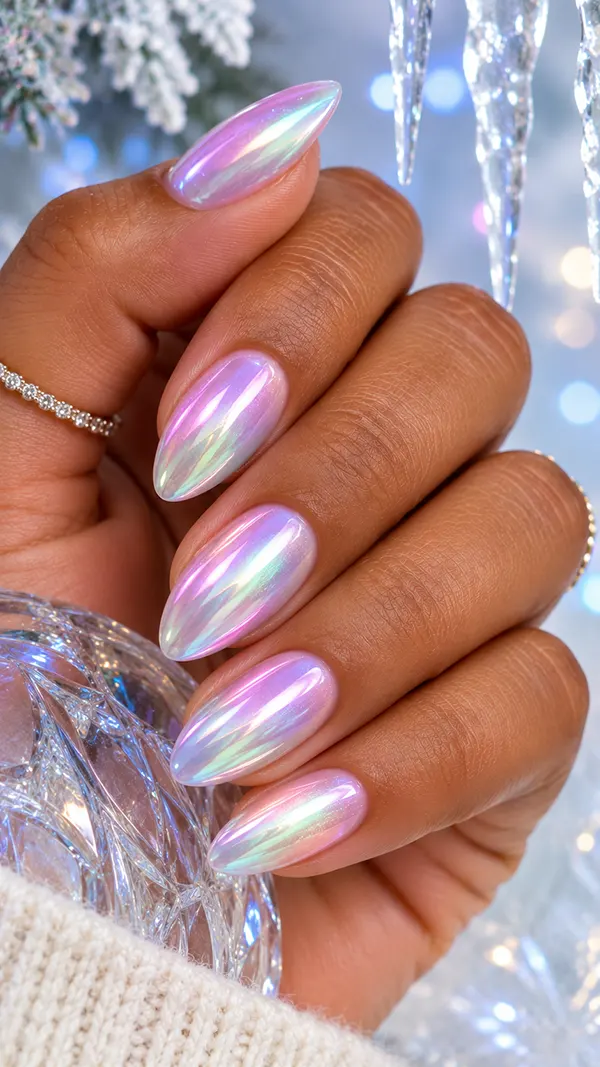
Aurora chrome nails shimmer in shades of pearl, lilac, blue, and mint, like the northern lights across a winter sky. The effect comes from an iridescent powder rubbed over a dark or milky base; it changes color as you move your hand. It is a fresh take on Christmas nail designs for anyone who finds red and green too traditional.
Choose a medium almond or oval shape, which lets the shimmer travel along the nail. Ask your technician to apply the powder over a white or pale base for a soft pastel glow, or over black for a stronger, more dramatic effect. A glossy top coat seals the finish, and a thin layer of clear gel prevents the powder from rubbing off.
Finish Tip: Pick the Base for the Mood You Want
A white base makes the aurora effect look pastel and dreamy, like frosted glass. A black base makes the colors look deeper and more electric, like a night sky. A sheer pink base creates a soft pearly glow that is easy to wear and flatters most skin tones.
Aurora powder can look different under different lighting, so ask your technician to show you a test nail. Wear it with silver jewelry for a cool look, or pair it with gold for contrast. If you want to add festive detail, ask for a tiny white snowflake or a single star on one nail.
Bold Statement Manicures That Get Noticed at Every Table
Sometimes you want your nails to be the loudest accessory in the room. These six designs use length, 3D details, and strong contrasts to create a manicure that looks like a piece of jewelry. They are best for parties, photos, and anyone who enjoys a dramatic hand.
Bold does not have to mean messy. I recommend choosing one focal technique—such as bows, rhinestones, chrome, or hand-painted foliage—and keeping the rest of the manicure clean. A strong idea with controlled execution looks glamorous, and it will still be a joy to wear on the twentieth of December.
25. Long Red Coffin Nails with Rhinestone Bows
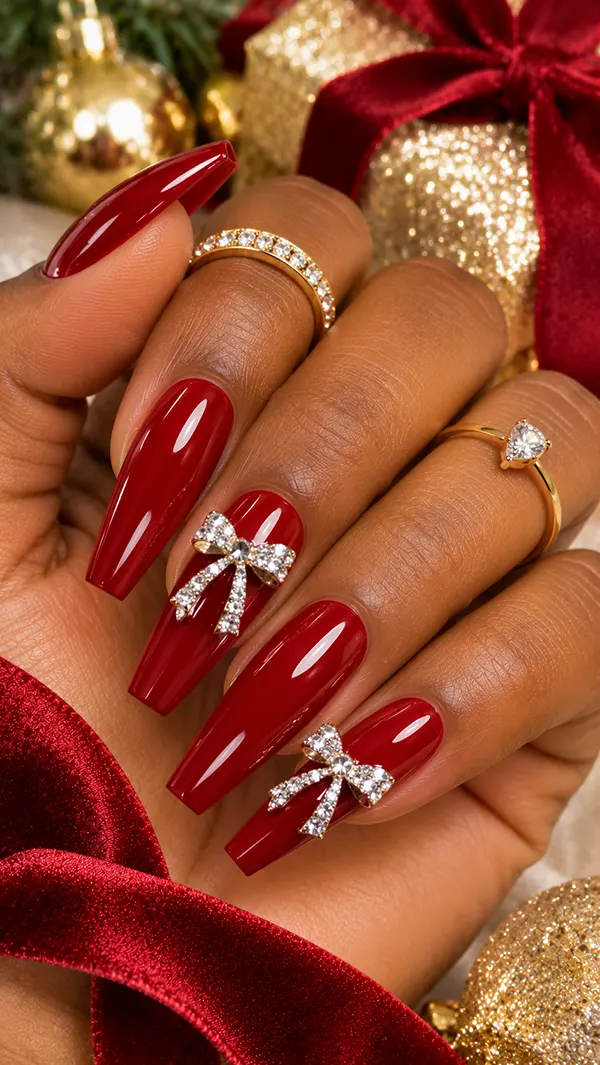
Long red coffin nails with rhinestone bows are the holiday glam of the season. The deep red base is glossy and rich, and tiny crystal bows sit on one or two nails like ribbons on a gift. It is a sparkly, feminine, and very photogenic manicure.
Ask your technician for a medium-to-long coffin shape, a deep red gel, and small rhinestone bows placed near the cuticle or at the center of the nail. A strong builder gel holds the crystals in place, and a thick top coat around the stones keeps them from catching on sleeves. Keep the bow clusters to one or two nails for balance.
Nail Care Note: Long Nails Need Protection
Long coffin nails need a strong structure, so ask your technician to apply a thin apex layer of builder gel to reinforce the stress point. This reduces the chance of breaks, especially with rhinestones and extra weight. Avoid using your nails to open cans or scrape surfaces.
Carry a small kit with a file, cuticle oil, and a little nail glue in case a stone lifts. Use your finger pads for typing and other tasks, and keep your gloves on while washing dishes after the holiday meal. Book a fill every two to three weeks, so the nails stay balanced and neat.
26. Painted Ribbon Bow Nails
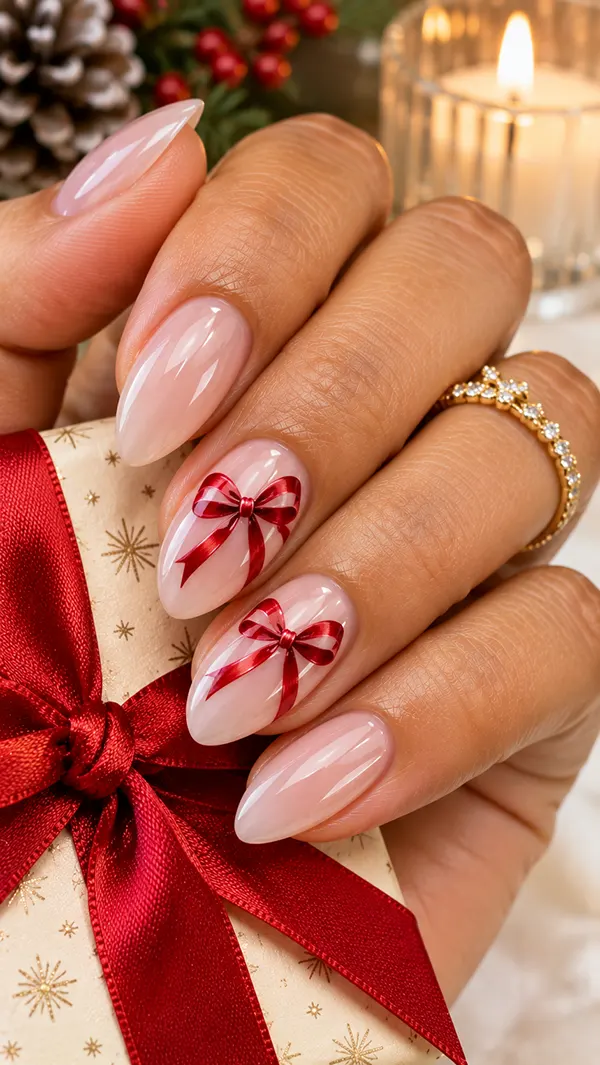
A painted ribbon bow on a nude or sheer base looks like a tiny present wrapped on each fingertip. The bow can be red, green, gold, or white, and the ribbons are drawn with soft curves and small loops. It is a romantic, sweet design that suits medium oval and almond nails.
Ask your technician to paint a small bow at the center of one or two nails, using a fine brush and gel paint. A tiny highlight dot on each loop makes the ribbon look glossy, and a thin shadow gives it depth. Keep the base clean, with a sheer pink or milky white, so the bow stands out.
Design Detail: Highlights and Shadows Add Dimension
A flat bow can look like a sticker, but a few small highlights and shadows turn it into a ribbon. A thin white line along the top of each loop and a darker line underneath create depth. This takes a few extra minutes, and it makes the art look professional.
If you are painting at home, start with a small center knot, add two loops on each side, and finish with two short tails. Use a thin brush and keep your hand steady by resting your wrist on the table. A glossy top coat makes the ribbon shine, and you can add a tiny rhinestone to the center for a sparkly touch.
27. Holly Berry and Leaf Nails
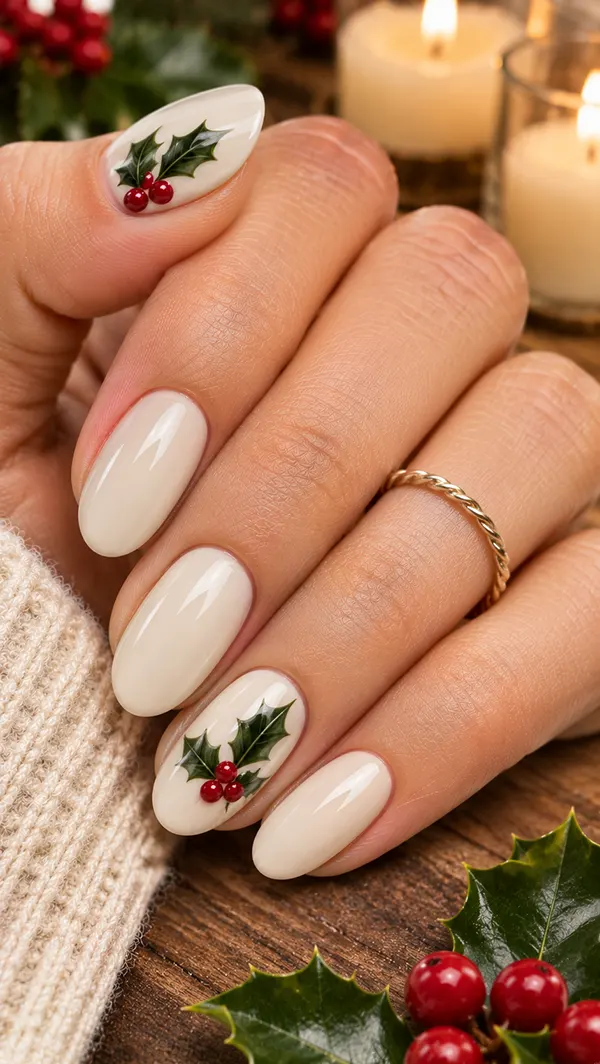
Holly berries and leaves are among the oldest symbols of Christmas, and on nails, they look classic and charming. Deep green leaves with small red berries sit on a nude, milky white or burgundy base, and the design feels both traditional and fresh. It is an elegant way to use the classic red-and-green palette.
For Christmas nail designs with a natural feel, this one is a favorite. Ask your technician to paint pointed holly leaves with a thin vein line and cluster three berries at the base. A glossy top coat makes the berries look juicy, and a tiny white highlight on each berry adds realism. Medium oval and almond shapes best show the leaves.
Why It Works: Contrast Keeps It Readable
Holly looks clear when the leaves are dark, and the base is light. A milky white or nude base makes the green and red pop, while a burgundy base gives a moody, rich effect. Avoid placing red berries on a red base, since they will disappear.
To recreate it at home, paint the leaves with a thin brush and two layers of green, then add the vein with a lighter green or gold. Dot the berries with a dotting tool and add a tiny white reflection. Seal with a glossy top coat, and avoid covering the whole nail, since a little negative space keeps it graceful.
28. Gold Glitter Half-Moon on Burgundy
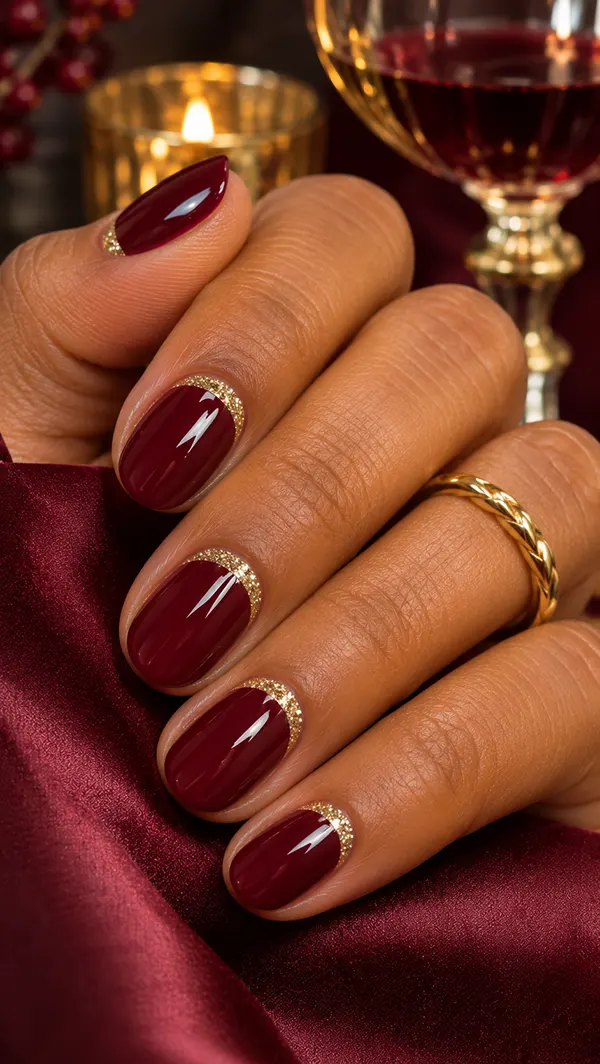
A gold glitter half-moon at the base of a burgundy nail is a modern, elegant take on the reverse French. The deep wine color is rich and moody, and the curved crescent of gold glitter near the cuticle adds a glowing detail that looks like a halo. It suits short oval and almond shapes.
Ask your technician to apply a glossy burgundy polish, then paint a thin crescent at the base of each nail with a fine gold glitter gel or foil. A clean cuticle line is essential, since the design sits right next to it. A thick top coat smooths the glitter and gives the polish a deep, glassy finish.
Salon Advice: Choose a Technician with a Steady Hand
The half-moon needs an even curve, so it helps to book with someone who does precise line work. Show a photo and ask them to match the crescent’s size to your nail bed. A smaller moon looks delicate, while a larger moon makes a bolder statement.
If you grow out your nails, the gap between the moon and the cuticle will become visible, so plan for a fill after about two weeks. A glitter moon can also be done on a nude or navy base. If you want a simpler version, ask for gold only on the ring finger, and keep the others solid burgundy.
29. Black and Red Velvet Holiday Nails
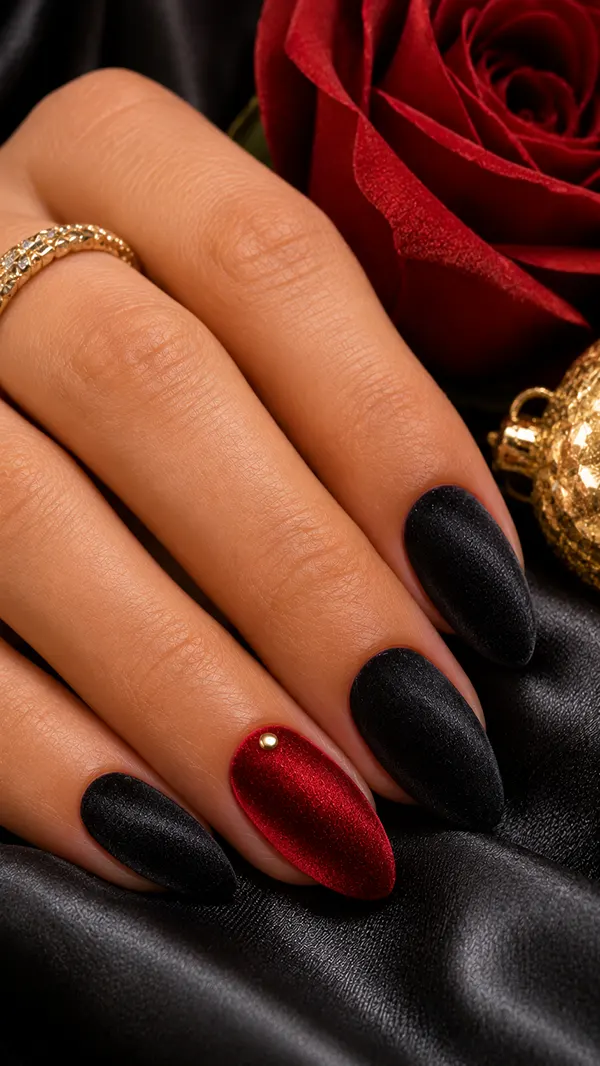
Black-and-red velvet nails are the moody, glamorous option for those who prefer a darker Christmas. A matte black base with red velvet accents, or a red matte base with a black French tip, looks sophisticated and a little dramatic. It suits medium almond and short coffin shapes.
Ask your technician for a velvet magnetic or matte finish in black, and add a velvety red accent on the ring finger, or a thin red line along the cuticle. A matte top coat gives the entire manicure a soft, fabric-like surface, and a single gold or silver detail can add a hint of shine. It looks lovely with a black dress and red lipstick.
Style Tip: Keep Metallic Details Tiny
Because black and red are already strong, any metallic detail should be small. A single gold dot, a thin silver line, or a tiny star adds interest without overwhelming the design. Too many shiny accents can make the matte surface look cluttered.
Matte black shows scratches and oil, so use a soft cloth to wipe the nails clean and avoid harsh scrubbing. If a scratch appears, a thin layer of matte top coat can hide it. Choose this design for dinners and parties, and expect the velvet look to stay crisp for about two weeks with proper care.
30. Chrome Christmas Ornament Nails
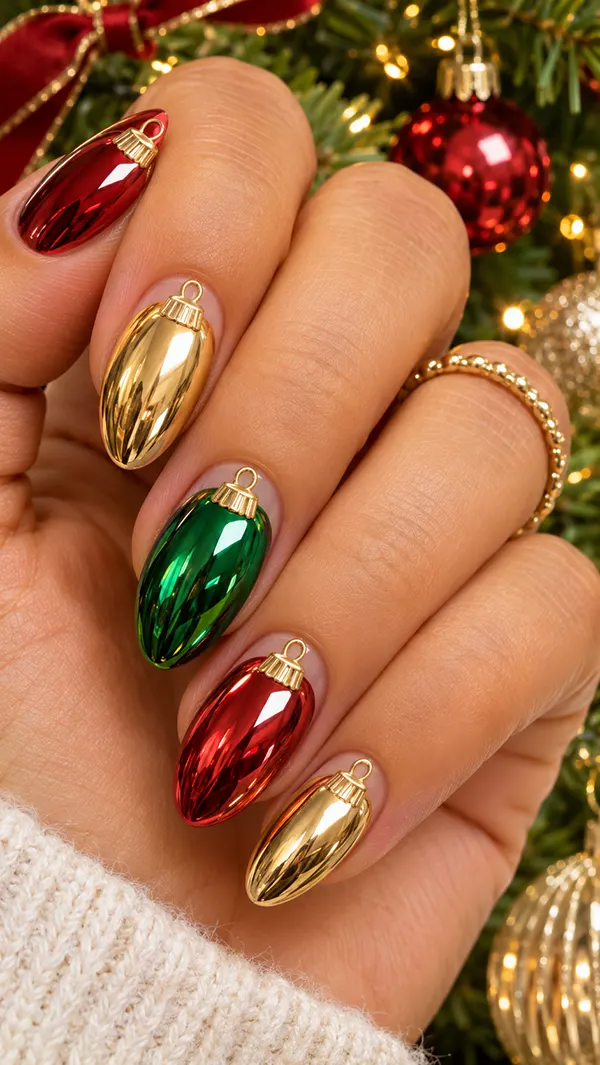
Chrome ornament nails look like tiny shiny baubles on a tree. Each nail is painted with a mirror finish in gold, red, silver, or green, and a thin line and a small cap are added at the top, like a hanging ornament. It is a playful, glamorous design that works especially well on medium oval and almond nails.
For Christmas nail designs that really stand out, this one is hard to beat. Ask your technician to apply a chrome powder in several colors across the nails, and to paint a small gold cap and a hook at the top of each nail. A bright highlight on each ornament gives it a realistic gleam, and a glossy top coat keeps the mirror effect.
Design Detail: Add a Tiny Highlight to Each Bauble
A white dot or a short white curve on the side of each ornament mimics a reflection on glass, making it look three-dimensional. Place the highlight in the same position on each nail so the light appears to come from one direction. This small step makes the design look polished.
If you are doing it at home, use chrome powder over a no-wipe gel and seal it before painting the cap and hook with a thin brush. Choose a limited palette, such as red, gold, and green, so the nails look cohesive. Keep the lines thin, and use a clean brush to correct mistakes before curing each layer.
Choosing the Right Christmas Nail Design for Your Personal Style
With 30 designs in front of you, it helps to have a way to choose among them. I start with three questions: How long are your nails? How much do you use your hands? Where will you spend the most time this month? A teacher who writes on a whiteboard all day needs a different manicure from someone who spends December at parties.
Skin tone matters too, though I would never call it a rule. Warm reds and golds tend to glow on golden and deep skin, cool reds and silvers often look crisp on fair and neutral skin, and emerald, navy, and champagne are friendly to almost everyone. Hold a swatch against your hand in natural light and trust what you see.
| Your Situation | Recommended Design Style | Why It Works |
| Short nails, busy hands | Glossy red, forest green, or sheer jelly (1, 2, 4) | Simple color hides chips and looks neat with no upkeep |
| Medium almond nails | French tips, marble or velvet cat-eye (7, 10, 12) | The shape gives clean lines and art room to flow |
| Long coffin or stiletto nails | Rhinestone bows, chrome ornaments, or aurora chrome (24, 25, 30) | Extra length carries detail and 3D accents well |
| You love a theme | Candy canes, gingerbread, or Santa hat accents (13, 14, 15) | One playful nail adds fun without crowding the manicure |
| You prefer quiet luxury | Burgundy velvet, champagne shimmer, or ivory marble (5, 6, 12) | Rich finish and restrained color look expensive |
| You want sparkle without fuss | Silver gradient or icy blue ombre (20, 21) | Glitter fades toward the tip and masks regrowth |
| You need a manicure for photos | Chrome, cat-eye or rhinestone designs (11, 10, 25) | Reflective finishes catch light on camera |
A few other things I would think about. If you wear a lot of black, a red or emerald manicure gives your outfit a lift. If you wear mostly neutrals, a champagne or burgundy shade blends beautifully. If your work involves typing or lifting, avoid long nails with 3D charms, since they can catch and break. And if you are unsure, choose a color you already love and add a single festive accent.
Translating Inspiration Into Your Own Manicure
You do not need to copy a design exactly. Each one is built on a principle you can adapt, and a simplified version often looks even better in your own hands.
| Instead of Copying This | Try This Principle |
| Long coffin nails with rhinestone bows | Keep your natural length and add one tiny crystal near the cuticle |
| Hand-painted Christmas trees | Choose three small trees on one nail, or use a thin green line for a minimalist forest |
| Full chrome ornaments | Apply chrome powder on one accent nail over a red or gold manicure |
| Buffalo plaid on every nail | Do plaid on one nail and keep the rest solid red or black |
| Sweater knit texture | Use a matte top coat on cream nails for a soft wool effect |
How to Recreate These Manicure Designs at Home or at the Salon
Most of these Christmas nail ideas follow the same method, whether you do them yourself or hand a photo to your technician. The order of the steps matters more than the specific products, because most problems come from skipped preparation or rushed layers.
- Prepare the nails. Remove the old polish, gently push back the cuticles, and shape the nails with a fine file. Choose a shape that suits the design, such as a short square for plaid or an almond for French tips. Clean the nail plate with a lint-free wipe so the polish can grip.
- Apply a base coat. A thin base coat protects the nail and helps the color last. For jelly and sheer designs, use a ridge-filling base for a smooth canvas.
- Paint the color in thin layers. Apply two thin coats rather than one thick one, and let each coat dry or cure before the next. Cap the free edge by running the brush along the tip.
- Add the design. Use a thin brush for lines and foliage, a dotting tool for berries and ornaments, and tweezers for foil, pearls, or rhinestones. Work on one nail at a time, so the polish does not dry before you finish.
- Seal with a top coat. Choose glossy for a juicy finish, matte for velvet or knit effects, and a thick top coat around rhinestones and pearls. Cover the edge of the nail to help prevent chips.
- Dry and finish. If you use regular polish, allow extra time for the layers to dry before activities. Finish with cuticle oil, and avoid hot water or heavy tasks for an hour.
For a salon visit, I would prepare a few photos on your phone showing the design, shape, and finish. Mention your length and how you use your hands, since a good technician will adapt the design to suit you. If you are unsure about a detail, ask them to test it on one nail first.
Making Your Festive Manicure Last Longer
A holiday manicure has to survive wrapping paper, cooking, cold weather, and a lot of hand washing. A few small habits can keep your nails looking fresh until you take the design off, and most of them take less than a minute.
- Seal the edges. Capping the free edge is the single best way to prevent early chips, and it works for both gel and regular polish.
- Use cuticle oil daily. It keeps the skin around the nail soft and the polish looking glossy. Apply a drop at night and rub it in gently.
- Wear gloves for chores. Dish soap and hot water can dull polish and loosen art. Gloves also protect hands from the cold.
- Refresh the top coat. A thin layer of top coat every three or four days restores shine to regular polish and helps protect hand-painted art.
- Do not use your nails as tools. Open packages and cans with your finger pads or a tool, since a small break can ruin a design.
- Be gentle with removal. Soak off gel according to the product instructions rather than peeling it, and give your nails a rest with oil and a strengthening treatment before the next set.
If you travel for the holidays, take a small kit with a file, cuticle oil, and a bottle of top coat. A quick file and a fresh top coat can rescue a manicure on the day of a big dinner, and it takes about five minutes.
Building Your Own Festive Manicure Formula
If you would like a repeatable way to choose nails for any December event, I use a simple formula. It starts with the outfit, because the manicure is the final accessory.
- Pick the base color from your outfit. Choose red with neutral, black, or green outfits; emerald with camel and cream; champagne with black and navy; or burgundy with winter whites.
- Choose the finish for the mood. Glossy for classic and clean; matte for cozy and moody; chrome for glam; and shimmer for soft sparkle.
- Add one festive detail. A snowflake, a foil accent, a pearl, a bow, or a single plaid nail is enough. Skip the rest.
- Match the shape and length to your life. Keep it short for busy weeks and go longer for special events.
- Plan the removal. Choose a design you can take off gently, and give your nails a few days of rest in January.
You can mix and match from the gallery. A burgundy velvet manicure with one gold foil accent, or a milky white base with a single snowflake and a champagne ring finger, would both be easy to ask for at a salon. The best Christmas nail designs are the ones that feel like you and that you will still enjoy on the last day of the month.
Frequently Asked Questions
What are the most popular Christmas nail designs this season?
Classic cherry red, deep burgundy velvet, forest green, and champagne shimmer are always popular, along with French tips in red and gold and soft snowflake art. Chrome and cat-eye finishes are also trending, since they catch the light in photos. If you want something safe, start with glossy red and add one small accent.
What nail shape is best for Christmas nail designs?
Short square and round shapes suit practical, everyday manicures and simple colors, while almond and oval shapes look graceful with French tips, marble and cat-eye finishes. Coffin and stiletto shapes give more room for bows, chrome, and detailed art. I would choose the shape that matches how you use your hands.
How far ahead should I book a Christmas manicure?
In the weeks before Christmas, many salons fill up quickly, so I would book as soon as you know the date of your main event. Aim to get your nails done two to four days before the party, so the polish is fully set and the manicure still looks fresh.
Can I do these Christmas nail ideas at home?
Many of them, yes. Solid colors, sheer jelly, glitter gradients, and simple accents such as dots and stripes are very manageable with basic tools. More complex designs, such as chrome ornaments, cat-eye finishes, and rhinestone bows, are easier at a salon. Practice on a spare nail or a sheet of paper first.
How long do Christmas nail designs last?
Gel manicures usually last two to three weeks with good care, while regular polish often lasts five to seven days. Designs with 3D charms, rhinestones, or long nails may need a fill or repair sooner. Seal the free edge, wear gloves for chores, and avoid using your nails as tools.
What colors go with a red Christmas outfit?
A neutral nail color, such as milky white, champagne, or nude, keeps the outfit as the star, while deep red or burgundy nails create a tonal look. Gold, green, and black also pair well. If you like contrast, a soft green or a metallic finish looks lovely with red clothing.
How do I remove glitter and chrome nails safely?
Use the soak-off method recommended for your product, such as wrapping cotton soaked in remover in foil and waiting until the gel softens. Avoid scraping or peeling the product, since this can thin the nail surface. After removal, apply cuticle oil and give your nails a few days of rest.